


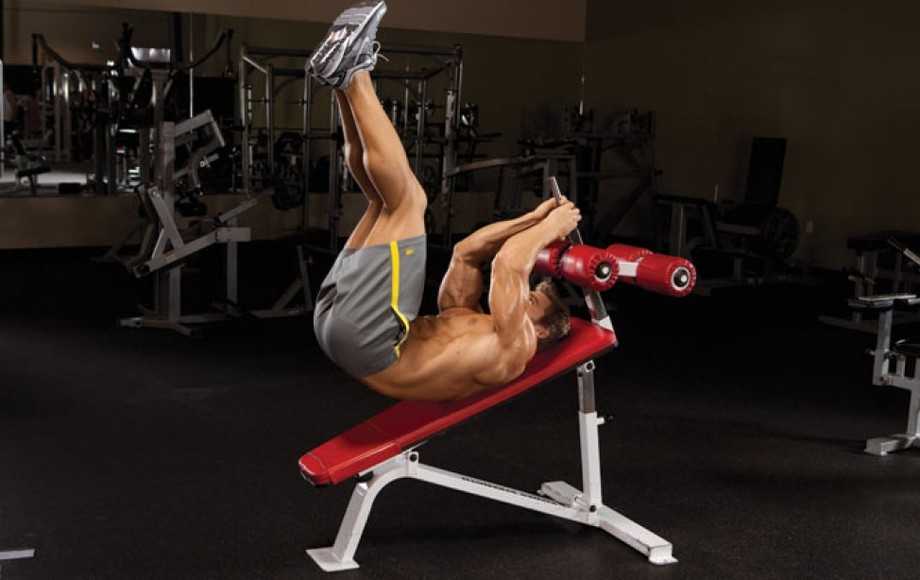
Introduction
The incline reverse crunch is the most demanding bodyweight lower-ab exercise you can perform without hanging from equipment. By lying head-up on a decline bench — with your head at the higher end and legs at the lower end — gravity works against you throughout the entire range of motion, making every rep harder than its flat floor equivalent. The lower abs must work against the combined weight of the legs plus the gravitational disadvantage of the inclined position from the first rep to the last.
Also known as the decline reverse crunch or slant board reverse crunch, this exercise uses the same movement pattern as the standard reverse crunch — hips lift off the surface, knees draw toward the chest — but the incline transforms that familiar movement into a genuinely advanced lower ab exercise. For trainees who are not yet ready for hanging knee raises but have outgrown the flat-floor reverse crunch, the incline-bench version is the most logical and effective bridge between the two.
The progression is built in: increase the bench angle and the exercise gets harder without changing a single aspect of the technique.
What is the incline reverse crunch?
The incline reverse crunch is an advanced lower ab exercise performed lying head-up on a decline bench in which the hips lift off the surface and the knees draw toward the chest against gravitational resistance. The inclined position increases the difficulty of the standard reverse crunch significantly — the lower abs must work against both leg weight and the downward pull of gravity throughout the full range of motion.
Muscles Worked in the Incline Reverse Crunch
Primary muscle
- Rectus abdominis (lower portion) — the inclined position increases the gravitational load on the lower abs compared to the flat floor version. The movement is driven by posterior pelvic tilt — the lower abs contract to tilt the pelvis and lift the hips off the bench against gravity’s downward pull. The steeper the incline, the greater the resistance the lower abs must overcome.
Secondary muscles
- Hip flexors (iliopsoas, rectus femoris) — assist with drawing the knees toward the chest and controlling the lowering phase; more active than in the flat floor version due to the increased gravitational load
- External and internal obliques — stabilize the torso throughout the movement and prevent rotation
- Transverse abdominis — braces the spine and maintains intra-abdominal pressure throughout
Antagonists
- Spinal erectors and surrounding lumbar musculature lengthen under control during the hip lift and work eccentrically to control the lowering phase.
How To Perform the Incline Reverse Crunch
Starting position
- Set the decline bench to the desired angle — start at a shallow incline (20 to 30 degrees) if new to this exercise
- Lie on your back with your head at the higher end — the reverse of the standard decline sit-up position
- Grip a secure structure behind your head with both hands — the bench uprights, a handle, or a fixed bar; this anchor point is critical for stability throughout the set
- Start with legs straight or bend hips and knees to 90 degrees — the bent-knee starting position is easier; the straight-leg start is harder and increases the range of motion
- Press the lower back into the bench and brace the core before the first rep

Execution
- Exhale and initiate the movement with a posterior pelvic tilt — the pelvis tilts before the knees begin to move
- Pull the knees toward the chest, simultaneously rolling the hips upward and off the bench
- Continue until the knees are as close to the chest as possible and the hips and lower back have lifted clear of the bench
- At the top, feel the lower abs contract maximally — the “emptying a bucket” mental image works well here: imagine tipping a bucket of water resting on your pelvis upward and inward
- Hold the top position for one to two seconds
- Slowly lower the hips and extend the legs back toward the starting position — two to three seconds minimum on the descent
- Stop before the heels touch the bench or the lower back fully relaxes — maintain tension and begin the next rep

The key coaching cue: Keep the knee angle constant throughout the movement — the 90-degree bend in the knees does not change from start to finish. If the knees open up or the feet swing outward, the hip flexors have taken over. That constant knee angle keeps the stimulus on the lower abs rather than turning the exercise into a hip-flexor swing.

Common Mistakes in the Incline Reverse Crunch
1. Losing the knee angle
The most common and most damaging mistake. When the knees straighten during the movement — even slightly — the legs become a longer lever that the hip flexors can use to generate momentum. The 90-degree knee bend is the technical control that keeps the exercise honest. Check the knee angle at the start of every set and maintain it consciously throughout.
2. Using momentum to swing the legs
The incline makes momentum particularly tempting — the downward pull of gravity at the bottom of the rep can be used to generate a swing that carries the legs up on the next rep. Every rep must begin in a controlled position, with a deliberate posterior pelvic tilt to initiate the movement. If momentum is unavoidable, reduce the bench angle until the lower ab strength catches up.
3. Not lifting the hips off the bench
Stopping the movement before the hips lift clear of the bench — essentially just rocking the knees back and forth — defeats the purpose of the exercise. The hip lift is where the lower abs contract maximally. The hips must leave the bench, and the lower back should peel off the surface at the top of the rep. That full range is what makes the incline version more effective than the flat floor version.
4. Gripping too hard with the hands
The hands hold onto the bench for stability — they are not there to pull the body upward. If the arms are generating force to help complete the rep, the lower abs are not doing the work they are supposed to do. Grip firmly enough to stay stable, not firmly enough to assist the movement.
5. Starting at too steep an angle
A 45-degree or steeper incline is significantly harder than it appears, particularly for trainees new to this variation. Starting too steep leads to compensated reps — shortened range, momentum-driven, with the lower abs barely involved. Start at 20-30 degrees and increase the angle only once the technique is consistent at the current setting.
Benefits of the Incline Reverse Crunch
Greater resistance than any flat floor lower ab exercise
The inclined position means gravity works against the lower abs at a less favorable angle throughout the entire movement. That continuous gravitational disadvantage creates a lower ab stimulus than the flat floor, bench, or reverse-crunch versions can replicate at the same level of technique. For trainees who have maxed out flat-surface lower-ab exercises, the incline bench provides a meaningful jump in difficulty with equipment already available in most gyms.
Built-in progressive overload through bench angle
Unlike floor exercises where progression requires added weight or a completely different movement, the incline reverse crunch can be made harder simply by increasing the bench angle. That built-in scalability makes it useful across a wide range of training levels without requiring new movement patterns or additional equipment.
Bridges the gap between floor work and hanging exercises
The incline reverse crunch falls squarely within the difficulty range between flat-floor reverse crunches and hanging knee raises. For trainees who cannot yet perform hanging knee raises with clean technique, the incline version provides comparable lower ab stimulus without the grip, shoulder stability, and anti-swing demands of the bar.
Full range of motion lower ab training
The inclined position allows the hips to lift clear of the surface through a full range of motion — from legs extended down the slope to knees at chest level — giving the lower abs a complete contraction through a longer arc than shorter-range floor variations.
Who Should Use This Exercise
- Intermediate trainees who have mastered the flat floor reverse crunch and need a harder bodyweight option before progressing to hanging variations
- Trainees who cannot yet perform hanging knee raises with clean technique — the incline reverse crunch provides a comparable lower ab stimulus without grip or shoulder demands
- Anyone looking for progressive overload in lower ab training without adding external weights — the bench angle provides a built-in progression variable
- Athletes who need strong lower abs and hip flexors as part of a general conditioning program
Who Should Be Cautious
- People with lower back pain or lumbar disc issues — the inclined position and the full hip lift place more demand on the lumbar region than the flat floor version; anyone with active lower back pathology should use the flat reverse crunch with physiotherapy clearance before attempting the incline version
- People with high blood pressure — the head-up inclined position increases blood flow to the upper body; not typically problematic for healthy individuals but worth noting for those managing hypertension
- Beginners who have not yet mastered the flat reverse crunch — the incline version demands the same technical foundation as the flat version but with added difficulty; compensation patterns are harder to correct when gravity is working against you
- People with shoulder or wrist issues — sustained gripping of the bench support behind the head requires shoulder and wrist stability; adjust the grip position if discomfort occurs
Progressions and Regressions
Regressions (easier)
- Flat floor reverse crunch — the foundational version with no gravitational disadvantage; master this before attempting the incline version
- Shallow incline reverse crunch (15 to 20 degrees) — reducing the bench angle to the shallowest setting provides a mild step up from the floor version; a useful entry point for trainees new to incline work
Progressions (harder)
- Steeper incline angle — the most direct progression; increasing from 30 to 45 degrees adds significant resistance without changing technique
- Weighted incline reverse crunch — holding a small dumbbell between the feet or wearing ankle weights adds external resistance on top of the gravitational load; even a small weight changes the exercise considerably given the inclined position
- Hanging knee raise — the logical destination for trainees who have maximized the incline reverse crunch; same movement pattern but in a fully suspended position requiring grip, shoulder stability, and anti-swing control
Incline Reverse Crunch vs. Reverse Crunch
Both exercises use the same fundamental movement — hips lift off the surface, knees draw toward the chest — but the inclined position significantly changes the difficulty and demand.
| Incline Reverse Crunch | Reverse Crunch | |
|---|---|---|
| Surface | Decline bench — head at higher end | Flat floor or bench |
| Gravitational load | Higher throughout ROM | Standard |
| Range of motion | Greater | Standard |
| Difficulty | Intermediate – Advanced | Beginner |
| Built-in progression | Yes — adjust bench angle | Limited — add weight or change variation |
| Equipment needed | Decline bench | None |
| Best for | Progressive lower ab development | Learning the movement pattern |
The practical takeaway: The reverse crunch is the starting point — it teaches the posterior pelvic tilt and hip lift pattern that both exercises share. The incline reverse crunch is the direct progression — harder, with more range of motion and a built-in overload variable that makes it useful across a longer stretch of training development. I program the flat reverse crunch as the foundation and introduce the incline version once a client can complete 4 clean sets of 20 flat reps with full hip lift and controlled eccentric on every rep.
Exercise Variations
Weighted Incline Reverse Crunch
Hold a small dumbbell between the feet or fasten ankle weights before performing the standard incline movement. The added weight increases the demand on the lower abs and hip flexors, in addition to the gravitational load already provided by the incline. Even 2 to 5 kilograms changes the exercise significantly — the inclined position amplifies the effect of any added weight at the end of the leg lever. Start conservatively and only add weight once the bodyweight version is consistently controlled at a given bench angle.
Incline Reverse Crunch with Straight Legs
Start with the legs straight rather than knees bent at 90 degrees. The straight-leg starting position lengthens the lever arm significantly, increasing both the hip flexor demand and the lower ab stimulus. This is a meaningful step up in difficulty from the bent-knee version and approaches the demand of hanging straight-leg exercises. Only attempt once the bent-knee incline version is consistently controlled with full range of motion.
Steep Incline Reverse Crunch
Setting the bench to a steep angle — 45 degrees or beyond — dramatically increases the gravitational resistance throughout the movement. At steep angles, the lower abs must overcome a force that approaches the full weight of the lower body. This variation sits very close in difficulty to the hanging knee raise and is the appropriate final bodyweight progression before moving to hanging equipment.
Replacement Exercises (Alternatives)
If the incline reverse crunch is not the right fit or a decline bench is unavailable, these exercises target the same primary muscle group:
- Reverse Crunch
- Captain’s Chair Leg Raise
- Captain’s Chair Knee Raise
- Hanging Leg Raise
- Hanging Knee Raise
- Lying Hip Raise
- Lying Leg Raise
- Swiss-Ball Reverse Crunch
- Full V-Sit (Jackknife Sit-Up)
The incline reverse crunch earns its place among the best exercises for lower abs as the most demanding bodyweight option before hanging variations — see how it fits into a complete progression. Looking to round out your ab training? Check out our guides to upper ab exercises, oblique exercises, and core exercises.
Programming Tips
- Rep range: 10–15 reps per set for bodyweight, 8–12 reps with added weight — the incline position makes this a more demanding exercise per rep than the flat floor version; quality over quantity applies here more than in most lower ab exercises
- Sets: 3–4 working sets
- Bench angle: Start at 20 to 30 degrees and increase gradually as strength and technique improve; most trainees find 30 to 45 degrees the most productive range for lower ab development
- Tempo: Two seconds up, one second hold at the top with deliberate pelvic tilt, three seconds down — the slow eccentric on the incline is critical; gravity accelerates the lowering phase and rushing it wastes the stimulus
- Frequency: 2–3 times per week with at least one rest day between sessions
- Where in the session: At the end of the workout after compound movements; pairs well with an upper ab exercise as a superset
- Progression trigger: When you can complete 4 clean sets of 15 reps at the current bench angle with full hip lift, constant knee angle, and a three-second eccentric on every rep — increase the angle by one notch or add a light weight between the feet
Conclusion About Incline Reverse Crunch
The incline reverse crunch occupies a specific and important position in lower ab training — harder than any floor-based variation, more accessible than hanging exercises, and uniquely equipped with a built-in progression variable that makes it useful for months of consistent training development.
In my experience, this is the exercise that most intermediate trainees skip over on their way from floor reverse crunches to hanging variations — and that skip usually costs them. The incline version builds the lower ab strength and the posterior pelvic tilt quality that makes hanging exercises productive. Trainees who go straight from flat-floor work to the bar without this intermediate step often carry their compensation patterns with them.
Start shallow, master the technique, increase the angle. The same movement, the same coaching cues, the same pelvic tilt — just more demanding with every notch up the bench. That simplicity is the point.
Frequently Asked Questions
What angle should the decline bench be set to for the incline reverse crunch?
Start at 20 to 30 degrees if you are new to this exercise — shallow enough that the movement is controllable but steep enough that the gravitational advantage is noticeable compared to the flat floor. Most trainees find 30 to 45 degrees the most productive range for lower ab development once the technique is established. Beyond 45 degrees the hip flexor demand increases substantially and technique tends to break down on the lowering phase. Increase the angle by one bench notch at a time rather than jumping to a steep incline prematurely.
Can I do the incline reverse crunch without a decline bench?
Not precisely — the inclined surface is what creates the gravitational resistance that defines the exercise. However, a practical substitute is placing a folded mat or foam wedge under the hips to create a mild angle while lying on the floor. This replicates a very shallow incline and provides more stimulus than the flat floor version. For a steeper angle without a bench, some trainees use a sturdy ironing board or a door wedge setup, but a proper decline bench is the only reliable way to access the full range of incline angles the exercise offers.
Is the incline reverse crunch safe for people with lower back problems?
Generally not without medical clearance. The inclined position places the lumbar spine in a loaded extension position at the bottom of each rep, and the full hip lift at the top adds compressive load on the lower back. For people with disc herniations, lumbar stenosis, or chronic lower back pain, the flat floor reverse crunch or lying hip raise are safer alternatives that provide lower ab stimulus with significantly less lumbar demand. Anyone with an active lower back condition should consult a physiotherapist before attempting incline variations of any reverse crunch exercise.
How is the incline reverse crunch different from the decline sit-up?
They use the same bench but in opposite orientations and train completely different muscle groups. In the decline sit-up, the head is at the lower end and the torso rises toward the legs — it is an upper ab and hip flexor exercise. In the incline reverse crunch, the head is at the higher end and the hips lift toward the chest — it is a lower ab exercise. The bench setup looks similar but the body orientation, the moving segment, and the primary muscles targeted are entirely different.
Why does the incline reverse crunch feel harder than hanging knee raises?
It should not — the hanging knee raise is generally harder because it adds grip demand, shoulder stability, and active anti-swing control on top of the lower ab stimulus. If the incline reverse crunch feels harder, it is almost always because the bench angle is set too steep. At angles beyond 45 degrees, the gravitational load on the incline reverse crunch approaches the demand of hanging work. Reduce the bench angle and the difficulty relationship between the two exercises should return to its expected order — incline reverse crunch as the intermediate step, hanging knee raise as the advanced progression.
