
Introduction
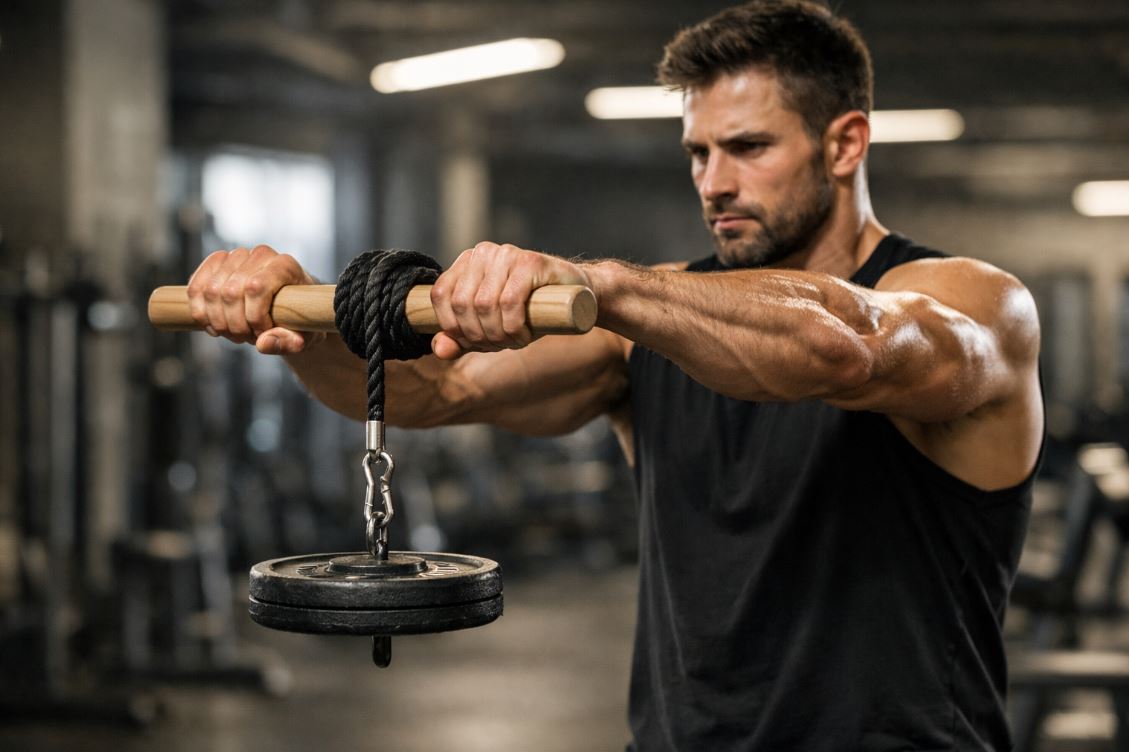
When it comes to building truly powerful forearms, most lifters rely on basic wrist curls and grip tools—but often overlook one of the most effective exercises ever created: the wrist roller. This simple yet brutally effective movement targets both the wrist flexors and extensors while simultaneously developing endurance, coordination, and crushing grip strength.
Unlike traditional forearm exercises that focus on short, isolated contractions, the wrist roller introduces continuous tension and time under tension that challenge your muscles in a completely different way. As you roll the weight up and down, your forearms are forced to work through sustained effort, making it one of the most efficient tools for building both size and functional strength.
From a coaching perspective, I consider the wrist roller a foundational grip-strength developer—especially for lifters who struggle to hold heavy weights during exercises like deadlifts, barbell rows, or pull-ups. If your grip gives out before your target muscles do, this exercise can be a game-changer.
In this guide, you’ll learn how to perform the wrist roller correctly, which muscles it targets, how to optimize your technique, and how to integrate it into your training for maximum results.
Other Names for the Wrist Roller Exercise
Before diving deeper, it’s useful to know that this exercise may be called by several names depending on the gym, coach, or equipment used.
- Wrist roller
- Wrist roll exercise
- Forearm roller
- Wrist roll-up exercise
- Grip roller exercise
- Wrist twist roller
- Rope wrist roller
- Wrist roller curl (less accurate, but sometimes used)
- Forearm roll-up
Required Equipment
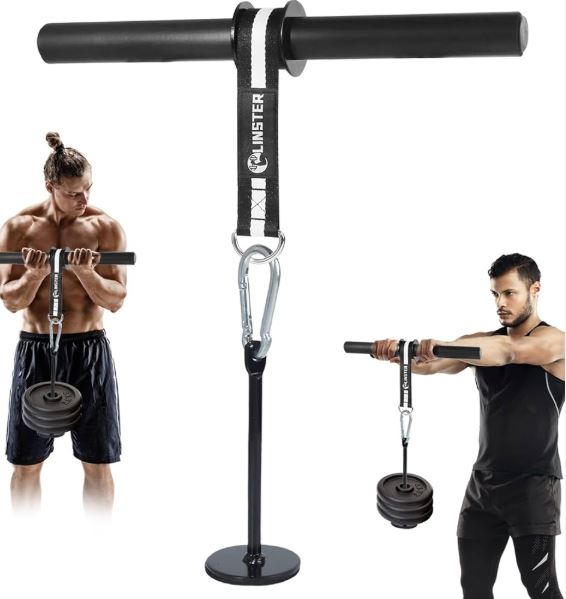
To perform the wrist roller exercise effectively, you don’t need complex gym machines—but having the right setup makes a big difference in both safety and performance.
- Wrist roller device
→ A handle (wooden dowel, metal bar, or dedicated tool) with a rope attached in the center. - Rope or cord
→ Strong and durable, long enough to allow full rolling range (typically 60–120 cm). - Weight (resistance)
→ Usually, a weight plate or dumbbell is attached to the end of the rope. - Carabiner or hook (optional)
→ Makes attaching and swapping weights faster and more secure. - Flat surface or open space
→ Needed to allow the weight to move freely up and down without obstruction.
How to Perform the Wrist Roller Exercise
Before starting, it’s important to understand that this exercise is not about lifting heavy weights quickly, but about maintaining constant tension and control throughout the entire movement. Proper setup and execution will ensure maximum forearm activation.
Starting Position (Setup)
- Stand upright with your feet about shoulder-width apart
- Hold the wrist roller handle with both hands using a pronated grip (palms facing down)
- Position your hands slightly wider than shoulder-width
- Extend your arms straight out in front of you at shoulder height
- Keep a slight bend in your elbows to reduce joint strain
- Let the rope hang straight down with the weight fully lowered
Alternative setup:
You can also perform this exercise with your arms slightly lowered (instead of fully extended) to reduce shoulder fatigue and focus more on the forearms.

Movement (Execution)
- Begin rotating the handle by flexing your wrists upward, rolling the rope around the handle
- Use controlled, alternating hand movements to create a smooth rolling motion
- Continue until the weight reaches the top (near the handle)
- Once at the top, reverse the motion by extending your wrists, slowly lowering the weight back down
- Maintain constant tension—do not let the weight drop freely
- Keep your body still and avoid using momentum or swinging
Key focus:
The goal is to fully engage both the wrist flexors (rolling up) and wrist extensors (rolling down).
Video Demonstration
Before adding this exercise to your routine, it’s highly recommended to see how it looks in real execution. The wrist roller may seem simple, but proper control, range of motion, and posture make a huge difference in effectiveness.
What to pay attention to while watching:
- Smooth and controlled rolling motion (no jerking)
- Full range of wrist movement (both flexion and extension)
- Stable upper body (no swinging or using momentum)
- Consistent tempo throughout the entire set
Watching a proper demonstration will help you avoid common mistakes and ensure you’re targeting your forearms as efficiently as possible.
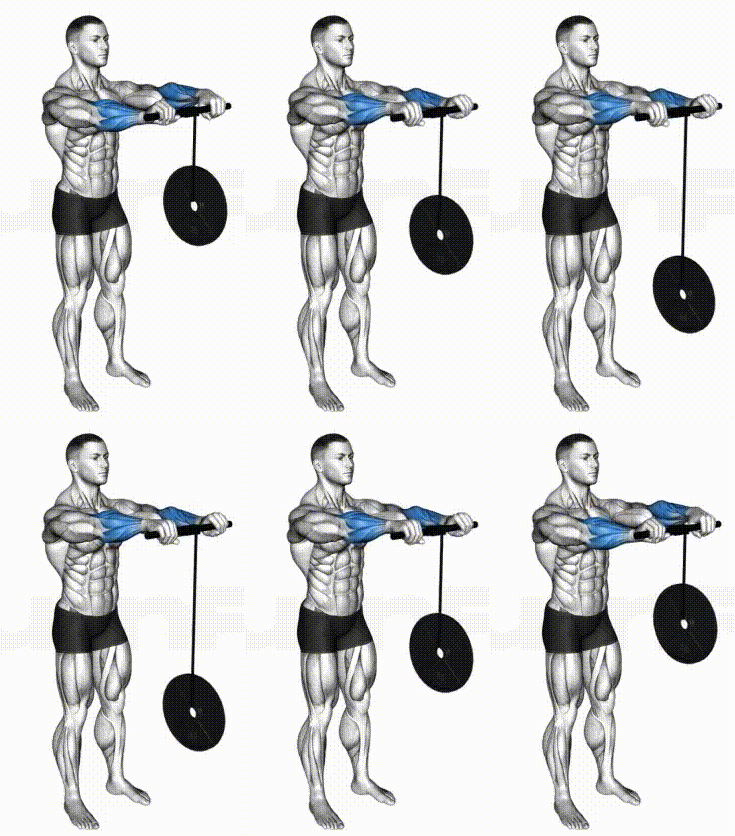
Muscles Worked in the Wrist Roller Exercise
To get the most out of this exercise, it’s important to understand that the wrist roller is not just a simple forearm movement—it’s a comprehensive grip and forearm developer that trains multiple muscle groups through both flexion and extension.
Primary Muscles (Agonists)
These muscles are directly responsible for generating the rolling movement and handling the load:
- Flexor Carpi Radialis
→ Responsible for wrist flexion and plays a key role when rolling the weight upward - Flexor Carpi Ulnaris
→ Assists in wrist flexion and stabilizes the wrist under load - Palmaris Longus
→ Supports wrist flexion and contributes to grip tension - Finger Flexors (Flexor Digitorum Profundus & Superficialis)
→ Crucial for maintaining a strong grip on the handle throughout the movement
Secondary Muscles (Synergists)
These muscles assist the primary movers and help maintain control:
- Brachioradialis
→ Contributes to forearm stability and assists in maintaining grip strength - Wrist Stabilizers
→ Help maintain alignment and control during both rolling directions
Antagonist Muscles
These muscles are heavily involved when reversing the movement (lowering phase):
- Extensor Carpi Radialis (Longus & Brevis)
→ Responsible for wrist extension during the unwinding phase - Extensor Carpi Ulnaris
→ Assists in controlled lowering of the weight - Extensor Digitorum
→ Helps stabilize the fingers and maintain grip integrity
Unlike many forearm exercises that mainly emphasize either the wrist flexors or the wrist extensors, the wrist roller trains both sides dynamically as you roll the weight up and then lower it back down under control. That is one of the main reasons why I consider it one of the most balanced and effective exercises for complete forearm development.
Technique Optimization Tips
Before increasing weight, focus on refining your technique—small adjustments can significantly improve forearm activation and overall effectiveness.
- Keep your arms stable – avoid swinging or using your shoulders
- Use a slow and controlled tempo – no rushing the movement
- Aim for full wrist range of motion (flexion + extension)
- Keep constant tension – don’t let the weight drop
- Choose a weight that allows complete up-and-down cycles
- Maintain a neutral posture – no leaning back or compensating
- ✔ Keep your arms stable throughout the set
- ✔ Use a full wrist range of motion
- ✔ Roll the weight up and down under control
- ✔ Maintain constant tension on the forearms
- ✔ Avoid swinging or leaning back
- ❌ Using too much weight and losing control
- ❌ Letting the weight drop too quickly on the way down
- ❌ Using shoulders or body momentum instead of the wrists
- ❌ Working through only a partial range of motion
- ❌ Losing constant tension during the set
Technical Emphasis & Targeting Adjustments
Small changes in setup and execution can shift the emphasis of the wrist roller exercise, making it more suitable for different training goals.
- Arms extended at shoulder height → increases overall difficulty and shoulder involvement
- Arms slightly lowered → reduces shoulder fatigue and places more focus on the forearms
- Pronated rolling direction → tends to emphasize the wrist extensors more during the lowering phase
- Supinated rolling direction → can place more emphasis on the wrist flexors
- Wider grip → increases the challenge for wrist control and forearm stabilization
- Narrower grip → usually feels easier and allows smoother rolling mechanics
Pros and Cons of the Wrist Roller Exercise
Before adding this exercise to your routine, it’s important to understand both its strengths and limitations. The wrist roller is extremely effective—but like any tool, it works best when used correctly and in the right context.
Benefits
#1 Builds Exceptional Grip Strength
The continuous rolling motion keeps your grip engaged throughout the entire set, making it one of the best exercises for improving real-world grip strength.
#2 Trains Both Flexors and Extensors
Unlike most forearm exercises, the wrist roller targets both sides of the forearms, leading to more balanced development and reduced injury risk.
#3 High Time Under Tension
This exercise keeps your muscles under constant load for extended periods, which is excellent for muscular endurance and hypertrophy.
#4 Minimal Equipment Required
You can easily perform this exercise at home or in the gym with a very simple setup.
#5 Direct Transfer to Compound Lifts
Improved grip strength can significantly enhance performance in exercises like deadlifts, rows, and pull-ups.
Drawbacks
#1 Limited Maximum Load
You won’t be able to use extremely heavy weights, which may limit maximal strength gains compared to static-grip exercises.
#2 Shoulder Fatigue Can Be a Limiting Factor
Holding your arms extended can tire your shoulders before your forearms reach full fatigue.
#3 Slower to Progressively Overload
Progression is typically based on time or control rather than simply adding weight, which can feel less straightforward.
#4 Can Be Uncomfortable for Beginners
The burning sensation in the forearms can be intense, especially for those not used to high time-under-tension work.
Wrist Roller Variations
Before sticking to just one version, it’s worth knowing that small changes in setup can significantly alter the difficulty and muscle emphasis of the wrist roller exercise.
- Arms-Down Wrist Roller
In this variation, your arms are slightly lowered or closer to your torso. This reduces shoulder fatigue and allows you to focus more directly on the forearms. - Behind-the-Back Wrist Roller
Performed with the bar held behind your back. This version places a different angle on the forearms and can feel more natural for some lifters. - Single-Direction Wrist Roller
Instead of rolling up and down, you roll only in one direction (e.g., flexion). This increases focus on either the flexors or the extensors, depending on the direction. - Wrist Roller with Resistance Bands
Instead of a hanging weight, resistance bands provide tension. This creates a different resistance curve and can be useful for higher-rep endurance work. - Thick-Grip Wrist Roller
Using a thicker handle significantly increases grip demand, making the exercise much more challenging even with lighter weights.
Replacement Exercises (Substitutes)
If you don’t have access to a wrist roller or simply want to add variety to your training, there are several excellent alternatives that target the forearms and grip in different ways.
- Seated Barbell Wrist Curl
A classic forearm builder that primarily targets the wrist flexors. Great for controlled hypertrophy and isolation work. - Standing Barbell Wrist Curl
Similar to the seated version but performed standing up, requiring greater stabilization and grip control. - Reverse Wrist Curl (Barbell or Dumbbell)
Focuses on the wrist extensors, helping balance forearm development and reduce injury risk. - Farmer’s Walk
One of the best functional grip exercises. Builds crushing grip strength and overall forearm endurance. - Dead Hangs (Pull-Up Bar)
Simple but highly effective for improving grip endurance and supporting muscles. - Plate Pinch Holds
Targets pinch grip strength and improves finger and thumb engagement. - Towel Grip Pull-Ups
Increases grip difficulty by using a towel, forcing the forearms to work harder.
Explore more: For a complete breakdown of forearm training, check out our forearm exercise database, where you’ll find a wide range of exercises categorized by difficulty, equipment, and training goals.
Wrist Roller vs. Seated Barbell Wrist Curl
Before choosing between these two exercises, it’s important to understand that they serve slightly different purposes. While both target the forearms, the way they stimulate the muscles differs.
| Feature | Wrist Roller | Seated Barbell Wrist Curl |
|---|---|---|
| Primary Focus | Grip strength + endurance | Wrist flexor hypertrophy |
| Muscle Activation | Flexors + extensors (dynamic) | Mainly flexors |
| Time Under Tension | Very high (continuous) | Moderate (reps-based) |
| Load Potential | Limited | Higher |
| Grip Demand | Very high | Moderate |
| Coordination | High (rolling motion) | Low |
| Ease of Progression | Moderate | Easy (add weight) |
| Shoulder Involvement | Moderate (arms extended) | Minimal |
| Best Use | Finisher / endurance work | Finisher/endurance work |
Conclusion:
Both exercises are valuable, but they excel in different areas. The wrist roller is superior for building grip strength, endurance, and overall forearm function, while the seated barbell wrist curl is better suited for targeted muscle growth of the wrist flexors.
Best approach: Use both. Combine wrist curls for size and wrist roller for function to achieve complete forearm development.
Where This Exercise Fits in a Workout
The wrist roller is best used as a finisher at the end of your workout, especially after pulling exercises like rows, deadlifts, or pull-ups.
- Perform it after your main lifts when your grip is already fatigued
- Ideal for back day or arm day routines
- Can also be added to dedicated forearm or grip training sessions
- Works well with time-based sets or full up-and-down cycles
Short and intense—perfect to finish your workout with a serious forearm burn.
Final Thoughts
The wrist roller is a simple but highly effective exercise for building forearm size, endurance, and grip strength. While often overlooked, it can directly impact your performance in many key compound lifts.
If you stay consistent and focus on control rather than heavy weight, this exercise can quickly become one of your most valuable tools for developing stronger, more capable forearms.

How often should I train the wrist roller for optimal results?
For most lifters, 2–3 times per week is enough to see noticeable improvements in grip strength and forearm endurance without overtraining.
Is the wrist roller better for strength or endurance?
It primarily develops muscular endurance and grip stamina, but it also contributes to strength when progressively overloaded over time.
Should I roll the weight up and down or only in one direction?
Both approaches are useful. Rolling up and down trains the forearms more completely, while single-direction rolling can isolate either flexors or extensors more effectively.
What weight should beginners start with?
Start light—often much lighter than expected. The goal is to complete at least one full up-and-down cycle with proper control.
Can the wrist roller help improve performance in deadlifts?
Yes, improving grip strength can delay failure in deadlifts, allowing you to lift heavier weights before your grip becomes the limiting factor.
Is it normal to feel a strong burning sensation in the forearms?
Yes, that intense burn is a sign of high time under tension and muscular fatigue—both are expected and beneficial in this exercise.
Should I use lifting straps if my grip is weak?
Use straps for heavy compound lifts if needed, but still train your grip separately with exercises like the wrist roller to improve long-term performance.
Can I use the wrist roller every day?
Daily use is not recommended for most people, as the forearms need recovery time. Overuse can lead to fatigue or even tendon irritation.
Does grip thickness affect the difficulty of the exercise?
Yes, a thicker handle significantly increases grip demand and makes the exercise more challenging even with lighter weights.
Is the wrist roller suitable for beginners?
Absolutely. It’s simple to learn and highly effective, as long as beginners focus on control rather than trying to lift too much weight.
