



A fold-away squat rack lets you train heavy barbell lifts without sacrificing garage or home-gym floor space. In just a weekend and using common lumber plus basic hardware, you’ll craft a sturdy, wall-mounted rack that swings into position for squats, bench presses, and safely folds flat when not in use.
In this guide, we’ll dive into everything you need to know about creating your own squat rack, from gathering the right materials and tools to following step-by-step instructions. By the end, you’ll not only have a functional squat rack but also a newfound appreciation for homemade fitness equipment. Let’s get started on this exciting adventure!
Materials & Tools
Materials
- 6× Pine 2×4×8′ framing studs
- 2× Pine 1×6×6′ fence planks
- 3× Oak 1×4×8′ finished S4S boards
- 1× Oak 1×6×4′ finished S4S board
- 1× Black walnut 1×3×7′ hardwood board (optional accent)
- 2× Maple blocks (4½″×3⅞″×¾″) for rack receivers
- 20× 3″×¼″ SPAX screws (or 3″ lag screws)
- 4× 3⁄8″×5″ carriage bolts (posts)
- 8× ¼″×5″ carriage bolts (rack blocks)
- 1 lb 1⅜″ screws (for accents)
- 2× 5″ lengths of steel grounding rod (for bar-adjust bolts)
- Wood glue (exterior-grade)
Tools
- Table saw or circular saw
- Planer (if surfacing rough lumber)
- Power drill with forstner bits (¾″) and driver bits
- Tape measure & carpenter’s pencil
- Speed square & level
- Clamps (for laminating posts)
- Wrench or socket set (for carriage bolts)
Step-by-Step Build
1. Laminate & Dimension Your Upright Posts
- Cut & Plane: From each 2×4×8′ stud, plane two boards to 1⅜″ thickness and rip to 2⅞″ width.
- Laminate: Glue two planed boards face-to-face to form one 4×4 post. Clamp and let dry. Repeat for all four posts.
💡 Tip: Laminating from 2×4 stock prevents twist and yields rock-solid, custom-sized uprights.


2. Add Hardwood Strike Plates
- Glue an oak 1×4 plank (7⁄8″×2¾″) perpendicular along the front face of each post. This sacrificial plate resists repeated barbell contact.
💡 Tip: If you skip the oak accent, your pine posts will still function—but may wear faster under heavy use.
3. Drill Indexed Adjustment Holes
- Mark & Drill: On each post side, mark 16″ from the floor, then every 3½″ up to your desired height (max ~6′). Center front-to-back on the post.
- Bore Holes: Use a ¾″ forstner bit (preferably in a drill press) to create clean, straight bolt holes for your adjustment rods.
💡 Tip: Double-check your measurements on both posts—misaligned holes can make the bar sit crooked and cause injury.
Because you’re using a steel rod (or carriage bolt) pinning through whichever pair of holes you choose, you can easily relocate the hooks lower for bench press, higher for squats, or anywhere in between—no permanent re-assembly needed. That hole pattern is exactly what lets you slide your rack blocks (or J-hooks) up or down.


4. Fabricate & Install Rack Blocks
- Cut Pieces: For each block, rip two ½″ plywood panels to 6″×3⅞″, one oak piece ⅞″×3⅞″×2⅞″, and one maple ¾″×3⅞″×4½″ for the decorative front.
- Assemble & Bolt: Glue and screw blocks, then drill a 7⁄8″ hole through center to accept your steel rod. Attach the maple face last for bar security.
💡 Tip: Chamfer or sand the maple edges (“dog ears”) to prevent hand cuts under heavy load.


5. Build Lateral Folding Arms
- Laminate Arms: Glue two 16″ pine boards together per arm.
- Drill Pivot Holes: Pre-drill a ¼″ hole 1½″ from one end. Round corners to clear hinge movement.
- Attach Brackets: Use hardwood blocks (3″×7″×¾″) as hinge plates—glue, screw, and later bolt to posts.


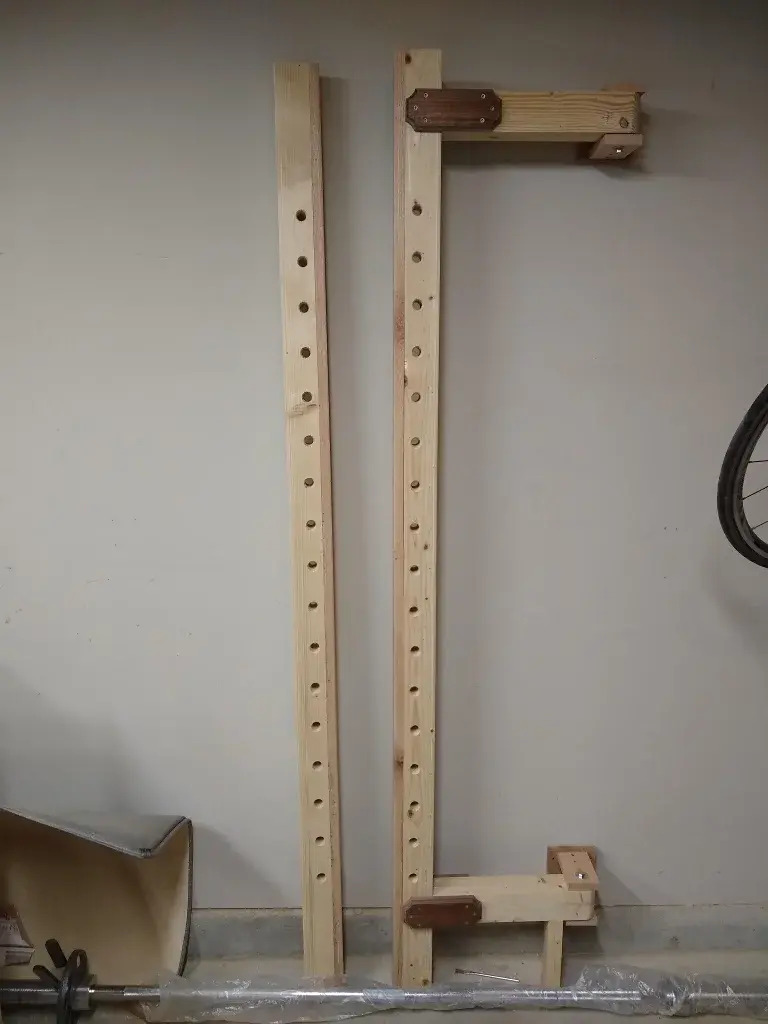
6. Install Heavy-Duty Hinges
- Cut Hinge Blocks: Mill oak blocks (5″×4¾″×¾″ back piece; two 3″×5″×¾″ caps; one 3⅛″×2″×¾″ stabilizer).
- Assemble Hinge Assembly: Glue and screw pieces, then bolt the lateral arm through the hinge using ¾″ carriage bolts.
- Add Stop Bolt: Drill a ¼″ hole in the bottom hinge to lock the arm in the open position for safety.
💡 Tip: Test swing clearance before final mounting—ensure your folded rack sits flat without scraping the floor.


7. Mount Wall Plates & Finalize
- Prepare Plates: Laminate two 6′ fence planks for each wall plate to spread load across multiple studs.
- Bolt Hinges to Plates: Center plates 45″ apart; bolt hinges through into wall studs at 16″ intervals.
- Secure Uprights: Attach your laminated posts via hinge plates; verify rack swings open smoothly and locks solidly.
💡 Tip: Use a stud-finder to align plates with at least 4–5 studs for maximum safety under heavy lifts.


Why a Fold-Away Power Rack Is a Game-Changer for Small Spaces
A fold-away power rack transforms any cramped corner into a serious lifting station, making it the ultimate garage gym solution for enthusiasts with limited square footage. Unlike bulky commercial cages, this space-saving squat rack tucks flat against the wall when not in use, freeing up room for cardio gear, yoga mats, or even family activities. Whether you’re in a one-car garage or a converted spare room, the convenience of folding your rack in seconds means you never have to choose between workout efficiency and living space. By combining heavy-duty construction with a compact footprint, this DIY design proves that you can have professional-grade training equipment without sacrificing your home’s functionality.

Safety & Troubleshooting
- Uneven Fold: Check hinge alignment—loosen bolts, realign arms, then retighten.
- Rack Flex under Load: Add a diagonal wood brace or an optional metal cross-brace between posts.
- Bolt Wear: Inspect steel rods and replace if bent—carriage bolts are inexpensive and easy to swap.
How to Use Your Folding Rack
- Back Squats: Unfold rack, lock arms in place, adjust blocks, and squat safely.
- Bench Press: Fold arms out, place bench inside, set blocks low, and press.
- Pull-Ups: Use the top cross-brace or add a removable pull-up bar accessory.
- Safety Bar Drills: Slide steel rods into adjustment holes for pin-supported partial lifts.
Conclusion & Next Steps
You’ve now built a professional-grade folding squat rack that maximizes space and versatility. Train heavy, then fold it away in seconds—perfect for multi-use garages or small apartments. For more innovative home-gym builds, visit our DIY Projects section.
While building a custom folding squat rack is rewarding, I’ll be honest—I’d much rather invest in a quality pre-made rack. The precision, hardware, and time required to get every detail just right can quickly become more hassle than it’s worth—even for a seasoned DIY enthusiast.
