
Introduction
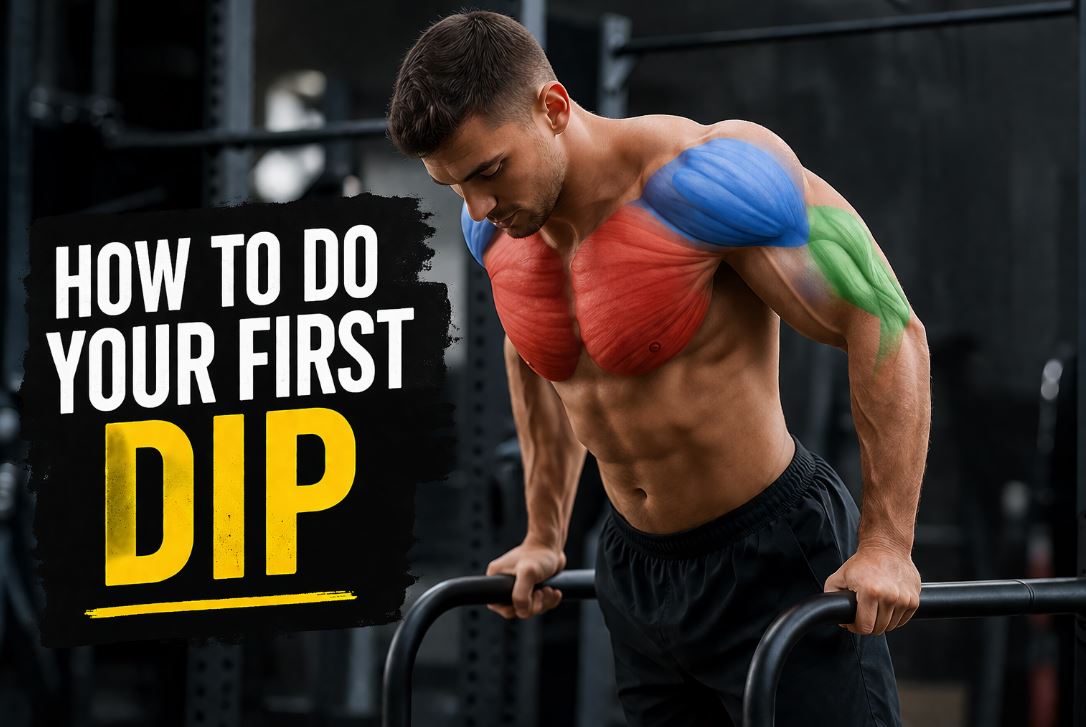
Most people fail at dips before they even get a chance to succeed.
They jump onto the bars, try to lower themselves… and instantly feel unstable, weak, or worse — pain in their shoulders. Within seconds, they give up and assume dips are simply “too advanced.”
But here’s the truth:
👉 Dips aren’t too hard — they’re just poorly taught.
Unlike push-ups or even pull-ups, dips require a unique combination of strength, stability, and shoulder control. And if you skip the right progression, your body will let you know immediately.
That’s exactly why most beginners never reach their first proper dip.
In this guide, I’ll show you how to build up to your first dip step by step — safely, efficiently, and without wrecking your shoulders.
You’ll learn:
- How to develop the exact strength needed for dips
- Which progression actually works (and which ones slow you down)
- How to avoid the most common mistakes that cause pain and frustration
- And how to transition from zero strength to your first clean rep
Whether you’re training at home or in the gym, this is your complete roadmap.
👉 If you follow this progression, your first dip isn’t a matter of “if” — it’s a matter of time.
What Are Dips?
Dips are one of the most effective upper-body bodyweight exercises you can perform. They involve lowering and pushing your body using your arms while supporting yourself on parallel bars, a bench, or dedicated dip stations.
What makes dips unique is that they combine strength, stability, and control in a single movement — making them a true test of upper-body pushing power.
Key Characteristics
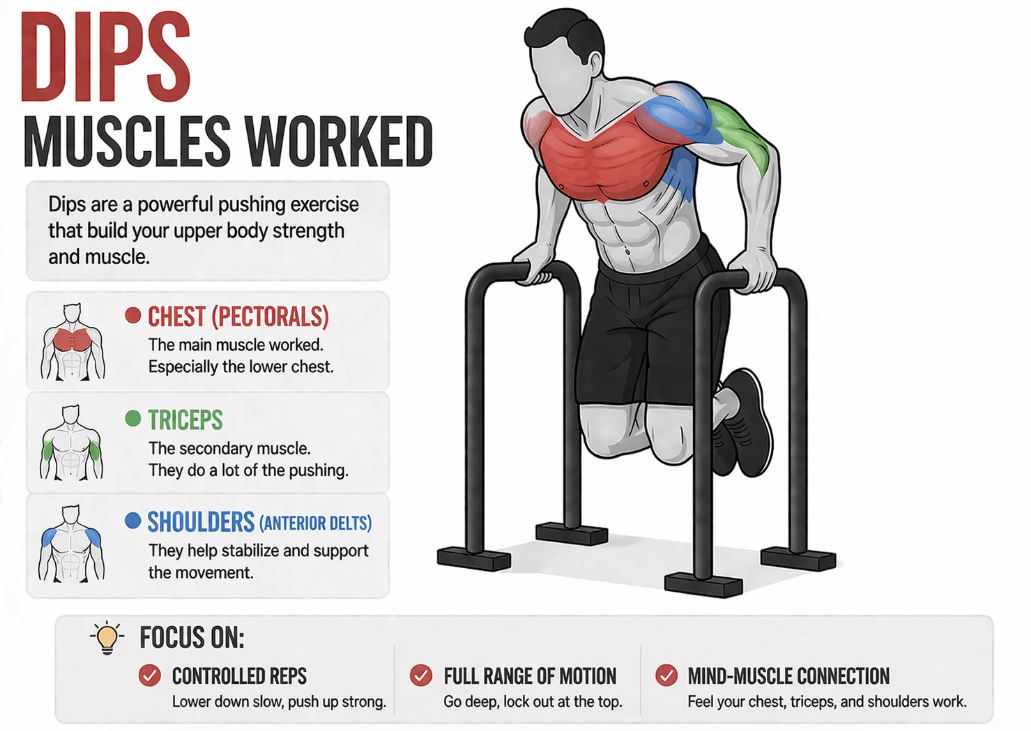
- Primary muscles: Chest (pectoralis major), triceps
- Secondary muscles: Anterior deltoids, shoulder stabilizers
- Type: Compound (multi-joint) exercise
- Equipment: Parallel bars, dip station, or bench
- Movement pattern: Vertical pushing
👉 In simple terms: dips are the upper-body equivalent of a squat — but for pushing strength.
They build real-world strength, improve muscle coordination, and lay the foundation for more advanced bodyweight movements.
If you can’t do a single dip yet — don’t worry.
👉 In the next section, you’ll understand exactly why dips feel so difficult and what’s holding you back.
Why Dips Feel So Hard (and Why Most People Fail)
If dips feel impossible the first time you try them, you’re not alone.
Most beginners jump onto the bars expecting a movement similar to push-ups — only to realize within seconds that dips demand a completely different level of strength, control, and stability.
👉 The problem isn’t that dips are “too advanced.”
👉 The problem is that they expose weaknesses most people don’t even know they have.
Let’s break down exactly what’s holding you back.
1. Lack of Specific Strength
Dips are not just a general upper-body exercise — they require very specific pushing strength.
Most beginners lack:
- Triceps strength (primary driver of the movement)
- Chest strength (especially in deeper ranges)
- Anterior deltoid strength (stabilizing and assisting role)
👉 You might be able to do push-ups, but dips place your muscles in a less favorable mechanical position, making them significantly harder.
2. Poor Shoulder Stability
This is one of the biggest hidden issues.
To perform dips safely, your shoulders must stay:
- Depressed (down, away from your ears)
- Stable throughout the movement
Without this:
- Your body becomes unstable
- Your shoulders take unnecessary stress
- The movement feels shaky and unsafe
👉 Stability is just as important as strength.
3. Lack of Control (Especially on the Way Down)
Many beginners don’t actually “lower” themselves — they drop into the bottom position.
This creates:
- Loss of tension
- Poor positioning
- Increased injury risk
👉 If you can’t control the descent, you don’t yet own the movement.
4. Mobility & Positioning Limitations
Dips require a degree of shoulder extension and control that many people aren’t used to.
Common issues include:
- Going too deep too soon
- Letting shoulders roll forward
- Poor body alignment
👉 More range of motion is not always better — especially if you can’t control it.
5. Shoulder Discomfort or Pain
This is where many people quit dips altogether.
If you feel:
- Sharp pain
- Pinching in the shoulders
- Discomfort in the bottom position
👉 That’s not something to ignore.
In most cases, pain comes from:
- Poor technique
- Lack of stability
- Forcing depth without control
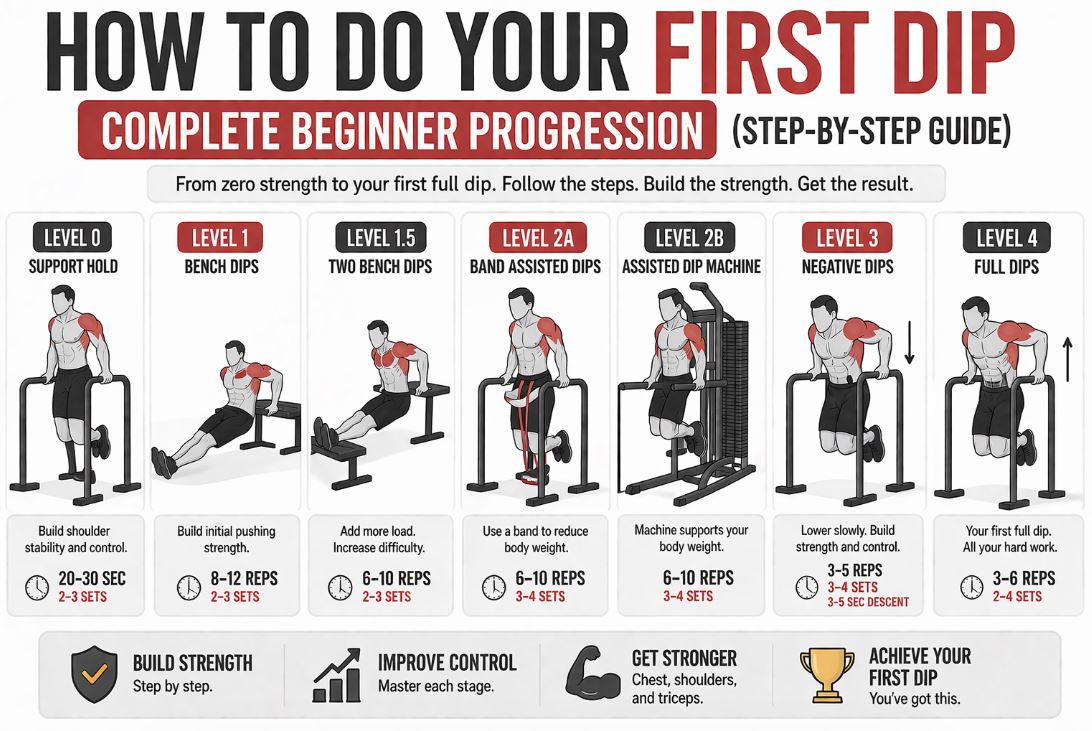
Dip Progression: Step-by-Step Path to Your First Dip
Now that you understand why dips feel so difficult, it’s time to fix it — step by step.
This progression is designed to build:
- The exact strength you need
- The stability your shoulders require
- And the control most beginners lack
👉 Follow these levels in order — don’t skip ahead.
🧱 Level 0 — Support Hold (Foundation First)
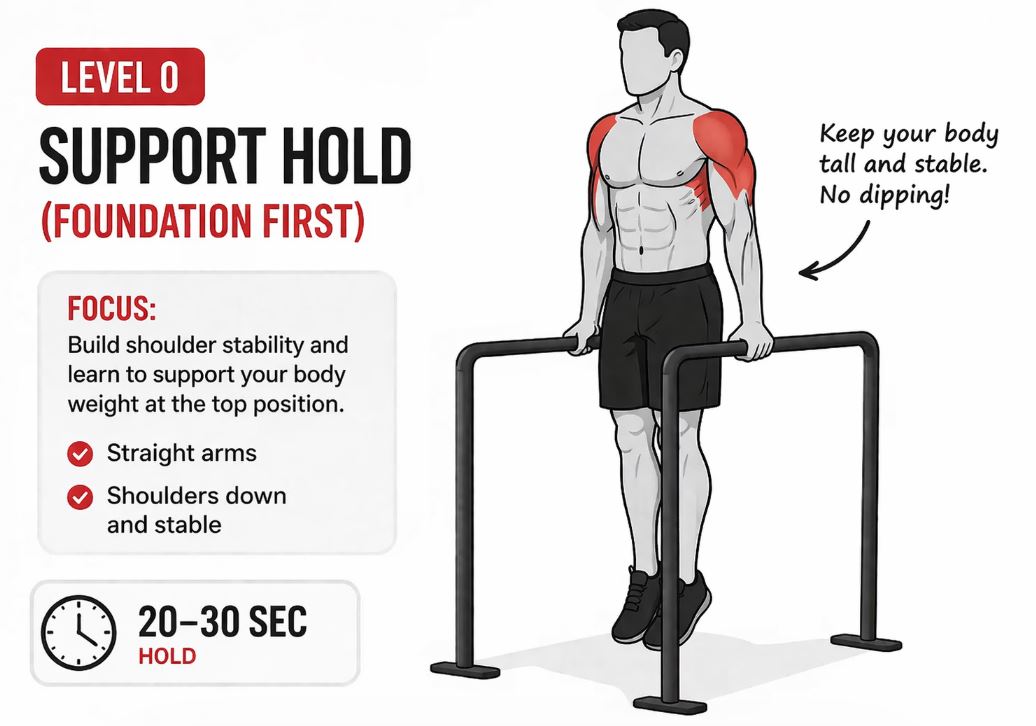
Before you even attempt a dip, you must be able to support your body weight properly.
How to do it:
- Get into the top dip position (arms fully extended)
- Keep shoulders down (depressed)
- Chest up, core tight
- Hold the position
Goal:
👉 20–30 seconds of stable hold
Why it matters:
- Builds shoulder stability
- Teaches the correct top position
- Prepares joints for loading
🧱 Level 1 — Bench Dips (Intro Strength)
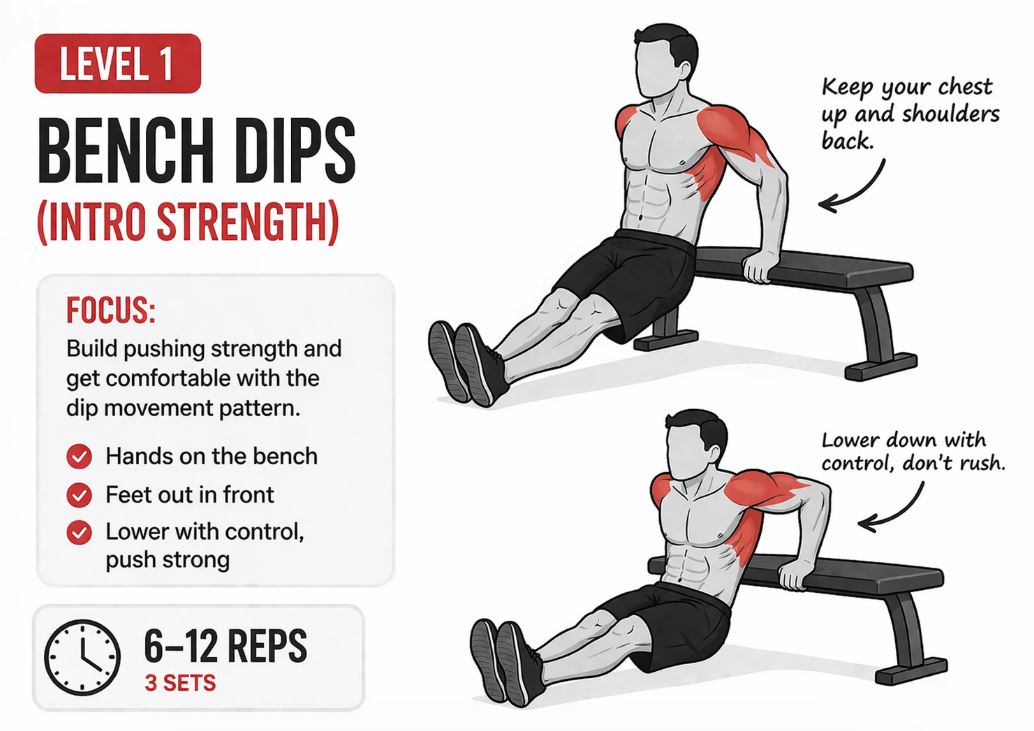
Bench dips can help you develop basic pushing strength, but they must be used carefully.
How to do it:
- Hands on the bench behind you
- Feet on the floor
- Lower your body in a controlled manner
- Push back up
Goal:
👉 10–15 controlled reps
⚠️ Important:
- Keep shoulders stable (don’t sink too deep)
- Stop if you feel shoulder discomfort
👉 This is just a starting point, not the end goal.
➕ Level 1.5 — Bench Dips (Feet Elevated / Two Benches)
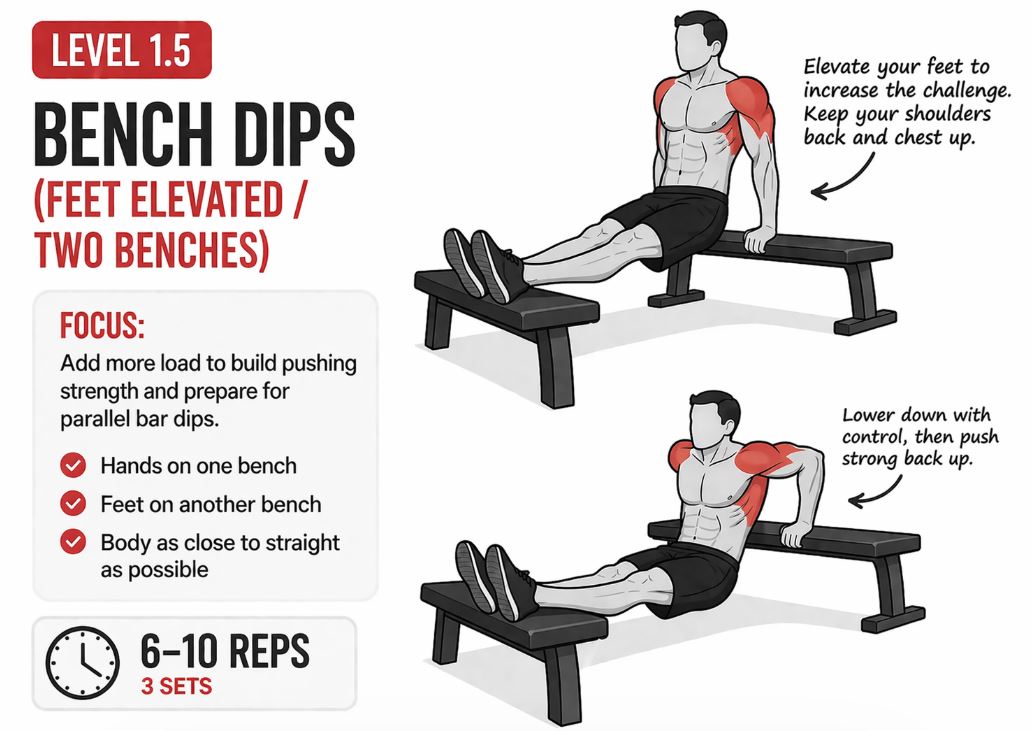
This is a more challenging variation of bench dips where your feet are elevated on a second bench, increasing the load on your upper body.
How to do it:
- Place your hands on one bench behind you
- Elevate your feet on a second bench
- Keep your hips close to the bench
- Lower your body in a controlled manner
- Push back up without losing tension
Goal:
👉 8–12 controlled reps
Why it’s useful:
- Increases triceps and chest loading
- Builds more strength than basic bench dips
⚠️ Important:
- Keep shoulders stable and avoid excessive depth
- Do not let your hips drift too far forward
- Stop immediately if you feel shoulder discomfort
👉 This is an optional progression — not required for achieving your first dip.
🧱 Level 2 — Assisted Dips (Real Movement Begins)
This is where you start practicing the actual dip pattern.
Option A — Resistance Band Assisted Dips
- The band supports part of your body weight
- Requires more stabilization

Option B — Machine Dips
- Guided movement
- Easier to control and progress
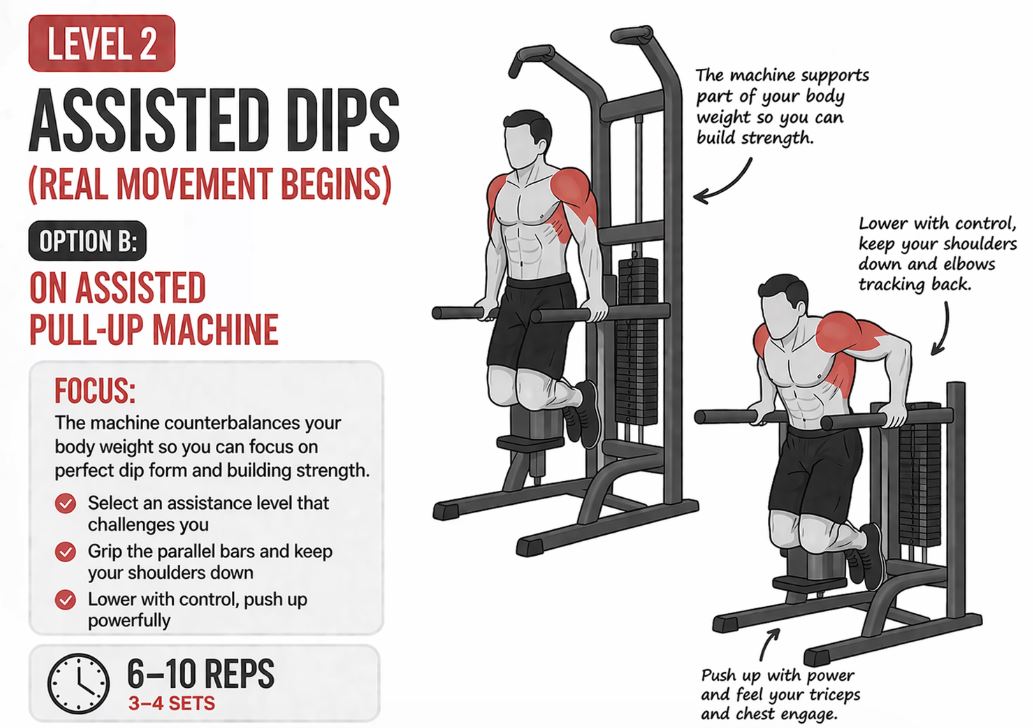
Goal:
👉 6–10 controlled reps
Why this is crucial:
- Teaches real dip mechanics
- Builds strength in the correct movement pattern
🧱 Level 3 — Negative Dips (Control the Descent)
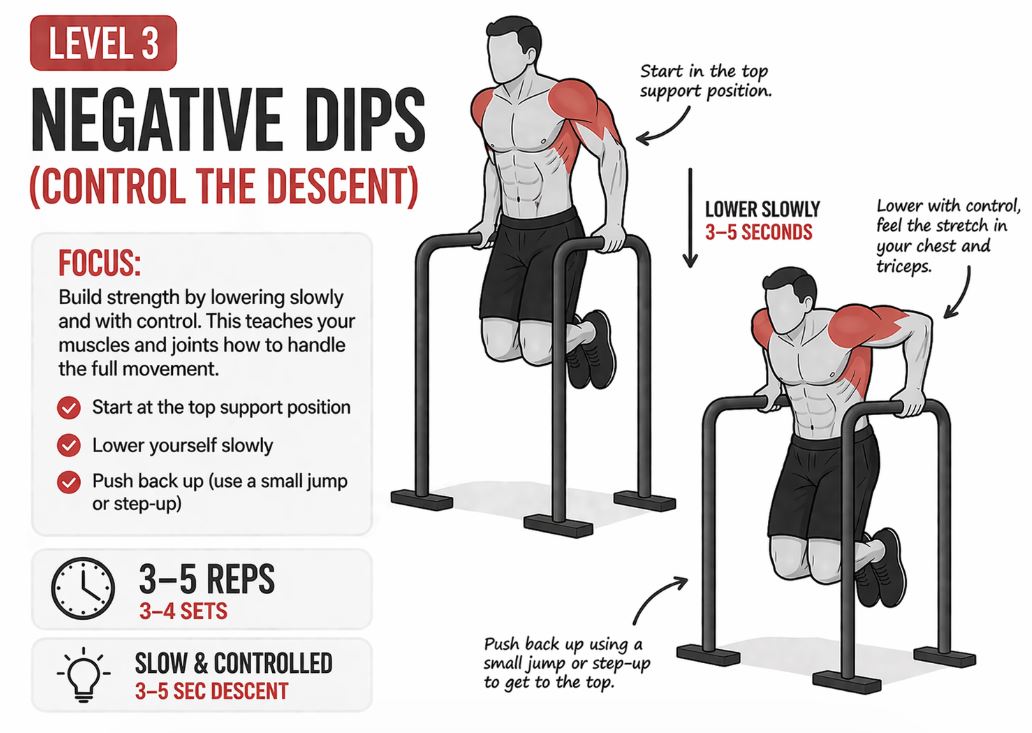
Now you focus on mastering the eccentric (lowering) phase.
How to do it:
- Jump or step into the top position
- Slowly lower yourself down (3–5 seconds)
- Reset and repeat
Goal:
👉 5–8 controlled negatives
Why it works:
- Builds strength faster than regular reps
- Develops control in the hardest part of the movement
👉 If you can control the negative, you’re very close to your first full dip.
🧱 Level 4 — Full Dips (Your First Rep)
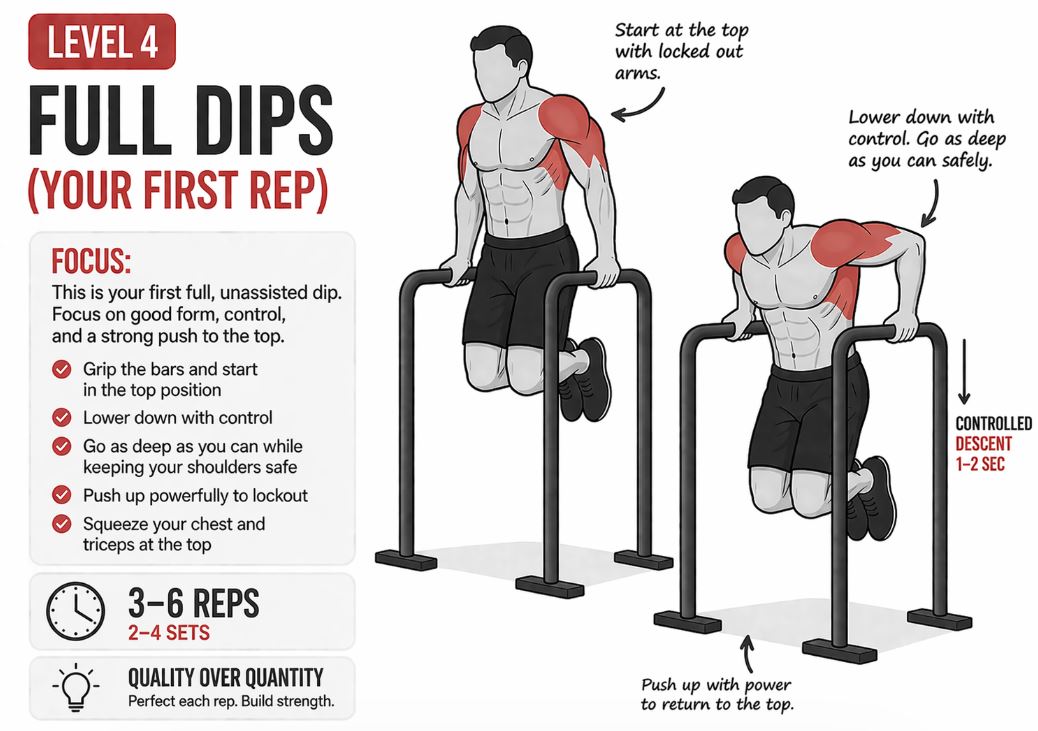
You’ve built everything needed — now it’s time to perform the full movement. This is the goal.
How to do it:
- Start in a stable top position
- Lower under control
- Push back up without losing form
Goal:
👉 1–3 clean reps
After you can comfortably perform multiple bar dips, ring dips are a natural long-term goal that builds even more strength and shoulder control.
Chest Dips vs Triceps Dips: What’s the Difference?
Once you can dip with decent control, the next step is understanding how body position shifts the exercise’s emphasis.
This is where many people get confused.
👉 Are dips a chest exercise or a triceps exercise?
The answer is simple:
👉 Both — but you can shift the emphasis depending on your technique.
Chest Dips (Forward Lean)
Chest-focused dips are performed with a slight forward lean, which changes the movement’s angle and increases chest involvement.
Key characteristics:
- Torso leaning forward
- Elbows slightly flared out
- Deeper range of motion
- Chest stretched at the bottom
Primary focus:
👉 Lower chest (pectoralis major)
When to use them:
- Building chest mass
- Replacing or complementing decline pressing movements
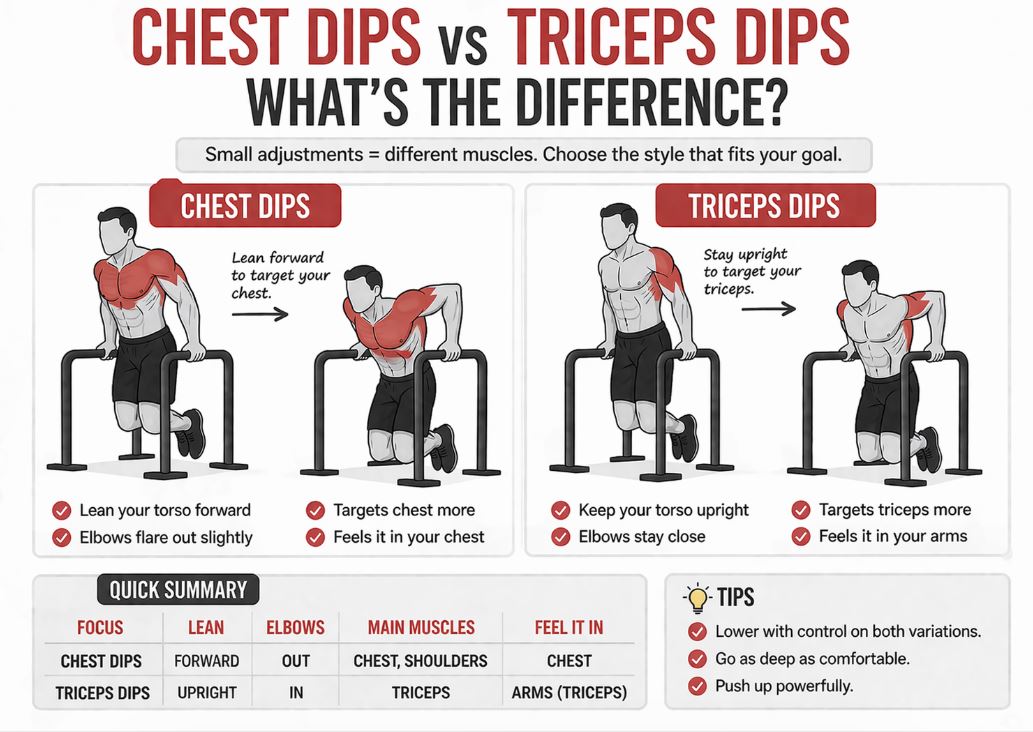
Triceps Dips (Upright Position)
Triceps-focused dips are performed with a more upright body position, shifting more load onto the arms.
Key characteristics:
- Torso stays vertical
- Elbows kept close to the body
- More controlled depth
- Less forward lean
Primary focus:
👉 Triceps
When to use them:
- Building arm strength
- Improving lockout power (useful for bench press)
Key Differences (Quick Comparison)
| Feature | Chest Dips | Triceps Dips |
|---|---|---|
| Torso angle | Forward lean | Upright |
| Elbow position | Slightly flared | Tucked |
| Main muscle | Chest | Triceps |
| Range of motion | Deeper | Slightly shorter |
| Shoulder stress | Higher | Moderate |
What Most Beginners Get Wrong
Here’s the truth most articles won’t tell you:
👉 You don’t need to worry about this when you’re just starting out.
At the beginner stage, your priority should be:
- Building strength
- Maintaining control
- Avoiding pain
Trying to “isolate” chest or triceps too early usually leads to:
- Poor form
- Instability
- Unnecessary shoulder stress
How to Do Dips with Perfect Form (Step-by-Step Technique Guide)
Now that you understand the progression and muscle emphasis, it’s time to focus on proper execution.
👉 This is where most people either build strength efficiently — or develop bad habits and shoulder pain.
Mastering the technique early will make everything else easier.
Starting Position (Setup)
Before you begin the movement, you need to establish a strong and stable base.
Setup checklist:
- Grip the bars firmly
- Arms fully extended (locked out, but not hyperextended)
- Shoulders depressed (down, away from ears)
- Chest slightly up
- Core tight
- Legs stable (either crossed or straight)
👉 Think: “tall, tight, and controlled.”
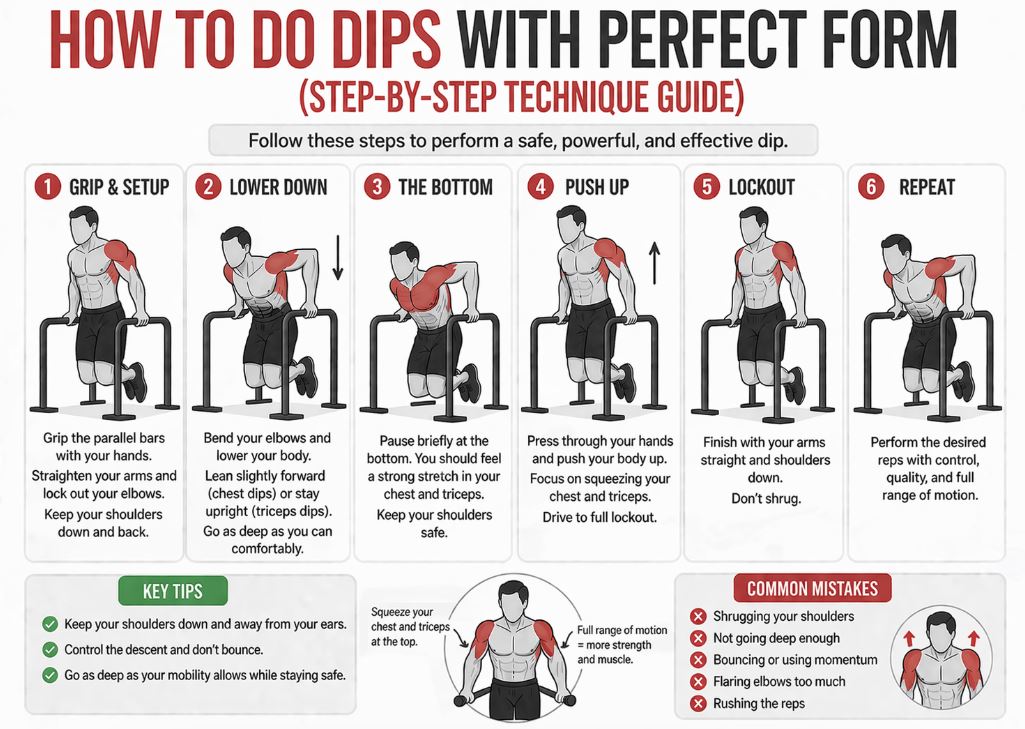
Movement (Execution)
Now perform the dip in a controlled manner.
Step-by-step:
- Start lowering your body slowly
→ keep tension, don’t drop - Allow a natural lean (slight forward tilt)
→ avoid staying too rigid or collapsing - Bend your elbows under control
→ don’t let them flare excessively - Lower until your upper arms are about parallel to the floor
→ depth should be controlled, not forced - Pause briefly at the bottom (optional but powerful)
→ builds control and stability - Push yourself back up
→ drive through your palms - Finish in a stable top position
→ shoulders still depressed, no shrugging
Key Technique Principles
These are the rules that separate clean reps from sloppy ones:
- Control > depth
- Stability > speed
- Quality > quantity
👉 One perfect rep is more valuable than five sloppy ones.
Beginner Dip Workout Plan (Build Your First Rep Faster)
Now it’s time to turn everything you’ve learned into action.
This beginner dip workout plan is designed to:
- Build the exact strength needed for dips
- Improve stability and control
- Gradually lead you to your first full rep
👉 Consistency matters more than intensity here.
📅 Training Frequency
- 2–3 times per week
- At least 1 day of rest between sessions
👉 Example: Monday – Wednesday – Friday
🏋️ Workout Structure
Each session should follow this order:
- Activation & preparation
- Dip progression work
- Supporting exercises
- Optional finisher
🔥 Full Beginner Dip Workout
1. Support Hold (Activation)
- 2–3 sets
- 15–30 seconds hold
👉 Focus on shoulder stability and control
2. Assisted Dips (Main Exercise)
- 3–4 sets
- 6–10 reps
👉 Use:
- Resistance band
- Or machine dips
Goal: controlled reps, no swinging
3. Negative Dips
- 3 sets
- 3–6 reps (slow 3–5 sec descent)
👉 This is where real strength is built
4. Push-Ups (Support Exercise)
- 3 sets
- 8–15 reps
👉 Builds additional pushing strength
5. Bench Dips (Optional)
- 2–3 sets
- 10–15 reps
👉 Only if pain-free and controlled
6. Triceps Isolation (Optional)
- Cable pushdowns/dumbbell extensions
- 2–3 sets
- 10–15 reps
📈 Progression Strategy
👉 Your goal is simple:
- Reduce assistance over time
- Improve control
- Increase strength gradually
Example progression:
- Week 1–2 → heavier assistance
- Week 3–4 → lighter assistance
- Week 5+ → attempt first full dip
How Long Until Your First Dip?
Most beginners can achieve their first full dip in:
👉 3 to 8 weeks
This depends on a few key factors:
- Your starting strength
- Body weight
- Training consistency
If you train dips 2–3 times per week and follow a proper progression, results can come surprisingly fast.
👉 In my experience, the biggest difference isn’t genetics — it’s consistency and proper progression.
Stay patient, build strength step by step, and your first dip will come sooner than you expect. 💪
How Body Weight Affects Dip Performance
Body weight plays a major role in how difficult dips feel — because you’re lifting your entire body, not just a portion of it.
👉 The heavier you are, the more strength you need to perform a single rep.
Why It Matters
- Dips are a bodyweight pushing exercise
- Strength must scale with your weight
- Even small weight changes can impact performance
👉 Gaining or losing just a few kilograms can noticeably affect your reps.
Heavier Lifters
If you have a higher body weight:
- Dips will feel significantly harder
- Progress may take longer
- Assisted variations become more important
👉 This doesn’t mean you’re weaker — you’re simply lifting more total load.
Lighter Lifters
If you’re lighter:
- Dips are generally easier to learn
- Progress may come faster
- Body control is easier to maintain
🚀 Final Thoughts
Dips are one of the most powerful bodyweight exercises you can master.
They build:
- Real upper-body strength
- Muscle mass
- Control and stability
But only if you approach them correctly.
👉 Follow the progression.
👉 Respect the technique.
👉 Stay consistent.
Your first dip is closer than you think. 💪
Each guide below is designed for beginners and will take you step by step from zero to your first clean rep — just like this dips guide.
