


Introduction
The Barbell Hold is as simple as grip training gets: load a barbell in a rack at hip height, grab it with a double overhand grip, and hold on for time. It’s not flashy, but it directly trains the exact moment I see fail in the gym constantly — that point on a heavy deadlift or barbell row where the weight isn’t the problem anymore, the hands are. If you’ve ever set a new deadlift PR only to have the bar slip out of your hands before you could lock it out, this is the exercise built specifically to fix that, and it ties directly into why grip strength matters so much in weight training in the first place.
Unlike the Plate Pinch Hold, which trains the thumb in a pinch grip, the Barbell Hold trains a support grip rather than a pinch grip — wrapping the whole hand around a bar, which is the exact grip pattern used in nearly every pulling lift you do.
Muscles Worked in the Barbell Hold
Primary muscles
- Finger flexors (flexor digitorum superficialis/profundus) — part of the broader forearm flexor group, these are the muscles directly responsible for keeping the fingers closed around the bar for the entire hold
Secondary muscles
- Brachioradialis — assists in maintaining elbow and forearm stability while the hands bear the load, covered in more detail in our guide to the biceps brachii and surrounding arm musculature
- Trapezius — engages to stabilize the shoulders and prevent them from rounding forward under load, working together with the rhomboids and rear deltoids, which also help hold the shoulder blades in place
One thing I point out to almost every client doing this for the first time: bar diameter changes everything. A standard 28–29mm barbell is manageable for most people, but the moment you switch to a thicker axle bar or slip on a pair of Fat Gripz, the same weight suddenly feels dramatically heavier in the hands — because a thicker grip mechanically reduces how much force your fingers can apply.
Step-by-Step Form Guide
Starting position
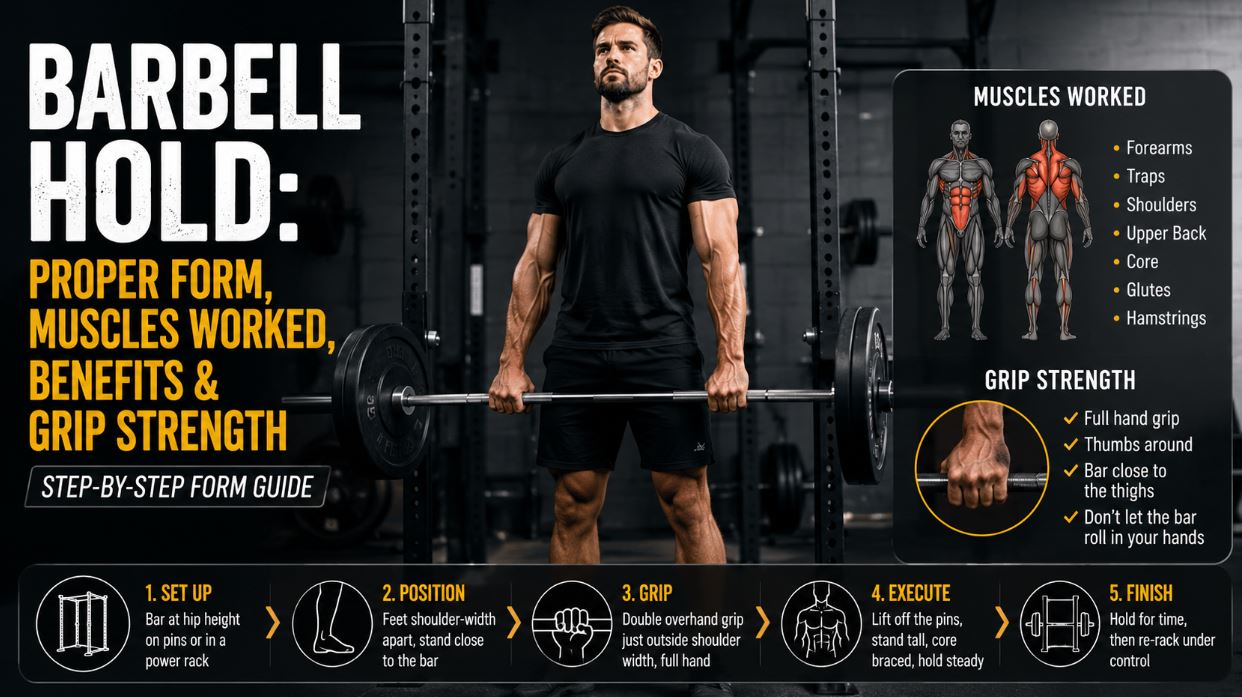
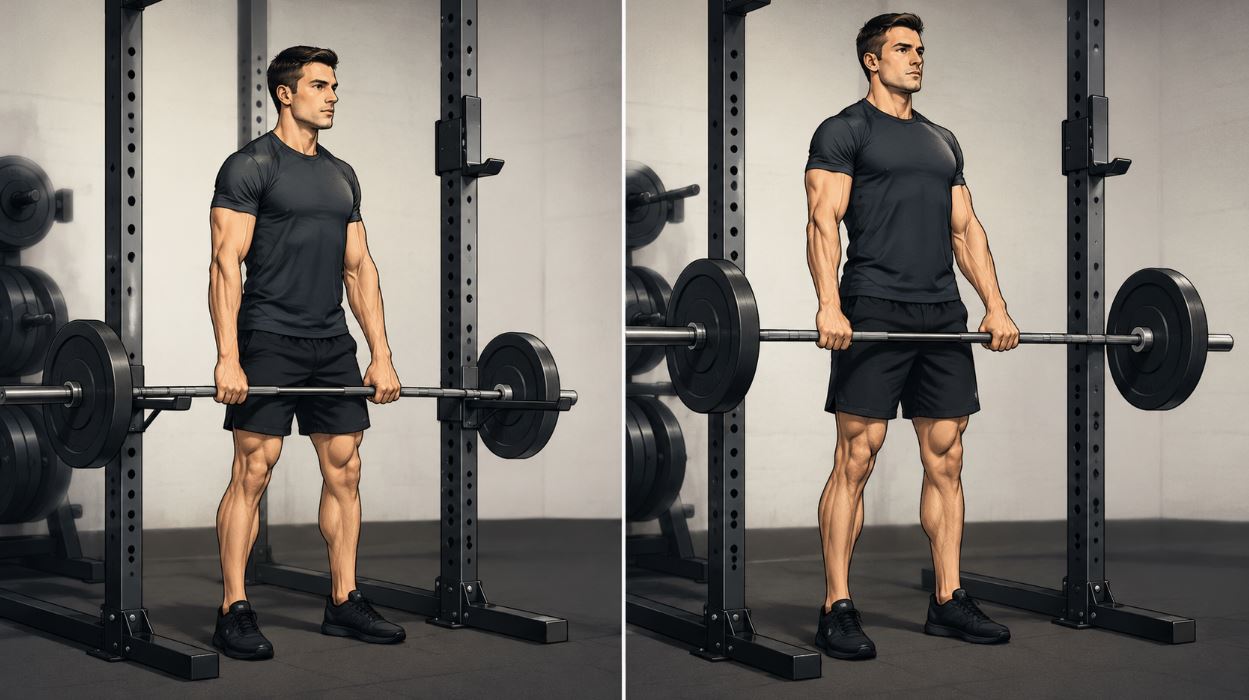
- Set a barbell in a power rack or on safety pins at roughly hip height, loaded with the desired weight
- Stand close to the bar with feet shoulder-width apart
- Take a double overhand grip just outside shoulder width, gripping the bar firmly with the whole hand — not just the fingertips
Execution
- Lift the bar off the pins by standing tall, letting it hang at arm’s length against your thighs
- Keep your shoulders back and down, chest up, and core braced — this is a posture hold as much as a grip hold
- Hold the position for the prescribed duration without letting the bar roll in your hands or your shoulders round forward
- Re-rack the bar under control once the time is up or your grip starts to fail
Coaching cue I give every client: Think about crushing the bar, not just holding it. A passive grip lets the bar slowly roll toward your fingertips, which is exactly where it slips out. Actively squeezing throughout the hold — not just at the start — is what actually extends your time under tension.
Common Mistakes
1. Using lifting straps
Straps defeat the entire purpose of this exercise. I understand the instinct — heavier weight feels more impressive — but the moment straps come out, you’re no longer training grip at all; you’re just testing how long your shoulders and back can hold a static position. Save the straps for actual heavy pulling work and leave them off here.
2. Letting posture collapse during the hold
This is the mistake I see most often: the grip is fine, but the shoulders round forward and the upper back rounds as fatigue sets in. The Barbell Hold is as much a posture exercise as a grip exercise — if your shoulders are slumping, you’re not just losing form; you’re also losing the trapezius engagement that should be supporting the hold in the first place.
Benefits of the Barbell Hold
Direct transfer to deadlifts, rows, and rack pulls
This is about as close as grip training gets to a pure carryover exercise. The grip pattern, the bar diameter, and the load are essentially identical to what you’re holding during a heavy pull — there’s no translation needed between this exercise and the lift it’s meant to support.
Trains posture and grip simultaneously
Because the hold demands an upright chest and stable shoulders to sustain for any real duration, it reinforces the same postural control that breaks down on heavy pulling sets, making it a useful two-for-one addition to a back day.
Builds genuine grip endurance
Because the hold is a sustained isometric contraction rather than a single rep, it trains the forearms to keep producing force over time rather than just for an instant — a different and often neglected quality compared to the brief grip demand of a single deadlift rep.
Improves bar control on heavy pulls
A grip that’s used to holding a bar under sustained tension is less likely to let the bar roll toward the fingertips during a heavy lockout. That improved control isn’t just about hanging on longer — it directly affects how secure the bar feels at the top of a max-effort pull.
Who Should Use This Exercise
- Lifters whose grip fails before their back or legs on deadlifts, rack pulls, or barbell rows — if the bar is slipping before the target muscles are fatigued, this is the direct fix
- Powerlifters and strongman competitors, since heavy static holds and odd-object events both demand exactly this kind of support-grip endurance
- Anyone using straps out of habit rather than necessity — this is a good way to find out how much grip strength straps have been masking
Who Should Be Cautious
- People with wrist pain or existing wrist injuries — sustained loading through a double overhand grip places direct stress on the wrist, and this isn’t the right exercise to push through discomfort
- Anyone with acute finger or hand pain, including flare-ups of conditions like trigger finger, since a maximal static grip can aggravate it further
How to Make It Easier or Harder
Easier
- Reduce the load — drop the weight rather than fighting through a grip that’s about to fail; quality holds at a manageable weight, build the pattern faster than grinding through failed attempts
- Shorten the hold duration — start with 10–15 second holds and build from there
- Use a standard Olympic bar rather than any thick-bar attachment — a standard 28–29mm diameter is the natural starting point before introducing any of the harder variations below
Harder
- Add Fat Gripz to a standard barbell — these slip-on attachments increase the effective diameter and force the hand into a weaker mechanical position without needing a separate thick bar
- Increase the load rather than the duration once a 45–60 second hold becomes easy at your current weight
- Progress to the Axle Bar Hold (see Variations below) once standard barbell holds at a heavy load are no longer challenging
Exercise Variations
One-Arm Barbell Hold
Performed the same way, but holding the bar in a single hand at a time, typically with less total weight than the bilateral version. This not only increases the demand on that hand’s grip, but also adds a core anti-lateral-flexion challenge, since the offset load pulls the torso to one side. It’s a useful way to address a grip imbalance between hands once the standard two-hand hold is no longer challenging.
Axle Bar Hold
A well-known strongman variation that swaps the standard barbell for a thick axle bar, typically 2 inches or more in diameter. The increased thickness forces the hand into a far weaker mechanical position, meaning even a modest weight that feels easy on a standard bar can become genuinely difficult to hold for more than a few seconds on an axle. This is a natural next step once standard barbell holds at a heavy load stop being challenging.
Barbell Hold vs. Farmer’s Walk
Both exercises train serious grip strength, but they ask for it in different ways — one is a static overload, the other is a moving endurance test.
| Barbell Hold | Farmer’s Walk | |
|---|---|---|
| Movement | Static | Dynamic |
| Grip demand | Maximum grip overload | Grip combined with gait and balance |
| Equipment | Rack required | Open space, no rack needed |
| Best for | Deadlift and rack-pull carryover | Total-body grip endurance |
The practical takeaway: I treat these as complementary rather than competing. The Barbell Hold is the better choice when the specific goal is raw support-grip strength for a heavy pull, while the Farmer’s Walk is the better choice for building grip endurance, conditioning, and total-body stability. A well-rounded grip program has room for both.
Replacement Exercises (Alternatives)
If the Barbell Hold doesn’t fit your setup or goals, these target a similar grip demand:
- Plate Pinch Hold (pinch-grip alternative)
- Captains of Crush Gripper (crush-grip alternative)
- Towel Pull-Up (combines pull strength with grip endurance)
- Farmer’s Walks
- Dead Hang
How to Incorporate the Barbell Hold Into Your Workouts
- As a finisher after deadlifts or barbell rows — I program this at the end of a pulling session, never before, since pre-fatiguing the grip will only compromise your main lifts
- Duration: 15–30 second holds to start; build toward 45–60 seconds before adding weight rather than extending duration further
- Sets: 3 sets
- Frequency: 2–3 times per week, ideally on the same days as your heavy pulling work rather than as a separate session
Looking to round out your grip training? Check out our guides to the Plate Pinch Hold, Farmer’s Walk, and Dead Hang, or learn more about why grip strength matters across your entire training program.
Conclusion
The Barbell Hold is the most direct way to train the exact failure point that ends so many heavy pulling sets — the grip giving out before the target muscles do. It’s not complicated, and it doesn’t need to be: load a bar, hold it with good posture, and let the simplicity do the work. Add it in as a finisher after your pulling sessions, resist the urge to strap up, and you’ll notice the difference the next time a heavy deadlift is on the bar.
This is just one piece of a complete grip routine — pair it with crush and pinch work for a grip that holds up everywhere, not just on the deadlift. Check out our full guide to grip strengthening exercises for the complete breakdown, or if your hands are still giving out before the rest of your body, find out exactly why here.
Frequently Asked Questions
How long should a Barbell Hold last?
Most lifters should aim to build toward 45–60 seconds with a given weight before increasing the load rather than chasing longer hold times indefinitely. A beginner starting out is better served by 10–15 second holds at a manageable weight while learning to maintain posture throughout the set.
Should I use lifting straps for the Barbell Hold?
No — using straps removes the entire training stimulus this exercise is built around. If your grip is the limiting factor on heavy pulls, training without straps here is exactly how you address that weakness rather than continuing to mask it.
Is the Barbell Hold the same as a deadlift hold at the top?
It’s similar in grip demand but removes the deadlift’s technical components — the hip hinge, the pull off the floor, and the lockout. Starting from a rack at hip height isolates the grip and posture challenge without adding the technical risk of lifting a near-maximal load off the ground.
Why does my grip fail on this exercise before my back gets tired?
This is common and is exactly the imbalance this exercise is designed to expose and correct. Grip strength generally develops more slowly than back and leg strength in most training programs, so it’s normal for the hands to become the limiting factor well before the larger muscle groups are challenged.
