



Negative chin-ups are a chin-up progression in which you start at the top of the movement, with your chin above the bar, and lower yourself to the bottom under control. You skip the pulling phase and train only the lowering, or eccentric, phase. For anyone who can’t yet do a full chin-up, it’s one of the most practical ways to build the strength needed for the first rep.
The idea works because muscles can control more load while lengthening than they can lift while shortening, as our guide to muscle actions explains. A meta-analysis found that eccentric training produced strength gains, with effects partly specific to the contraction type trained. That’s a useful reminder: negatives build strength, but they work best alongside some practice of the pulling phase itself.
In this guide, you’ll learn how to perform negative chin-ups with proper form, how fast to lower yourself, how to program them, and how they compare with band-assisted chin-ups.
Negative chin-ups (eccentric chin-ups) are a bodyweight pulling progression in which you begin at the top of a chin-up, with the chin above the bar and an underhand grip, and lower yourself under control until your elbows are fully or nearly fully extended. Only the eccentric (lowering) phase is performed. The exercise mainly trains the latissimus dorsi, biceps brachii, brachialis, and teres major, and is commonly used to build strength toward full chin-ups.
This is the question I hear most from clients working toward their first chin-up. My honest answer: negatives help a lot, but they rarely work best on their own. Lowering and pulling are related skills, not identical ones. Some clients build great control on the way down and still get stuck at the bottom when they try to pull up.
That’s why I pair negatives with a bit of pulling practice in the same session, usually band-assisted chin-ups or a single attempt at a full rep. In my experience, clients who can do three sets of five controlled negatives, each lasting about five seconds, are usually close to their first chin-up. It’s a rule of thumb from my own coaching, not a guarantee, and body weight, limb length, and training history all change the timeline.
— Krunoslav, Ph.D. in Kinesiology
Other Names for Negative Chin-Ups
You’ll find this exercise under several names:
- Eccentric chin-ups – the scientific term for the lowering phase.
- Chin-up negatives – a common gym expression.
- Slow-lowering chin-ups – a descriptive name used in some programs.
- Negative pull-ups – often used loosely, although strictly speaking the pull-up uses an overhand grip.
Required Equipment
You need very little to get started:
- Pull-up bar. Any sturdy bar works; see the different types of pull-up bars for home options.
- Box, bench, or step. Lets you step into the top position instead of jumping. It must be stable and high enough that your chin can reach above the bar.
- Timer or a partner (optional). Helps you keep the lowering speed consistent.
How to Do Negative Chin-Ups
The key to negative chin-ups is a controlled, even descent. Set up the box first so getting into the top position takes little effort, saving your energy for the lowering phase.
Starting Position
Place a sturdy box under the bar, then:
- Grab the bar with an underhand grip (palms facing you), hands about shoulder-width apart.
- Step up on the box until your chin is above the bar and your elbows are bent, close to your body.
- Lift your feet off the box and hold the top position, keeping your chest up and avoiding excessive shrugging.
- Keep your legs together or bend your knees slightly, with your trunk lightly braced, similar to a gentle hollow body position.


Execution
From the top position, lower yourself with control:
- Begin lowering at a slow, even speed, taking approximately 3–5 seconds to reach the bottom.
- Keep your elbows moving in a controlled path close to your body, and let your shoulder blades move naturally with your arms.
- Keep the speed even through the whole range, including the second half, where many lifters start to drop.
- Continue until your elbows are fully or nearly fully extended, avoiding dropping abruptly into a passive hang.
- Place your feet back on the box, step up to the top position, and repeat. Breathe steadily during the lowering instead of holding your breath for the whole rep.
Each controlled lowering counts as one rep. A shorter, controlled descent is more useful than a very long one that ends in a fall; see our guide to lifting tempo for more on rep speed.


Video Demonstration
The video below shows negative chin-ups from setup to the final rep. Notice how the lifter steps into the top position instead of jumping, and how the descent starts smoothly rather than with a sudden drop.
Pay attention to the second half of each rep. A good negative keeps the same speed from top to bottom and ends with the arms extended under control. If you film and time your set, it’s easy to see where you lose control.

The most common mistake I see with negative chin-ups is the “elevator with a snapped cable.” The first second of the descent looks great, slow and controlled, and then the lifter suddenly falls through the bottom half as if the cable broke. On paper it’s a five-second negative; in reality, it’s one good second and a drop.
With clients, I count the seconds out loud and ask them to reach the halfway point no earlier than “two.” If they can’t, I’d rather see a clean three-second negative than a dramatic six-second one with a crash at the end. Within a few weeks, the descent becomes even, and most clients notice that the bottom half, the part they used to skip, is exactly where they were weakest.
Quick Form Checklist
Check these points before and during every set:
- Step into the top position from a stable box
- Chin above the bar, chest up, no excessive shrugging
- Lower for approximately 3–5 seconds at an even speed
- Elbows fully or nearly fully extended at the bottom
- Step back up rather than dropping off the bar
Negatives can be done with any grip, but the grip changes how hard they feel and which muscles share the work. This is the overview I give my clients:
| Grip | Elbow Path | Typical Characteristics |
|---|---|---|
| Underhand, about shoulder width (chin-up) | Close to the body, in front of the torso | Usually the easiest to control; strong biceps involvement |
| Neutral, palms facing each other | Close to the body | Comfortable for many wrists and elbows; a good alternative to the underhand grip |
| Overhand, slightly wider than shoulders (pull-up) | Down and out to the sides | Usually the hardest of the three; the natural next step after chin-up negatives |
I start most beginners with the underhand grip, because it tends to be the strongest and the easiest to control on the way down. If underhand chin-ups bother a client’s wrists or elbows, we switch to a neutral grip. Once negative chin-ups feel solid, overhand negatives are the logical next step toward full pull-ups.
Research comparing pull-ups and chin-ups found that lat activity was broadly comparable, while the chin-up showed higher biceps and pectoralis major activity. That study looked at full repetitions, not negatives, and higher activation doesn’t automatically mean more growth, but it fits why the underhand grip feels easier for most beginners.
— Krunoslav, Ph.D. in Kinesiology
Technical Emphasis & Targeting Adjustments
Small changes in how you lower yourself change the training effect. Use these cues as practical adjustments:
- Elbows close to the body → more lat and biceps involvement. Keeping the elbows in front of the torso emphasizes controlled shoulder extension, a key action of the latissimus dorsi.
- Chest up at the top → stronger starting position. Starting with the chest lifted and the shoulders not shrugged makes the first part of the descent easier to control.
- Even speed from top to bottom → more work in the weakest range. Keeping the same pace through the second half increases time under tension where you most need strength.
- Pause just above your weak point → targeted strength. A one- to two-second pause where you usually lose control trains that part of the range directly.
- Legs together, glutes squeezed → less swinging. A rigid body is easier to control and keeps the work on your back and arms.
Common Negative Chin-Up Mistakes
Most negative problems come from rushing the setup or the descent. Watch for these mistakes:
- Dropping in the second half. Controlling only the first part of the descent skips the weakest part of the range. Count the seconds and slow down if you reach the halfway point too early.
- Jumping into the top position. A jump can make you overshoot the bar or land in a poor position. Step up from a box instead.
- Starting with shrugged shoulders. Holding the top with the shoulders up by the ears makes the position harder to control. Keep the chest up and the neck long.
- Doing too much too soon. Unaccustomed eccentric work can cause significant delayed-onset muscle soreness. Start with a few reps and build up gradually.
- Dropping off the bar at the bottom. Letting go abruptly can jar the shoulders and elbows. Finish each rep under control and step back onto the box.
Find your sticking point, then pause just above it. Most people lose control at the same spot on every rep, often somewhere in the second half. Film one set, find where the speed suddenly increases, and on the next session add a one- to two-second pause just above that point.
Keep the rest of the descent at your normal pace. After two or three weeks, many clients find that the weak spot has moved or disappeared, and their negatives look smooth from top to bottom. It’s a small change that makes each rep do more of the work you need.
Mechanical Considerations
In a negative chin-up, the same muscles that pull you up during a full chin-up work while lengthening to slow your descent. Muscles can produce more force when lengthening than when shortening, which is why many people can lower their body weight under control before they can lift it. The movement path is the same as in the full chin-up, so the shoulder and elbow positions you practice transfer directly to the full exercise.
Muscle activity is lower during the lowering phase. In an EMG study of pull-up variations, the concentric phases showed greater activation of the brachioradialis, biceps brachii, and pectoralis major than the eccentric phases. Lower activation doesn’t mean negatives are ineffective; it reflects how eccentric contractions work and is part of why they’re manageable for beginners. The study didn’t examine negative-only training, so these results describe the phases of a full repetition rather than training outcomes.
Muscles Worked by Negative Chin-Ups
Negative chin-ups train the same muscles as full chin-ups, working eccentrically as a compound exercise:
MAIN
- Latissimus dorsi – controls the shoulder as the arms move back overhead.
- Biceps brachii and brachialis – control elbow extension during the descent.
- Teres major – assists the lats.
SECONDARY
- Brachioradialis – assists the elbow flexors, along with other forearm muscles.
- Middle and lower trapezius and rhomboids – control the shoulder blades as they move up and out. Learn more about the trapezius muscle.
- Posterior deltoid and pectoralis major – assist control of the shoulder.
STABILIZERS
- Abdominals and other core muscles – keep the body still.
- Rotator cuff – stabilizes the shoulder joint.
- Forearm flexors – maintain the grip, which often limits beginners; see why grip strength matters.
Pros and Cons
Negative chin-ups are a valuable progression, with a few limitations worth knowing:
Advantages
- Accessible before you can do a chin-up. You can train the full movement path with your own body weight long before the first full rep.
- Minimal equipment. A bar and a box are all you need.
- Easy to scale. Adjust the difficulty with lowering speed, pauses, and grip without changing the setup.
- Strength in the full range. A controlled descent trains the muscles from the top position through full arm extension.
Potential Drawbacks
- More soreness at first. Unaccustomed eccentric work often causes noticeable muscle soreness.
- No pulling practice. Negatives don’t train the concentric phase directly, so they work best combined with assisted pulls.
- Time-consuming resets. Stepping back up after every rep makes sets slower.
- Easy to rush. Without counting, it’s easy to turn a negative into a quick drop.
Safety Considerations
Negative chin-ups are generally safe, but eccentric work brings one specific consideration: soreness. A review of eccentric training noted that unaccustomed eccentric exercise can cause muscle damage and delayed soreness, and that repeated sessions with submaximal, gradually increasing intensity are the most useful way to prevent it. Keep these points in mind:
- Start conservatively. Begin with two or three sets of a few reps and increase the volume over several weeks.
- Use a stable box. Make sure the box can’t tip or slide, and keep it close enough to step back onto safely.
- Don’t drop at the bottom. Finish each rep with control instead of letting the elbows snap straight under speed.
- Allow time to recover. Leave at least a day between sessions, especially in the first weeks; our guide to rest and muscle recovery explains why. Stop if you feel sharp pain in the elbows or shoulders.
Variations of Negative Chin-Ups
These variations let you adjust the difficulty or move toward full pull-ups:
Flexed-Arm Hang
Difficulty: Beginner
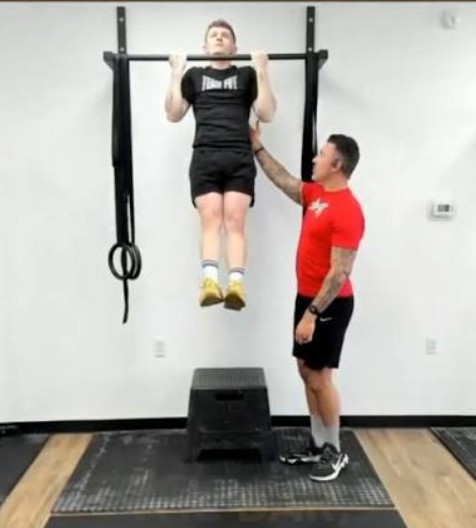
Step into the top position and simply hold it for as long as you can with control. It’s a good first step if a full negative still feels too difficult.
Paused Negative Chin-Up
Difficulty: Beginner to intermediate
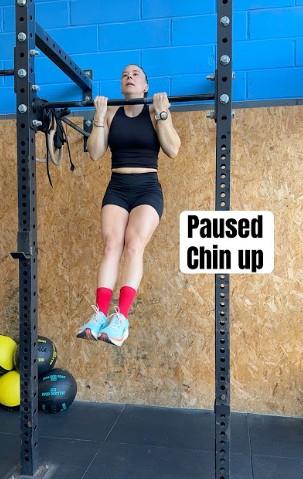
Add one to three short pauses during the descent, for example at the top, the middle, and just above full extension. Pauses make it easier to maintain a steady tempo and strengthen the positions where you usually lose control.
Neutral-Grip Negative
Difficulty: Beginner to intermediate
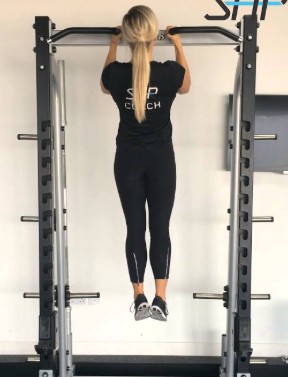
Perform the negative on parallel handles with the palms facing each other. Many lifters find this grip more comfortable for the wrists and elbows.
Negative Pull-Up
Difficulty: Intermediate
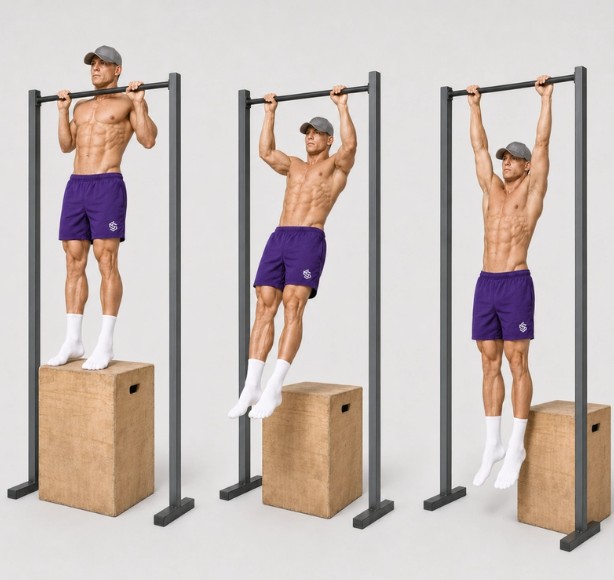
Use an overhand grip slightly wider than shoulder width. It’s usually harder than the chin-up version and a natural step toward the full wide-grip pull-up.
Weighted Negative Chin-Up
Difficulty: Advanced
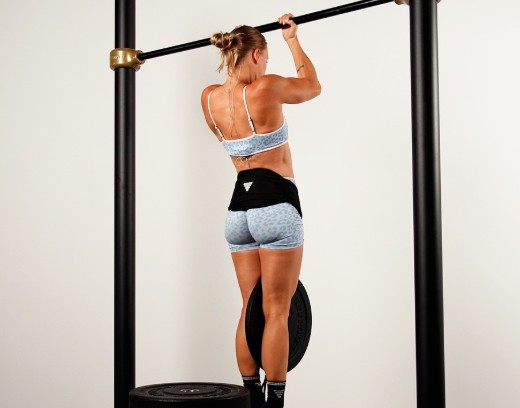
For lifters who can already do several chin-ups, adding weight with a belt or vest turns negatives into an advanced strength method. Learn more about negative repetitions as an advanced technique.
Replacement Exercises
These exercises are good substitutes or companions for negative chin-ups. Rows are included on purpose: the idea that vertical pulls build back “width” and rows build “thickness” is an oversimplification, since both train the lats.
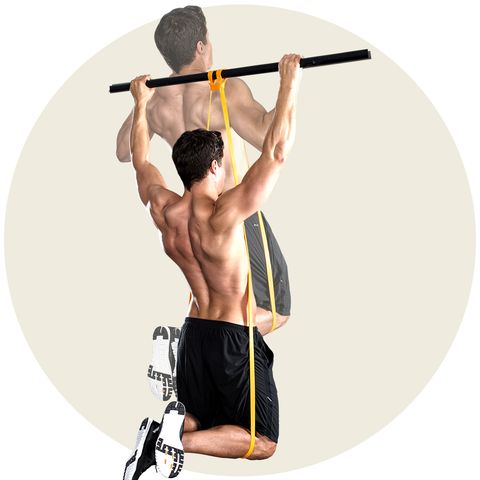
- Band-Assisted Pull-Up. Resistance band-assisted pull-ups train the full movement, including the pulling phase, with reduced load.
- Assisted Pull-Up Machine. The assisted pull-up machine lets you set the assistance precisely and reduce it in small steps.

- Close-Grip Lat Pulldown. The close-grip lat pulldown trains a similar vertical pull with an adjustable load; use an underhand or neutral grip to match the chin-up.

- Body Row. The body row builds pulling strength in the back and arms with an adjustable body angle.

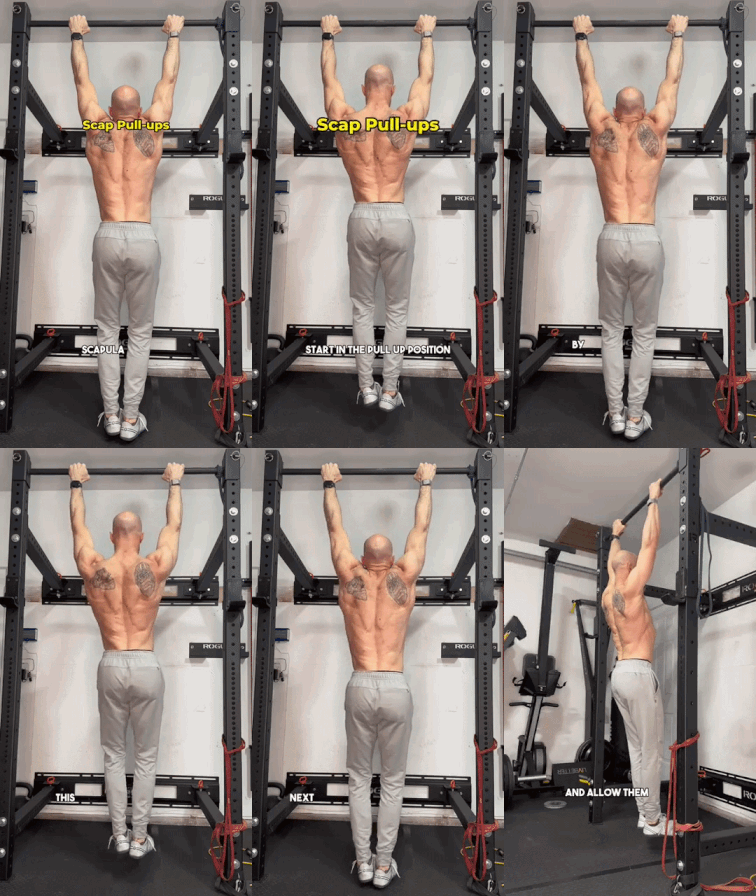
- Scapular Pull-Up. Scapular pull-ups teach shoulder-blade control while hanging, a useful skill for every pull-up variation.
- Hammer Curl. The standing hammer curl strengthens the elbow flexors, which often limit beginners on chin-ups.

How to Program Negative Chin-Ups
Use the box below as a starting point. Negatives fit well into beginner programs such as a full-body training program.
Show full programming guideHide programming guide ▾
| Goal | Sets | Reps | Rest | Tempo |
|---|---|---|---|---|
| First weeks (getting used to eccentrics) | 2–3 | 2–3 | 90–120 s | 3 s lowering |
| Building the first chin-up | 3–4 | 3–5 | 90–120 s | 3–5 s lowering |
| Strength (already doing chin-ups, weighted) | 3–4 | 3–5 | 2–3 min | 3–5 s lowering |
For most beginners, body weight is a heavy load, so negatives work much like a heavy-load strength exercise. That fits the research: heavier loads tend to favor maximal strength, while muscle growth occurs across a broad spectrum of loading ranges. Quality matters more than volume here: every rep should be controlled from top to bottom.
- At the start of a pull or full-body session, right after the warm-up
- Paired with band-assisted chin-ups or one attempt at a full chin-up
- In a beginner push-pull routine on the pull day
- On non-consecutive days, to allow recovery from the eccentric work
First, extend each negative toward five seconds, then add reps until you reach about five per set. Next, try one full chin-up at the start of each session. Once you get it, combine a few full chin-ups with negatives in the same workout and gradually shift the balance. Our guide on how to do chin-ups for beginners covers the next stage.
Negative Chin-Ups vs Band-Assisted Chin-Ups
Both are popular progressions toward the first chin-up, but they train the movement in different ways:
| Feature | Negative Chin-Ups | Band-Assisted Chin-Ups |
|---|---|---|
| Phase trained | Lowering (eccentric) only | Pulling and lowering |
| Load | Full body weight | Reduced body weight |
| Equipment | Bar and box | Bar and resistance band |
| Assistance profile | None during the descent | Most help at the bottom, least at the top |
| Soreness | Often higher at first | Usually lower |
| Progression | Longer descents, more reps, pauses | Lighter bands, more reps |
| Best for | Building strength at full body weight | Practicing the complete movement |
The main difference is what each one practices. Negatives let you handle your full body weight, but only on the way down. Bands let you practice the whole chin-up, including the pull, but reduce the load most where you’re usually weakest, at the bottom.
Neither is better overall, and combining them is often the most practical approach: negatives for strength at full body weight and band-assisted reps for pulling practice. For more strategies, see our guide to your first pull-up and our tips to improve your pull-ups.
Final Thoughts
Negative chin-ups are a simple and effective progression toward your first chin-up. Step into the top position, lower yourself for about three to five seconds at an even speed, and finish each rep under control.
Combine them with some pulling practice, gradually increase the volume, and give your muscles time to adapt to the eccentric work. To understand the training principle behind them in more depth, read our guide to eccentric weight training.
Frequently Asked Questions
Do negative chin-ups help you get your first chin-up?
Yes, they’re a useful progression, especially when combined with some pulling practice, such as band-assisted chin-ups.
How slowly should I lower myself?
About 3–5 seconds per rep is a practical target. An even, controlled descent matters more than making it as long as possible.
How many negative chin-ups should I do?
Most beginners do well with 3–4 sets of 3–5 reps, two times per week. Start with fewer reps in the first sessions.
Why am I so sore after negatives?
Unaccustomed eccentric work often causes delayed-onset muscle soreness. It usually decreases as your body adapts over the next few sessions.
Should I jump or use a box to get to the top?
A box or step is better for most people, because it gets you into a controlled starting position without overshooting the bar.
What muscles do negative chin-ups work?
They work the same muscles as full chin-ups: mainly the lats, biceps, brachialis, and teres major.
Are negative pull-ups and negative chin-ups the same?
Not quite. Negative chin-ups use an underhand grip; negative pull-ups use an overhand grip and are usually harder.
Can I do negatives every day?
It’s better not to. Leave at least a day between sessions so your muscles can recover from the eccentric work.
Are negatives better than band-assisted chin-ups?
Neither is better overall. Combining both is often the most practical way to build toward full chin-ups.
