



The Yates row is a barbell row performed with an underhand grip and a more upright torso than the classic bent-over row. You pull the bar toward your lower abdomen, keeping the elbows close to the body. The exercise is named after six-time Mr. Olympia Dorian Yates, who made it a staple of his back training, and it targets the latissimus dorsi, mid-back, and elbow flexors.
The underhand grip sets the exercise apart and changes how the work is shared between the back and the arms. Research on vertical pulls supports this: in a comparison of chin-ups and pull-ups, lat activity was broadly comparable, while the underhand chin-up showed higher biceps and pectoralis major activity. That study looked at vertical pulls, not rows, but it supports the common observation that an underhand grip brings the biceps more into play.
In this guide, you’ll learn how to perform the Yates row with proper form, which muscles it works, how to program it, and how it compares with the classic overhand bent-over barbell row.
The Yates row (reverse-grip or underhand barbell row) is a free-weight rowing exercise performed with a supinated grip about shoulder width and a moderately inclined torso, in which the barbell is pulled toward the lower abdomen with the elbows close to the body. The exercise mainly trains the latissimus dorsi, teres major, middle trapezius, and rhomboids, with substantial involvement of the biceps brachii and brachialis.
You’ve probably heard that the Yates row is the exercise for the “lower lats.” Clients repeat it to me all the time. My honest answer: it’s an oversimplification. The lats are one muscle with fibers running in different directions, and while some research suggests that different regions can be activated slightly differently, there’s no good evidence that a specific row grows one part of the lat on its own.
What the Yates row does well is keep the elbows close to the body and drive them back toward the hips, which emphasizes shoulder extension, a key action of the lats. That’s why many lifters feel their lats strongly on this exercise. I use it for exactly that reason, not because it builds a particular “part” of the back.
— Krunoslav, Ph.D. in Kinesiology
Other Names for the Yates Row
You’ll see this exercise under several names:
- Reverse-grip barbell row – the most common descriptive name.
- Underhand barbell row – emphasizes the grip.
- Supinated bent-over row – a technical name used in some programs.
- Reverse-grip bent-over row – a variation of the descriptive name.
Some lifters use “Yates row” for any underhand barbell row, while others reserve it for the more upright version Dorian Yates used. In this guide, the name refers to the upright, underhand version.
Required Equipment
You need standard barbell equipment:
- Olympic barbell and plates. A standard bar works well.
- Power rack (optional). A power rack lets you start from mid-thigh height instead of lifting from the floor.
- Wrist straps (optional). Wrist straps help when your grip fails before your back on heavier sets.
- Weight-lifting belt (optional). A lifting belt can help some lifters brace, but it isn’t necessary for typical working sets.
How to Do the Yates Row
The Yates row relies on a stable, moderately inclined torso. Set your grip and torso angle first, then keep both the same throughout the set.
Starting Position
Take the bar from a rack at about mid-thigh height, or lift it from the floor with good deadlift technique. Then:
- Hold the bar with an underhand grip (palms facing forward) about shoulder-width apart, with the wrists straight. See our guide to grip types and widths for terminology.
- Stand with your feet about hip-width apart and your knees slightly bent.
- Hinge at the hips until your torso leans forward moderately, typically about 20–30 degrees from vertical, which is more upright than in a classic bent-over row. The hinge follows the same pattern as the Romanian deadlift.
- Let the bar hang at about knee height or just above, with your arms fully or nearly fully extended.
- Keep your spine and neck neutral and brace your trunk.

Execution
From the starting position, pull with control:
- Drive your elbows back and close to your body, pulling the bar toward your lower abdomen.
- Let your shoulder blades move back naturally as the elbows pass the torso, without shrugging.
- Keep your torso angle fixed; don’t stand up or lean back to lift the bar.
- Pause briefly when the bar touches or nearly touches your lower abdomen.
- Lower the bar under control until your elbows are fully or nearly fully extended and the shoulder blades have moved forward naturally.
- Exhale during the pull or at the top, and inhale as you lower the bar.
Keep the movement smooth. A small amount of body movement on the last rep is common, but if your torso rises on every rep, the weight is too heavy, and momentum is doing part of the work.
Video Demonstration
The video below shows the Yates row from setup to the final rep. Notice the underhand grip, the moderately inclined torso, and how the bar travels toward the lower abdomen rather than the chest.
Watch the torso angle throughout the set. In a well-controlled set, it stays the same from the first rep to the last, and the elbows stay close to the body. Filming yourself from the side makes it easy to see whether you gradually stand up during the set.


The most common Yates row mistake I see is what I call the “sunrise.” The set starts with a decent forward lean, but with every rep the torso rises a little more, like the sun coming up over the horizon. By the last rep, the lifter is standing almost straight, and the “row” has turned into a combination of a shrug and a reverse curl.
With clients, I set the torso angle at the start and ask them to keep their chest pointing at the same spot on the floor for the whole set. If the chest starts to rise, the set is over. The weight usually comes down a bit, but most clients are surprised how much more they feel their lats, and how much less their biceps and upper traps take over.
Quick Form Checklist
Check these points before and during every set:
- Underhand grip about shoulder width, wrists straight
- Torso inclined moderately, spine neutral
- Elbows close to the body, bar toward the lower abdomen
- Torso angle stays the same on every rep
- Controlled lowering to fully or nearly fully extended elbows
On the Yates row, grip orientation and width decide how your elbows travel and how comfortable the exercise feels. This is the overview I give my clients:
| Grip | Elbow Path | Typical Characteristics |
|---|---|---|
| Underhand, about shoulder width (classic Yates row) | Close to the body, toward the hips | Tends to emphasize the lats and elbow flexors; the standard setup |
| Underhand, slightly wider than shoulders | Close to the body, slightly out | Often more comfortable for the wrists and elbows of broad-shouldered lifters |
| Overhand, about shoulder width | Back and slightly out, toward the lower chest | This is closer to the classic bent-over row; more upper-back involvement |
I start most clients with the classic underhand grip about shoulder width, with the wrists straight. If their wrists or elbows complain, I let them widen the grip slightly or switch to an EZ-bar. When a client wants more upper-back work, I don’t modify the Yates row; I program an overhand bent-over row instead.
Interestingly, the research doesn’t simply show “underhand = more lats.” In a study on the lat pulldown, a pronated grip produced greater lat activation than a supinated grip, while grip width made little difference. That was a vertical pull, not a row, but it’s a good reason to choose the Yates row for how it feels and fits your program, not because of claims that it isolates the lats.
— Krunoslav, Ph.D. in Kinesiology
Technical Emphasis & Targeting Adjustments
Small changes in how you pull shift where you feel the Yates row. Use these cues as practical adjustments:
- Elbows toward the hips → more lat emphasis. Driving the elbows back along the body emphasizes shoulder extension, a key action of the lats.
- Finish with the shoulder blades back → more mid-back involvement. Let the shoulder blades follow the elbows toward the spine • engages the rhomboids and middle traps.
- Think “elbows,” not “hands” → less biceps dominance. Treat your hands like hooks to reduce the tendency to curl the bar up.
- More forward lean → longer range of motion. Leaning further forward increases the range and the demand on the back, including the lower back.
- Controlled lowering for 2–3 seconds → more eccentric work. A slower descent keeps tension on the back and discourages bouncing the bar.
Common Yates Row Mistakes
Most Yates row mistakes come from using more weight than you can control. Watch for these:
- Standing up during the set. Gradually rising turns the row into a shrug. Keep the torso angle fixed and end the set when it starts to change.
- Curling the bar. Bending the elbows early and pulling with the hands shifts the work toward the biceps. Drive the elbows back, and read why you might not feel your lats if the back still doesn’t engage.
- Shrugging at the top. Lifting the shoulders toward the ears turns the finish into a barbell shrug. Keep your neck long and your shoulders away from your ears.
- Bending the wrists back. Letting the wrists extend under load can strain the forearms. Keep the wrists straight and the bar in the palm.
- Rounding the lower back. Losing the neutral spine increases stress on the lower back. Brace before every rep and use a load you can control.
If your wrists or elbows don’t like the straight bar, switch to an EZ-bar. A fully supinated grip on a straight bar is uncomfortable for some lifters, especially under heavy load. The angled grips of an EZ-bar, the same bar used for the standing EZ-bar curl, reduce how far the forearms have to rotate.
Use the inner angles for a slightly narrower grip or the outer angles for a wider one. The movement stays the same, but many clients find they can train the Yates row consistently without the nagging elbow or wrist discomfort they had with the straight bar.
Mechanical Considerations
The more upright torso is the main mechanical difference between the Yates row and the classic bent-over row. With the torso leaning only moderately forward, the bar stays closer to the hips, so the lower back has a shorter lever to hold, and many lifters can use heavier loads. The trade-off is a shorter range of motion and a pull that runs at an angle to the torso rather than perpendicular to it. The underhand grip also places the elbow flexors, especially the biceps, in a strong position. This is biomechanical reasoning, not a measured result.
No study appears to have examined the Yates row directly. Research on the classic version shows why the hinge still matters: in a comparison of rowing exercises, the standing bent-over row produced large muscle activation from the upper to the lower back, along with the largest lumbar spine load of the rows tested. The Yates row uses a more upright posture, which likely reduces that demand somewhat, but it’s still an unsupported hinge, and heavier loads can offset the advantage.
Muscles Worked by the Yates Row
The Yates row is a compound exercise involving the back, shoulders, and arms:
MAIN
- Latissimus dorsi – extends the shoulder as the elbows travel back toward the hips.
- Teres major – assists the lats in shoulder extension.
- Middle trapezius – retracts the shoulder blades at the top. Learn more about the trapezius muscle.
- Rhomboids – work with the middle traps to pull the shoulder blades together.
SECONDARY
- Biceps brachii and brachialis – flex the elbows, with more biceps involvement than in overhand rows.
- Brachioradialis – assists elbow flexion, along with other forearm muscles.
- Posterior deltoid – assists shoulder extension.
- Lower trapezius – helps control the shoulder blades.
STABILIZERS
- Erector spinae – hold the spine neutral.
- Glutes and hamstrings – maintain the hip hinge.
- Abdominals and other core muscles – brace the trunk.
- Rotator cuff – stabilizes the shoulder joints.
Pros and Cons
The Yates row has clear strengths, along with a few limitations:
Advantages
- Strong lat and elbow-flexor involvement. The underhand grip and close elbow path suit lifters who want to feel their lats and arms working together.
- Heavy loading. The more upright torso lets many lifters handle substantial loads.
- Less lower back leverage than the classic row. The bar stays closer to the hips, which many lifters find more comfortable.
- Simple equipment. A barbell and plates are enough.
Potential Drawbacks
- Shorter range of motion. The upright torso limits how far the bar travels.
- Easy to cheat. The posture makes it tempting to stand up and shrug the weight.
- Stress on the wrists, elbows, and biceps. A heavy underhand grip doesn’t suit everyone; read about biceps tendonitis in weightlifting if you have recurring elbow pain.
- Less upper-back emphasis. Lifters who want more rear-delt and upper-trap work may prefer an overhand row.
Safety Considerations
The Yates row is generally safe with sensible loading, but the underhand grip and the unsupported hinge bring a few specific considerations:
- Keep the load controllable. If you need to stand up or swing to complete reps, the weight is too heavy.
- Protect your elbows. Heavy underhand pulling places a high demand on the biceps; increase loads gradually and stop if you feel sharp pain at the front of the elbow.
- Keep your wrists neutral. Straight wrists, or an EZ-bar, reduce forearm strain.
- Respect your lower back. If you have recurring lower back pain, choose a chest-supported row and consult a qualified professional.
Yates Row Variations
These variations let you change the equipment, the support, or the difficulty:
EZ-Bar Yates Row
Difficulty: Intermediate

Use an EZ-bar instead of a straight bar. The angled grips reduce forearm rotation and are often more comfortable for the wrists and elbows.
Smith Machine Yates Row
Difficulty: Beginner to intermediate

The Smith machine guides the bar along a fixed path, reducing the balance demand and letting you focus on the elbow path. Read about the pros and cons of Smith machine training before choosing it.
Dumbbell Yates Row
Difficulty: Intermediate

Hold two dumbbells with the palms facing forward and row them toward your hips. Each arm works independently, and you can adjust the hand position for comfort.
Paused Yates Row
Difficulty: Intermediate

Hold the bar against your lower abdomen for one to two seconds on every rep. The pause removes momentum and makes it obvious whether the torso stays still.
Replacement Exercises
If you want a similar training effect, or need to reduce the demand on your lower back or elbows, these exercises are good substitutes:
- Pendlay Row. The Pendlay row is a stricter barbell row with each rep starting from the floor.

- Freestanding T-Bar Row. The freestanding T-bar row uses a similar hinge with a fixed bar path and a neutral grip.

- Supported T-Bar Row. The supported T-bar row allows heavy loading with chest support.

- Chest-Supported Dumbbell Row. The chest-supported dumbbell row can be done with the palms forward and removes most of the lower back demand.
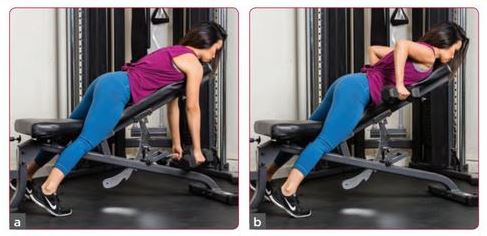
- Seated Cable Row. The seated cable row with an underhand bar mimics the grip while supporting the torso.

- Close-Grip Lat Pulldown. The close-grip lat pulldown with an underhand grip trains a similar vertical elbow path.

How to Program the Yates Row
Use the box below as a starting point and adjust it to your goals and training split.
Show full programming guideHide programming guide ▾
| Goal | Sets | Reps | Rest | Tempo |
|---|---|---|---|---|
| Hypertrophy | 3–4 | 8–12 | 90–120 s | 2–3 s lowering, brief pause at the top |
| Strength | 3–5 | 5–8 | 2–3 min | Controlled lowering, firm pull |
| Muscular endurance | 2–3 | 12–15 | 60–90 s | Steady, controlled |
Heavy Yates rows are tempting, but the torso tends to rise as loads increase. Moderate loads with a fixed torso angle are a practical default; muscle growth has been reported across a broad spectrum of loads and repetition ranges, provided sets are taken reasonably close to failure.
- As the main or secondary row on back or pull days
- After vertical pulls, such as pull-ups or lat pulldowns
- Alternating with overhand rows from one training block to the next
- Before direct biceps work, since the elbow flexors are already involved
Add a small amount of weight once you complete all sets at the top of your rep range without changing your torso angle. If the torso starts to rise, stay at that weight. Apply progressive overload with the same strict standard on every rep.
Yates Row vs Bent-Over Barbell Row
Both are free-standing barbell rows, but the grip and torso angle change the exercise:

| Feature | Yates Row | Bent-Over Barbell Row |
|---|---|---|
| Grip | Underhand, about shoulder width | Usually overhand, about shoulder width or slightly wider |
| Torso angle | More upright, about 20–30° from vertical | More inclined, often 45° or lower |
| Bar path | Toward the lower abdomen | Toward the lower chest or upper abdomen |
| Elbow path | Close to the body | Back and slightly out |
| Range of motion | Shorter | Longer |
| Elbow-flexor involvement | Higher, especially the biceps | Moderate |
| Lower back leverage | Shorter lever | Longer lever |
| Best for | Lat and arm involvement with heavy loads | Longer range and more upper-back work |
The main differences are the grip and the torso angle. The Yates row keeps the elbows close and the torso more upright, which emphasizes shoulder extension and the elbow flexors while shortening the range. The bent-over barbell row uses a more inclined torso and usually an overhand grip, which lengthens the range and involves the upper back more.
Neither is better overall. Many lifters alternate between them from one training block to the next. For a broader look at underhand versus overhand pulling, see our chin-up vs pull-up comparison, and for more row ideas, our list of the best exercises for developing back thickness.
Final Thoughts
The Yates row is an underhand barbell row with a more upright torso that trains the lats, mid-back, and elbow flexors. Keep the grip about shoulder width, the wrists straight, the elbows close to the body, and the torso angle fixed from the first rep to the last.
Use it as a main or secondary row, switch to an EZ-bar if your wrists or elbows complain, and don’t let the weight turn the row into a shrug. To understand the muscles behind every rowing movement, read our guide to the muscles involved in pulling movements.
Frequently Asked Questions
What muscles does the Yates row work?
It mainly works the lats, teres major, middle traps, and rhomboids, with substantial biceps and brachialis involvement.
Why is it called the Yates row?
It’s named after six-time Mr. Olympia Dorian Yates, who made the underhand row a staple of his back training.
Does the Yates row target the lower lats?
That’s a simplification. The Yates row emphasizes shoulder extension, a key lat action, but there’s no good evidence that it grows one region of the lat on its own.
How upright should my torso be?
A forward lean of about 20–30 degrees from vertical is typical. The key is keeping the angle the same throughout the set.
Is the Yates row better than the bent-over row?
Neither is better overall. The Yates row offers more lat and arm involvement; the bent-over row offers a longer range and more upper-back work.
Is the Yates row bad for the biceps?
Not inherently, but heavy underhand pulling places a high demand on the biceps. Increase loads gradually and stop if you feel sharp elbow pain.
Can I use an EZ-bar for Yates rows?
Yes. An EZ-bar reduces forearm rotation and is often more comfortable for the wrists and elbows.
Where should the bar touch my body?
Pull the bar toward your lower abdomen, roughly around the belly button.
Should I use straps for Yates rows?
Straps are optional. They’re helpful when your grip fails before your back on heavier sets.
