

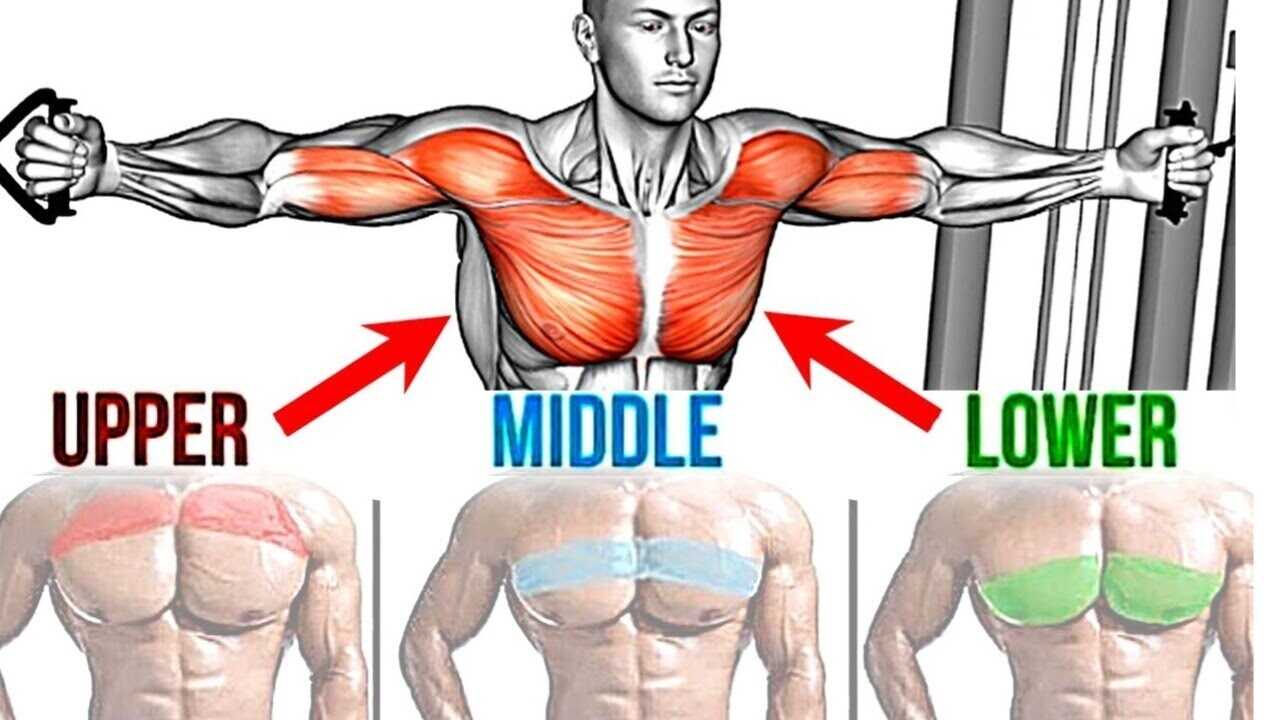
Are you looking to build a strong and muscular chest? Building a strong and well-defined chest is a goal for many fitness enthusiasts. Whether you’re looking to increase your pressing power, improve posture, or simply achieve a more aesthetic physique, proper chest-building exercises are essential. Chest exercises can be largely divided into three categories: middle chest exercises, upper chest exercises, and lower chest exercises.
Enhancing the middle chest muscles is pivotal for achieving a well-balanced and proportionate chest shape. You can accomplish a larger, denser chest contour by emphasizing this region, ultimately augmenting both your bodily aesthetics and upper muscularity. Effectively exercising the middle pecs necessitates the incorporation of particular routines into your chest workout.
In this ultimate guide, we will share with you the most effective chest exercises that target the middle portion (middle fibers) of the pectoralis major muscle. Whether you’re a beginner or an experienced lifter, these exercises are perfect for muscle growth (true mass builders) and overall strength. Each chosen exercise will be backed up with detailed instructions, tips, and a clear video presentation of the correct technique of performance.
The importance of having strong chest muscles
Most men dream of having a well-developed muscular chest, but it’s far more than just an aesthetic appeal. A stronger chest offers multiple benefits for everyday life and sports. It isn’t just about looking better in your shirts or at the beach, it plays a crucial role in upper body strength. This muscle group helps us with vital actions such as pushing a heavy door, throwing a ball, or even executing punches in martial arts. In sports, a powerful chest enhances performance in baseball, swimming, boxing, and more, by boosting speed, power, and stability. Regular chest exercises can also help improve posture, reducing the risk of back injuries and muscular imbalance.
Chest muscles anatomy
The chest is made up primarily of two muscles: (1) the pectoralis major, and (2) the pectoralis minor.
The pectoralis major has two anatomic sections or heads. The first one is the upper clavicular head (upper pectoralis major). The second one is the lower sternal head (lower pectoralis major). Although the pectoralis muscle has only two anatomic divisions, functionally it may be considered in three sections (upper, middle, and lower) depending on the angle through which the arm is moved. As the position of the shoulder joint changes, certain fibers of the chest muscle have a better mechanical advantage for creating motion. Although the remaining fibers of the chest muscle continue to be active, due to the position of the shoulder, their ability to contract is somewhat impeded. This is the main reason why we can talk about the middle, upper, and lower chest exercises. The middle section is the largest, and it is targeted when your arms work at a 90-degree angle to your body, as in horizontal adduction.
Aside from the different regions of the pectoralis major muscle, another crucial part of the chest anatomy that deserves your attention is the pectoralis minor muscle. Located on the upper part of the chest, beneath the pectoralis major, this small, thin, triangular yet important muscle is responsible for many normal functions like stabilization, depression, and movement of the shoulder blade. Keeping this muscle strong and flexible not only supports upper body strength and posture but indirectly enhances the visual impressiveness of the chest by maintaining proper shoulder alignment. An effective chest training program should never neglect the contributions of the pectoralis minor muscle.
If you are more interested in the anatomy of the pectoral muscles (which is certainly recommended for every serious bodybuilder to know), we refer you to our article which deals exclusively with the anatomy of the pectoral muscles.
Middle chest exercises versus inner chest exercises
Incorporating exercises that take the range of motion past the midline of the body and focus on the full extension will target your inner chest area – that inner chest line that separates your chest. For example, if you cross over your hands at the bottom while doing a cable crossover exercise (basically lower chest exercise) you will increase the range of motion and make that line that separates the chest more prominent. So it is very advisable to cross your hands over one another so that your wrists touch to get a much stronger contraction and to promote development in the center of your chest. You can get the same effect when you use the middle chest exercise – flat bench cable fly.
Therefore, this effect can be achieved using many middle, upper, and lower chest exercises by following the above-given advice. So there are no specific exercises to make that line more prominent – you simply use existing well-known middle, upper, and lower chest exercises and you perform that specific movement at the end of the bottom phase of the exercise.
The best exercise to target the middle chest area
When it comes to middle chest exercises, there are plenty of options to choose from. Our exercise database contains many middle chest exercises you can choose from. However, not all chest exercises are created equal (while they all have their unique advantages), and some may be more effective than others in achieving your desired results (maximal muscle growth). Since you can’t do them all, we’re sure you want to know the best middle-chest exercises to include in your chest workout routine – those that provide total muscle stimulation. We’ve done the work to compare them for you and to make the list of those who stand out with their ability to promote the greatest growth of the pectoral muscle.
However, one thing must be absolutely clear at the start. It is impossible to fully isolate the middle, upper, and lower portions (fibers) of the pectoralis major muscle. This is because the chest muscles (pectoralis major and minor) work together as a unit. Every chest exercise will hit the entire area of the muscle – all three portions. However, some exercises can indeed place a little more emphasis on either the middle, upper, or lower portion of the muscle.
Based on what criteria did we choose these exercises? These exercises were chosen based on their proven results in the lab, total muscle stimulation and intensity, ease of learning and performing, popularity among lifters and bodybuilders, as well as the availability of equipment in commercial gyms. By incorporating a combination of these exercises into your routine, you can effectively target and develop your chest muscles.
Dividing middle chest exercise into certain groups
The middle chest exercises are divided into these main groups of exercises:
- barbell pressing exercises;
- dumbbell pressing exercises;
- machine, cable, or band pressing exercises;
- fly-type exercises; and
- push-up
While a lot of these exercises, like the bench press, are compound movements involving multiple joints and engaging muscles like the deltoids and triceps in addition to the pectorals, they primarily serve as chest workouts due to the motion of the upper arms.

#1 FLAT BENCH BARBELL PRESS
One essential middle chest exercise that packs a powerful punch is the flat bench barbell press. Bodybuilders consider the barbell bench press to be the king of all chest exercises. This classic compound exercise primarily targets the pectoralis major muscle (primarily middle chest fibers) – the broad muscle situated in the upper chest. Simultaneously, it also engages secondary muscles such as the triceps, deltoids, and serratus anterior, making it not just an excellent chest exercise, but a fantastic full upper-body workout.
STARTING POSITION:
- Lie on your back on a bench and position your feet flat on the floor or on the bench. Tighten your abdominal muscles to help protect your back.
- Hold the bar slightly wider than shoulder-width apart.
- Lift the bar over the middle of your chest. Keep your elbows slightly bent, and the wrists should be straight.
MOVEMENT:
- Take in a deep breath and slowly lower the bar to about an inch from the middle of your chest. Your elbows should end up slightly below your shoulders.
- Pause for a moment and then slowly raise the bar back to the starting position. Push your shoulder blades into the bench while raising the bar.
TIPS:
- As you lift the barbell, ensure to keep your elbows at an angle roughly 45 degrees to your body to prevent them from flaring outwards. In doing so, your arms and body form an arrow shape, not a ‘T’.
- It’s essential to keep the barbell on a straight path, avoiding any drift away from your body during the process. With such a deviation, the movement becomes more challenging due to an inefficient bar path.
- Throughout the entire exercise, ensure your buttocks remain in contact with the bench for stable positioning.
- Instead of simply bringing the barbell down to your chest, consider lifting your chest up to meet the bar. It’s a tactic that aids in generating tension throughout your upper body parts.
- For a more efficient workout capable of lifting more weight, consider creating a back arch, bringing your feet close to the body, and turning your heels outward. These adjustments will enhance leg drive and decrease the barbell’s travel range, simplifying the exercise.
#2 FLAT BENCH DUMBBELL PRESS
Whether you’re a fitness enthusiast or just starting, the flat bench dumbbell press is an indispensable part of your chest workout routine. Known for its effectiveness in engaging the middle chest, this exercise is often hailed as the ultimate chest-builder.
The magic of the flat bench dumbbell press lies in its range of motion. Unlike the barbell bench press, the dumbbells allow a deeper stretch at the bottom, leading to increased fiber engagement. This is what makes the dumbbell press such a great middle-chest exercise. What’s more, it’s a compound exercise –meaning it engages multiple muscles at once. While your pectoralis major (your large chest muscle) is primarily targeted, your triceps and anterior deltoids (front shoulder muscles) are also working to help you press those dumbbells in the air.
STARTING POSITION:
- Pick up two equally weighted dumbbells, holding them with a firm grip. The outer surface of the dumbbell’s lower half should be resting against your thighs, with the handles parallel to one another.
- Make yourself comfortable at one end of a flat bench with the dumbbells on your thighs.
- Slowly lay back in a supine position, your head resting on the opposite end of the bench. Initially, bring the dumbbells to your chest area (near your armpits) then call for your spotter’s help to maneuver them above your chest. Your elbows should be extended, with your forearms parallel.
- Adjust your position to create a firm five-point body-contact posture: (1) Keep your head firmly on the bench. (2) Make sure your shoulders and upper back are securely and evenly positioned on the bench. (3) Position your buttocks evenly on the bench. (4) Keep your right foot flat on the floor. (5) Ensure your left foot is flat on the floor as well.
MOVEMENT:
- Start by slowly bringing the dumbbells towards your chest. Keep your body sturdy on the bench and ensure an even lowering rate for both dumbbells.
- Maintaining stiff wrists, align your forearms vertically to the ground and keep the dumbbells in sync. Steer clear of any excessive front, back, or sideways motion.
- Lower the dumbbells towards the side abdomen part of your chest, aligning them with the nipples.
- Typically, the dumbbells reach a depth equivalent to that of a flat barbell bench press. Envision an imaginary bar passing through your hands – the lowest dumbbell position should be where this imaginary bar would rest at nipple height. If you have the dumbbells in a neutral position, you can lower them further, unhindered by the torso.
- Avoid lifting your chest by arching your lower back excessively.
- Retain a solid five-point body contact position with your head, torso, hips, and feet.
- Diligently press the dumbbells upwards at an even rhythm, and slightly towards each other for better control.
- After completing your reps, gradually bring the dumbbells back to your chest area before carefully placing them back onto the floor, one at a time.
TIPS:
- Do not arch your back or wiggle your body to help lift the weights.
- Avoid lifting your head off the bench.
- Do not lock your elbows when you straighten your arms.
- Don’t allow the dumbbells to sway toward your head.
#3 SEATED MACHINE CHEST PRESS
The chest press machine is a fantastic piece of equipment, concentrating not only on enhancing your chest but also on strengthening the front side of your shoulders and your triceps. Comparable to the bench press, this apparatus offers a seated option for your exercise. One of its key benefits over the bench press lies in its capacity to offer more stability, as it doesn’t require working with free weights. This increased stability aids in isolating your chest muscles more effectively. However, be mindful when utilizing the chest press machine, particularly if you have pre-existing shoulder, elbow, or wrist conditions.
STARTING POSITION:
- First, adjust the machine to match your body type. Make sure the handles align with your mid-chest.
- Sit on the machine with your back flat against the pad.
- Grasp the handles firmly (both palms facing down, elbows out to your sides), ensuring your hands are in line with your chest and not your shoulders. The wrists should be straight.
- If the machine has a foot lever to move the handles forward, press down on the lever.
MOVEMENT:
- Push the handles away until your arms are fully extended but not locked. Exhale as you exert force.
- Hold this position for a second and then slowly let the handles come back towards you as you inhale. This completes one rep.
- Remember to keep the movement controlled both ways, don’t let the weights control you.
- Repeat the exercise for your desired number of reps.
TIPS:
- Avoid completely straightening your arms, as this could lead to your elbows locking.
- Ensure that your shoulders, head, or buttocks are firmly in contact with the padding throughout the exercise.
- Maintain a neutral spine by abstaining from arching your back excessively.
- Keep your wrists in a straight position and avoid inclining them.
- Take care not to extend your arms too far backward. Your elbows should never surpass shoulder height.
#4 SMITH MACHINE FLAT BENCH PRESS
The Smith machine can serve as an effective alternative for a barbell or dumbbell bench press, especially for those new to weightlifting. One of the key benefits of a Smith machine lies in its safety feature; it eliminates the need for a spotter as it doesn’t require you to balance the weight. If fatigue sets in, the machine’s supports make it easy to secure the bar. However, the Smith machine does have its drawbacks. The bench press exercise in this machine often follows an unnaturally straight path, as opposed to the slightly circular arc common in free weights or most high-quality machines. This aspect could potentially cause discomfort in some people’s shoulders. It also leads to less development of stabilizing muscles because you don’t have to balance the weight.
STARTING POSITION:
- Start by positioning the bench under the Smith machine bar.
- Adjust the bar to a suitable height, sit down on the bench, and grip the bar with an overhand grip and with your hands wider than your shoulder width.
- Take a deep breath and unrack the bar by pushing it upwards.
MOVEMENT:
- Lower the bar to the middle of your chest as you exhale.
- Hold for a moment, then press the bar back up to the start position while inhaling.
- Repeat for the chosen number of reps.
TIPS:
- Avoid lifting the feet off the ground or buttocks off the bench.
- Refrain from using too much weight that results in a poor range of motion or improper form.
- Do not allow your elbows to flare wide out to the side; this puts unnecessary stress on the shoulders.
- It’s crucial to keep control during a movement and refrain from bouncing the bar off your chest or arching your back. These actions can both decrease the workout’s effectiveness and risk injury to your chest muscles.
- Additionally, make sure not to drop the weight suddenly, as this can also lead to harm.
#5 REGULAR (BASIC; BODYWEIGHT) FLOOR PUSH-UPS
Renowned for their ability to bolster upper body strength and endurance, push-ups are a pivotal aspect of any strength-training regimen. By working your chest, shoulders, and triceps simultaneously, push-ups enhance your throwing ability – a beneficial quality in sports such as football and baseball. Undoubtedly, one of the greatest attributes of push-ups is their simplicity; no weights or special gear is needed, just enough space for your body length.
STARTING POSITION:
- Start by positioning yourself flat on the ground, stomach down.
- You should be in a plank position with the arms extended and the body in a straight line. Place the hands just outside shoulder width on the floor.
- Push your toes against the floor, maintaining a straight line from your head to your heels.
MOVEMENT:
- Keeping the head, neck, and spine in a neutral position, lower the chest to the floor, and touch the chest to the ground. The upper arms should be fairly tucked at a 30- to 45-degree angle relative to the torso, and the body should be kept in a straight line.
- Reverse the movement by thrusting your body upward, returning to the initial position.
TIPS:
- Common pitfalls include flaring out elbows, bending at the hips, and not going down deep enough.
- Most people want to have the elbows pointing straight out to the sides and the body in a T shape. Think of making an arrow instead.
- Remember to breathe – inhaling on your way down, and exhaling as you push up. Conscious and controlled breathing greatly enhances the effectiveness of push-ups.
#6 FLAT BENCH DUMBBELL FLY
When it comes to strengthening and defining the middle chest, the flat bench dumbbell fly exercise shines as one of the most effective exercises. It’s an isolation exercise that squarely targets your pectoral muscles, specifically focusing on the pectoralis major sternal head – the middle chest area. This movement works not just your middle chest, but also stimulates your deltoids and bicep muscles, encouraging overall upper body strength and stability.
STARTING POSITION:
- Start by lying flat on the bench with your feet firm on the ground.
- Grip the dumbbells in each hand with your palms facing each other and extend your arms above your chest.
- Keep a slight bend in your elbows.
MOVEMENT:
- Lower the dumbbells out to the sides in a controlled semicircular (in an arc) movement until you feel a stretch in your chest.
- Pause briefly at the bottom of the movement before bringing the dumbbells back up to the starting position, maintaining the slight bend in your elbows.
- Concentrate on using your pecs to power the lift.
- Repeat the exercise for your desired number of repetitions.
TIPS:
- Ensure that the motion is slow and controlled – this isn’t an exercise that benefits from momentum.
- Avoid arching your back to help raise the dumbbells.
- Maintain your elbow angle throughout the exercise; don’t straighten or overbend your elbows.
- Avoid letting the dumbbells touch at the top of the movement for maximum tension in your chest muscles.
- Lowering the dumbbells too far (below your shoulders) can also put excessive strain on your shoulder joints.
#7 FLAT BENCH CABLE FLYES
For those desiring a chiseled chest, flat bench cable flyes make an excellent isolation exercise to carve and define your pectorals. Essentially this middle chest exercise mirrors the flat bench dumbbell flyes, the difference being the use of cables instead of free weights. The effectiveness of flat bench cable flyes surpasses that of dumbbell flyes due to the persistent resistance provided by the cables throughout the complete motion of this exercise. This means there’s no “resting point”—your chest muscles remain engaged at all stages during the exercise.
STARTING POSITION:
- Position yourself on a flat bench placed between two cable machines.
- Grab the cable handles with each of your hands. Note that your grip should be neutral (palms facing each other).
- Lie down on the bench with your feet firmly planted on the ground. This is your starting position.
MOVEMENT:
- Initiate the exercise by pulling your hands together in a wide arc, maintaining a slight bend at your elbows. Imagine you’re hugging a large tree. This is where the ‘flye’ comes into the name. The movement should be controlled but powerful, and your chest muscles should be doing the work, not your arms.
- As you bring your hands together, squeeze your chest muscles. This is the most efficient way to target the middle chest. After holding this contraction for a moment, lower your arms back to the starting position. Maintain the bend in your elbows and control the movement. Don’t let the weights simply drop.
TIPS:
- Aim for smooth, controlled motion and concentrate on the muscle group you’re working on.
- You should feel a stretch in your chest and deltoids, but there shouldn’t be any pain.
- To prevent stress on the biceps tendon, make sure to maintain a slight bend in your elbows throughout the entire range of motion instead of keeping your arms completely straight.
#8 MACHINE FLY EXERCISE
The chest fly machine is an exceptional tool for honing the definition of your chest, specifically focusing on its outer and middle divisions. This middle chest exercise effectively targets and isolates the pectoral muscles, without involving the triceps, providing optimal focus on chest development. This formidable device replicates the same muscular engagement as achieved during a dumbbell fly. Yet, the pec fly machine has the added advantage of granting added stability, thereby presenting itself as an easier alternative to the dumbbell fly. This stability allows you to venture with slightly elevated weights when using the pec fly machine. However, it’s important to exercise caution if you’re prone to shoulder, elbow, or neck issues while employing this equipment.
STARTING POSITION:
- To begin, adjust the machine to suit your body shape. This will involve setting the seat height so that your shoulder aligns with the machine’s handles when seated.
- Next, grasp the handles with a firm but comfortable grip, ensuring your palms are facing inward. In this position, your elbows will be slightly flexed and your upper arms and forearms should be parallel with the floor.
- Lean back against the padding, engaging your core and keeping your spine neutral.
MOVEMENT:
- Slowly push your hands together in a sweeping arc, just as a bird would flap its wings. Keep a slight bend in your elbows to avoid straining your joints.
- Pause when your hands meet in the middle, squeezing your chest muscles momentarily before reversing the motion.
- Open your arms wide again, but do not let your elbows move beyond your body. This control ensures that your chest muscles are engaged throughout the exercise, not your momentum.
- Repeat this motion for a set number of reps, adjusting your weight or sets as needed to challenge your chest muscles.
TIPS:
- While performing the exercise, imagine a broad arc motion with your elbows just slightly bent, like you’re hugging someone. Touch the handles in front of your chest.
- Upon the knuckles touching, contract your chest muscles with a sense of care to avoid trapping your fingers between the handles.
- Ensure a steady, wide arc motion of the pads. Any jerky movements will compromise the effectiveness of the exercise by reducing the work on your pectoral muscles.
- If you notice that you’re throwing the weights onto the stack between repetitions, it’s an indication that you’re moving too swiftly.
- Avoid pulling your arms too far back since it could lead to possible shoulder injuries.
- Maintain your posture during the workout by not bending your wrists or elevating your shoulders.
#9 PEC-DECK FLY (BUTTERFLY)
Although both the pec deck and the fly machine harness the same set of muscles, their operational mechanisms, and consequent benefits have certain distinctions. The significant variance lies in the elbow angle. Unlike the near-straight arm posture required with a fly machine, the pec deck involves a drastically angular presence of elbows.
The fly machine incorporates vertical handles, which position the weight far out on each side. Consequently, your body must rally a more substantial amount of muscle fibers from your inner chest to stabilize and move this weight. It therefore enables a deeper stretch of the muscle, thus ultimately proving more efficient in muscle mass development compared to the pec deck machine.
The pec deck machine, on the other hand, features arm pads for resting the inside of your elbows and forearms. It maintains your elbows at an approximately 90-degree angle throughout the motion. Striking the fine balance between these exercises could lead to optimum benefits for your chest muscles.
STARTING POSITION:
- Adjust the seat on the machine so that your arms are at the level of your chest. This helps primarily with optimal muscle engagement.
- Take a seat and firmly place your feet flat on the ground. This position provides essential stability during the movement.
- Place your elbows and forearms on the pads. Your elbows are flexed at about 90º at the mid-chest level. This ensures the right posture for the exercise.
MOVEMENT:
- Slowly start to push the handles together. It’s important to use your chest muscles for this movement and avoid straining your arms or shoulders too much.
- When your hands meet in the middle, try to hold the position for a second. This momentary pause increases muscle tension and yields better results. But remember to exhale as you push the handles.
- Slowly return to the starting position while breathing in. This completes a single repetition of the exercise.
TIPS:
- Focus on maintaining slow and controlled movements throughout the exercise. Fast movements can lead to injury and reduce the exercise’s effectiveness.
- Ensure your head, shoulders, and back are firm against the seat back while sitting.
Full list of middle chest exercises
Maintaining low body fat levels
To showcase a well-defined middle chest, it’s essential to maintain low body fat levels. While developing the chest muscles is important, excess body fat can hide the definition and shape of the chest. By reducing body fat through a combination of proper nutrition and regular exercise, you can enhance the visibility of your middle chest.
Engaging in cardiovascular exercises such as running, cycling, or swimming can help burn calories and reduce overall body fat. Additionally, incorporating strength training exercises that target multiple muscle groups, including the chest, can increase muscle mass and boost metabolism. This combination of cardiovascular and strength training exercises can contribute to maintaining low body fat levels and achieving a more defined middle chest.
It’s important to note that body fat distribution varies from person to person. While some individuals naturally carry more fat in the chest area, others may have a leaner chest. By focusing on overall body fat reduction, you can optimize the visibility of your middle chest regardless of your natural body composition.
Consistency is key
Lastly, consistency is key when it comes to developing chest area. Consistently challenging the chest muscles through a variety of exercises and gradually increasing the intensity can lead to significant improvements over time. Alongside consistency in training, maintaining a balanced and nutritious diet is crucial for muscle growth and overall chest development.
Closing thoughts: Best Exercises for Building Middle-Chest Mass and Strength
To effectively target the chest muscles as a whole, it’s important to incorporate a variety of exercises that stimulate different areas of the chest. Your middle chest (middle fibers) is one of three areas you have to cover. The other two areas are the upper and lower fibers of the pectoral muscle. So make sure you always incorporate one or two exercises that target your middle chest area into your chest workout. Based on extensive research and expert recommendations, we have compiled a list of the best middle-chest exercises for muscle growth. The exercises presented in this article will add size and mass to your chest and stimulate muscle growth (hypertrophy) in the shortest time. Also, these exercises are useful for developing functional strength – supporting your everyday life and sports activities.
Literature consulted
- "Strength Training Anatomy" by Frederic Delavier:
- This book provides a detailed look at the anatomy of muscles involved in strength training exercises, including illustrations and explanations.
- "Encyclopedia of Bodybuilding" by Arnold Schwarzenegger:
- Arnold Schwarzenegger, a legendary bodybuilder, shares his knowledge on training techniques, exercise routines, and nutrition.
- "The New Rules of Lifting" by Lou Schuler and Alwyn Cosgrove:
- This book combines strength training principles with practical advice, including detailed workout plans for different goals.
- "Bodyboss Ultimate Guide" by Polly Hayden:
- A comprehensive guide covering exercises, nutrition, and workout plans suitable for all fitness levels.
- "The Women's Health Big Book of Exercises" by Adam Campbell:
- Specifically tailored for women, this book offers a variety of exercises targeting different muscle groups, accompanied by detailed instructions.
- "Jim Stoppani's Encyclopedia of Muscle & Strength" by Jim Stoppani:
- Dr. Jim Stoppani provides science-based insights into muscle and strength development, along with workout programs and exercise demonstrations.
- "Delavier's Women's Strength Training Anatomy Workouts" by Frederic Delavier and Michael Gundill:
- Tailored for women, this book combines anatomy and exercise programs to help women achieve their fitness goals.
- "Strength Training for Fat Loss" by Nick Tumminello:
- Focused on the combination of strength training and fat loss, this book includes exercises and workouts designed for efficient and effective training.
- "The Complete Book of Abs" by Kurt Brungardt:
- While specifically targeting the abdominal muscles, this book also covers overall core strength and stability exercises.
- "High-Intensity Training the Mike Mentzer Way" by Mike Mentzer and John R. Little:
- Mike Mentzer's approach to high-intensity training, including workout routines and exercise descriptions for muscle growth.
