


Introduction
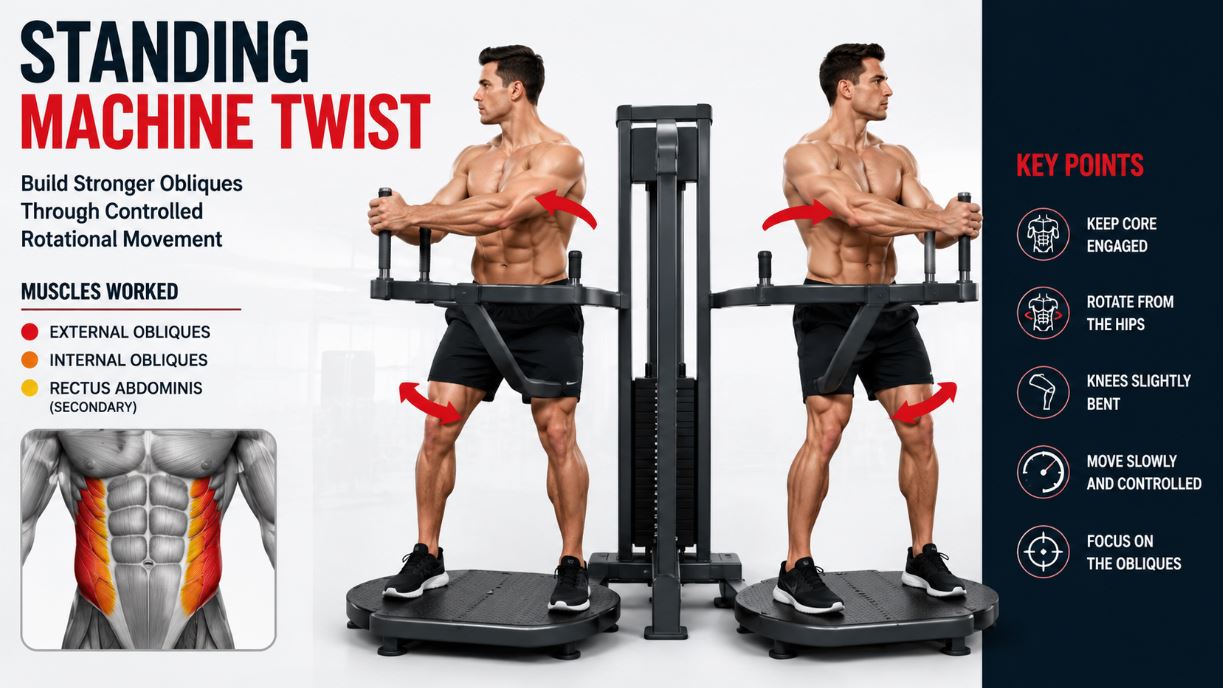
The standing machine twist is one of those gym fixtures that attracts two very different kinds of trainees: beginners who believe it will melt fat from their waistline, and experienced lifters who walk straight past it on the way to the cable stack. Both are making a mistake — the first group for the wrong reasons, the second group for dismissing a genuinely useful tool.
Let me be direct about what this exercise is and what it is not. The standing machine twist — also called the standing torso twist machine, standing rotary torso machine, or standing waist twist machine — does not reduce waist fat. No exercise does that selectively. What it does is activate and train the obliques through a standing, pelvis-initiated rotation pattern with the upper body fixed — a movement direction that is genuinely distinct from both the broomstick twist and most cable-based oblique exercises. When the machine is used correctly, with controlled rotation and genuine oblique engagement, it provides a meaningful training stimulus. When it is used incorrectly — which usually means letting the platform spin under momentum while the muscles disengage — it is, as one description I once read put it, completely useless.
The machine is also legitimately dangerous if performed carelessly. The rotating platform, combined with momentum and fixed knee position, creates conditions for knee and lower back injury that require conscious technique to avoid. This is not a machine you switch off your brain on.
Exercise Snapshot
Muscles Worked in the Standing Machine Twist
Primary muscles
- External obliques — on the side toward which the pelvis rotates, the external obliques work concentrically to drive the rotation; on the opposite side, they work eccentrically to control the descent and reverse direction
- Internal obliques — work alongside the external obliques throughout; the internal oblique on one side and the external oblique on the opposite side work together to produce each rotational direction
Secondary muscles
- Rectus abdominis — stabilizes the anterior trunk and assists with maintaining the upright torso position against the rotational forces
- Transverse abdominis — braces the spine and maintains intra-abdominal pressure throughout the movement
Antagonists
The same obliques on the opposite side of the body lengthen under control during the rotation and contract to drive the return and continuation in the opposite direction.
One mechanical note worth understanding: the standing machine twist rotates the lower body toward a fixed upper body — the opposite of the Russian twist, where the upper body rotates toward fixed legs. This reversal of direction trains the obliques in their role as controllers of lower body rotation, which has direct carryover to athletic movements where the hips drive rotation while the torso stabilizes — throwing, swinging, kicking, and changing direction.
How to Do a Standing Machine Twist: Step-by-Step Form Guide
Starting position
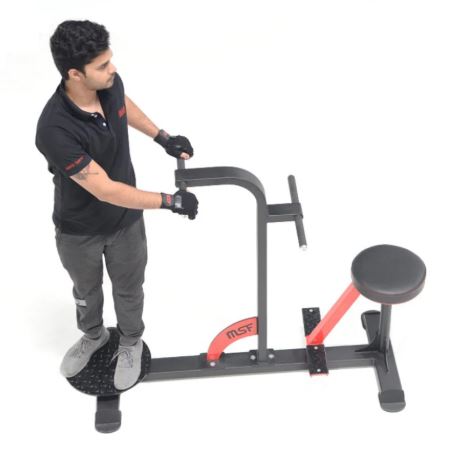
- Stand on the machine’s rotating platform with feet approximately shoulder-width apart and knees slightly bent — never locked
- Grasp the handles firmly with both hands
- Position the torso upright — chest up, shoulders back, head facing forward, neutral spine
- Before beginning, engage the abdominal muscles to stabilize the torso; the core brace must be in place before the first rotation begins

Execution
- Slowly rotate the platform to one side by contracting the obliques — think of the movement as rotating the rib cage and pelvis together as one unit, not twisting the lower back
- Keep the upper body stable and aligned with the handles throughout; the handles are fixed, and the upper body stays with them while the hips and pelvis follow the platform
- Rotate only as far as you can comfortably control without pain or excessive twisting of the knees or lower back — typically around 90 degrees total arc, or 45 degrees each side
- Pause briefly at the end range and consciously contract the obliques
- Reverse the movement under control, rotating through center and continuing to the opposite side
- Continue alternating sides in a slow, deliberate rhythm — maintain constant abdominal tension throughout; never let the platform coast between reps

The key coaching cue: Focus on feeling the obliques controlling the movement rather than simply spinning the platform from side to side. If the platform is moving faster than you are consciously driving it, momentum has taken over, and the obliques have switched off. Slow down until every degree of rotation is driven by muscle contraction, not inertia.
5 Common Standing Machine Twist Mistakes (And How to Fix Them)
1. Using momentum to spin the platform
This is the most common mistake on this machine — and the one that makes it dangerous. When the platform spins freely under momentum, the obliques disengage and the ligaments and smaller muscles of the spine are left to restrain the movement at the end range. That is how lower back injuries happen on this machine. Every rep must be initiated and controlled by the obliques. If the platform is rotating faster than your deliberate muscular effort is driving it, slow down immediately and reduce the range of motion until control is restored.
2. Locking the knees
The knees must remain slightly bent throughout the entire movement. Locked knees on a rotating platform create significant torsional stress at the knee joint as the platform rotates beneath the fixed knees. This is a genuine injury mechanism — I have seen knee problems develop in trainees who consistently used this machine with their legs straight. Slightly bent knees allow the knee joint to accommodate the rotation safely.
3. Excessive range of motion
More rotation is not better on this machine. Rotating beyond the range the obliques can control transfers the load to passive structures — spinal ligaments, joint capsules, and intervertebral discs — that are not designed to absorb rotational forces under load. Work within a range that feels fully controlled at all times. For most trainees, that is significantly less than the machine’s full range of motion.
4. Rotating from the lower back rather than the thoracic spine and hips
The lumbar spine has very limited rotational capacity — approximately 5 degrees per segment — and forcing rotation through it creates disc stress. The rotation should come from the hips and thoracic spine, with the lumbar spine remaining as stable as possible. Think of the lower back as a connector between the moving hips and the stable upper body, not as a joint that is itself rotating.
5. Holding the breath
Some trainees hold their breath throughout a set, particularly when focusing on core bracing. The standing machine twist should be performed with natural breathing in short intervals — exhale during one direction, inhale on the return. Sustained breath-holding increases intra-thoracic pressure and can cause dizziness, particularly on a rotating platform.
Benefits of the Standing Machine Twist
Lower body-initiated rotation pattern
The standing machine twist targets the obliques in a lower-body rotation pattern — the hips and pelvis rotate while the upper body stays fixed. This is the same pattern as the hip crossover, but in a standing position with a fixed platform providing a guided range of motion. That standing lower-body rotation pattern carries directly over into athletic movements that require the hips to drive rotation while the upper body stabilizes.
Safe introduction to rotational training
The fixed handles and the guided platform range of motion make the standing machine twist one of the safer introductions to rotational oblique training for beginners or trainees returning from injury. The handles provide upper-body stability, removing the balance and coordination demands of free-standing rotational exercises.
Consistent rotational stimulus
Unlike the broomstick twist where resistance is essentially zero, the machine platform provides a consistent rotational stimulus through the guided movement. For trainees who want oblique activation beyond what the broomstick twist offers but are not yet ready for loaded cable or Russian twist work, the machine provides a useful intermediate step.
Accessible for trainees with limited mobility
The standing position and the machine-guided range of motion make this exercise accessible for trainees who cannot comfortably perform seated or supine rotational exercises. For older adults or those with hip or lumbar stiffness that limits floor-based work, the standing machine twist offers a viable option for oblique rotation.
Who Should Use This Exercise
- Beginners who want a machine-guided introduction to rotational oblique training before progressing to free-standing or loaded rotational exercises
- Trainees returning from lower back issues who need a controlled, limited-range rotational exercise that does not place excessive demand on the lumbar structures — provided the technique is strict and the range of motion is conservative
- Older adults who need a standing rotational exercise with machine support and a fixed range of motion
- Athletes in rotational sports who want a standing lower-body-rotation drill as part of their warm-up or activation work — golfers, tennis players, baseball players, and martial artists all involve this movement pattern
Who Should Be Cautious
- People with knee problems — the rotating platform creates torsional stress at the knee joint; anyone with existing knee pathology should get clearance from a physiotherapist before using this machine
- People with lumbar disc issues — rotational exercises can aggravate certain lumbar pathologies; get physiotherapy clearance and work within a very conservative range of motion if cleared
- Anyone expecting fat loss from this exercise — the standing machine twist does not selectively reduce waist fat or love handles; it trains the obliques, and fat loss is governed by overall energy balance, not by which muscles are exercised
- Advanced trainees seeking maximum oblique stimulus — the machine twist provides moderate oblique activation; for serious oblique development, cable oblique crunches, standing cable oblique crunches, and roman chair side bends provide superior stimulus
How to Make It Easier or Harder
Easier
- Reduced range of motion — rotating through a smaller arc reduces the oblique demand and the momentum risk; the appropriate starting point for beginners or those with limited rotational mobility
- Slower tempo — a slower, more deliberate rotation pace makes it easier to control the movement and feel the obliques working rather than relying on momentum
Harder
- Extended hold at end range — pausing for two to three seconds at the end of each rotation with a deliberate oblique contraction dramatically increases the time under tension
- Longer sets — the standing machine twist responds well to longer sets; 30 to 50 controlled reps per set increases metabolic demand and oblique endurance stimulus
- Reduced rest between sets — shorter rest periods between sets increase the cardiovascular and endurance demand without changing the rotational mechanics
Standing Machine Twist vs. Broomstick Twist
Both exercises train the obliques through standing rotation with light or no resistance, but the mechanical setup and the movement direction differ in meaningful ways.
| Standing Machine Twist | Broomstick Twist | |
|---|---|---|
| What rotates | Lower body — hips and pelvis | Upper body — torso and shoulders |
| What is fixed | Upper body — held by handles | Lower body — seated or standing |
| Equipment | Rotary twist machine | Bar or broomstick |
| Resistance | Platform weight — minimal | None |
| Range of motion | Machine-limited | Full thoracic range |
| Knee demand | Moderate — rotating platform | Low — lower body fixed |
| Best for | Standing lower-body rotation pattern | Thoracic mobility, warm-up |
| Difficulty | Beginner | Beginner |
The practical takeaway: Both exercises serve similar roles as activation and warm-up tools rather than primary strength movements. The broomstick twist is the better thoracic mobility exercise — the upper body rotates freely through its full range. The standing machine twist is the better lower-body rotation training tool — the hips and pelvis drive the movement while the upper body stays fixed. I program both in warm-up sequences for athletes who need complete rotational preparation, using the broomstick twist for thoracic mobility and the standing machine twist for hip rotation activation.
Exercise Variations
Rotary Torso Machine
The rotary torso machine is the seated or kneeling version of machine-based trunk rotation — and the more loaded of the two options. Unlike the standing machine twist where the lower body rotates on a platform while the upper body stays fixed, the rotary torso machine reverses that pattern: the upper body rotates against a weighted stack while the lower body is fixed by the machine’s pads and platforms. That reversal trains the obliques in the upper-body-rotation direction, making it a natural complement to the standing machine twist in a complete rotational oblique program.

Seated Rotary Torso Machine
The seated rotary torso machine is the most common configuration of rotary torso training in commercial gyms. The trainee sits with the chest against a pad, lower body fixed by thigh pads and foot platforms, and rotates the upper body against a weighted resistance stack. Compared to the standing machine twist, the seated version provides meaningful resistance through the weight stack, a fully supported body position, and measurable progressive overload — making it the better choice when oblique strength and hypertrophy are the primary goal rather than activation and warm-up.

Broomstick Twist Superset
Performing a set of standing machine twists immediately followed by a set of broomstick twists — or vice versa — provides a complete rotational warm-up that covers both lower-body-initiated and upper-body-initiated rotation in a single superset. Useful as a pre-training activation sequence for rotational sports athletes.

Replacement Exercises (Alternatives)
If the standing machine twist is not available or not the right fit, these exercises target the same primary muscle group:
- Russian Twist – Oblique Trunk Rotation
- Twisting Cable Crunch
- Hip Crossover
- Heel Touches
- Standing Cable Oblique Crunch
- Dumbbell Side Bend
- Lateral Crunch
- Cross-Over Crunch
- Bicycle Crunch
- Decline Twisting Sit-Up
- Roman Chair Side Bend
- Hanging Windshield Wiper
- Hanging Oblique Knee Raise (Hanging Oblique Crunch)
- Side Jackknife: Double Leg Double Side Jackknife
- Landmine 180s
How To Incorporate the Standing Machine Twist Into Your Workouts
- As a warm-up movement — 2 to 3 sets of 20 to 30 controlled rotations at the beginning of a core session or before rotational sports practice; this is the primary application for most trainees
- As a low-intensity oblique finisher — at the end of a core session when the primary oblique exercises are complete, a high-rep set of standing machine twists provides additional activation volume without meaningful additional fatigue
- Paired with the broomstick twist — superset for a complete rotational warm-up covering both lower-body and upper-body rotation patterns
- Rep range: 20–40 reps per set — best results are obtained with longer sets at a slow, controlled pace; this is not an exercise suited to low-rep heavy loading
- Sets: 2–3 sets
- Frequency: 2–3 times per week as part of a core training program, or daily as a warm-up tool at low intensity
- Tempo: Slow and deliberate — two to three seconds per side with a brief pause at each end range; never fast or momentum-driven
- Not as a primary oblique strength exercise — if oblique hypertrophy or strength is the goal, more loaded exercises should be the primary stimulus; the standing machine twist supplements rather than replaces those movements
Conclusion
The standing machine twist occupies a specific and legitimate niche in oblique training — activation, mobility, and low-intensity rotational work — that it fills better than most alternatives. The problem is that it rarely gets used for that purpose. Instead, it gets used carelessly, at high speed, with the platform spinning freely while the trainee holds the handles and watches.
Done that way, it is dangerous and useless in equal measure. Done correctly — slow, controlled, oblique-driven rotation with a deliberate pause at each end range — it is a genuinely useful tool for training the lower-body rotation pattern that most other oblique exercises do not address.
Keep the knees bent, keep the tempo slow, keep the momentum out of it, and keep your expectations realistic about what a machine with no meaningful resistance can deliver. Use it for what it is — an activation and warm-up tool — and it will earn its place in your program.
Want to explore the full range of oblique training? Check out our guide to best oblique exercises for definition. For a well-rounded ab and core program, see our guides to upper ab, lower ab, and core exercises.
Frequently Asked Questions
Is the standing machine twist the same as the seated rotary torso machine?
No — they are related but mechanically different exercises. In the standing machine twist, the feet and hips rotate on a platform while the upper body is stabilized by fixed handles — the lower body drives the rotation. In the seated rotary torso machine, the trainee sits on a fixed seat and the upper body rotates against a pad — the upper body drives the rotation. Both train the obliques through rotation, but in opposite directions. The seated version typically provides more resistance and is generally a more effective tool for oblique strength development. The standing version is better suited for lower-body rotation activation and warm-up purposes.
Why do I feel the standing machine twist in my hips and knees rather than my obliques?
Two likely causes. First, the tempo is too fast — when the platform rotates quickly under momentum, the obliques disengage and the passive structures of the hips and knees absorb the rotational forces at the end range. Slow down significantly and focus on consciously driving each degree of rotation with the obliques. Second, the knees may be too straight — locked knees on a rotating platform create torsional stress at the knee joint rather than allowing the rotation to be absorbed naturally through a slightly flexed position. Keep the knees consistently soft throughout the entire set. If knee discomfort persists regardless of technique, stop and consult a physiotherapist before continuing.
How does the standing machine twist compare to cable wood chops for oblique training?
They are fundamentally different in training stimulus. The cable wood chop is a loaded, diagonal pulling movement that trains the obliques through a combination of rotation and flexion against meaningful cable resistance — it produces real oblique strength and hypertrophy. The standing machine twist uses minimal resistance and trains pure rotation in the standing position — it provides oblique activation and lower-body rotation patterning without meaningful loading. For oblique development, the cable wood chop is the superior tool by a significant margin. The standing machine twist is better understood as an activation and mobility exercise that complements loaded work rather than replacing it.
Reviewed by a Fitness Professional: The exercise technique, muscles worked, and training recommendations presented in this guide were reviewed by Tomislav G., Certified Fitness Instructor , who specializes in personalized training, injury recovery, and human anatomy.
