

Introduction
The seated rotary torso machine is the most common configuration of the rotary torso machine found in commercial gyms — and the one most trainees sit down on without adjusting a single setting before loading the weight stack. That combination of poor setup and excessive loading is why this machine has a reputation for being ineffective. The reputation is undeserved. The setup habits are not.
When the machine is adjusted correctly — chest pad at the right height, starting position set, resistance honest — the seated rotary torso machine provides one of the most isolated and measurable oblique training stimuli available in a gym setting. The chest pad locks the upper body in place, the thigh pads and foot platforms fix the lower body, and what remains is pure upper-body-initiated trunk rotation against a weighted stack. The obliques have nowhere to hide and no other muscle group to hand the work to.
I use this machine regularly with clients who are new to loaded oblique training and with athletes who need to identify and correct left-right rotational strength asymmetries. The machine’s guided range of motion makes technique accessible, the weight stack makes progression measurable, and the bilateral independent setup makes asymmetries immediately obvious. Those are genuine practical advantages that free-standing rotational exercises do not offer in the same way.
The critical caveat — and I will keep returning to this throughout the article — is weight selection. The seated rotary torso machine is not a machine for heavy loading. The obliques are a rotational stabilization muscle group, not a prime mover in the same sense as the quadriceps or lats. They respond to controlled, moderate-load training with a genuine pause at end range. Loading beyond that consistently produces compensation — hip rocking, lumbar rotation, momentum — that defeats the machine’s purpose entirely.
Exercise Snapshot
Muscles Worked in the Seated Rotary Torso Machine
Primary muscles
- External obliques — on the side toward which the torso rotates, the external obliques work concentrically to drive the rotation; on the opposite side they lengthen under control during the rotation and contract to drive the return
- Internal obliques — work in concert with the external obliques; the internal oblique on one side and the external oblique on the opposite side team up to produce rotation in each direction
Secondary muscles
- Rectus abdominis — stabilizes the anterior trunk throughout the rotation and assists with maintaining upright posture against the resistance
- Transverse abdominis — braces the spine and maintains intra-abdominal pressure throughout the movement
- Erector spinae — assists with maintaining the upright trunk position against the rotational forces
Antagonists
The obliques on the opposite side of the body lengthen under control during rotation and contract to drive the return and continuation in the opposite direction.
One thing worth noting about this machine specifically: the chest pad plays a more active role than most trainees realize. By pressing the chest firmly into the pad and maintaining that contact throughout the rotation, the trainee creates a fixed reference point that makes it much harder to compensate with hip movement or shoulder shrugging. Lose chest-pad contact, and the isolation disappears. Maintain it and the obliques have to do the work.
How to Use the Seated Rotary Torso Machine: Step-by-Step Form Guide
Starting position
- Adjust the seat height so the chest pads rest comfortably across the upper chest and shoulders — not at the throat and not at the stomach; mid-chest is the target
- Set the starting position on the machine and select a resistance that allows complete control through the full range of motion
- Sit upright with the chest firmly against the pads and feet securely on the foot platforms
- Grasp the handles and squeeze the thigh pads with the legs to stabilize the lower body
- Brace the core and establish a neutral spine before beginning — this bracing must be in place before the first rotation starts, not applied reactively once the weight is moving

Execution
- Begin the movement by slowly rotating the upper body away from the starting position — initiate with the obliques, not by pulling with the arms. Allow the torso to rotate while keeping the hips and legs fixed.
- Keep the chest firmly against the pads throughout the rotation — if the chest loses contact with the pad, the torso is compensating with something other than oblique rotation
- Continue rotating until a comfortable end range is reached — typically 45 to 90 degrees depending on machine design and individual thoracic rotation mobility
- Pause briefly at the end position and consciously contract the obliques — this pause is not optional; it is where the peak stimulus lives
- Exhale during the rotation; inhale during the return
- Slowly reverse the movement and return to the starting position under full control — do not allow the weight stack to slam down or the machine to pull the torso back
- Maintain constant muscular tension throughout — the weight stack should never rest on the bottom between reps
- Complete all reps on one side before adjusting the machine and training the opposite direction
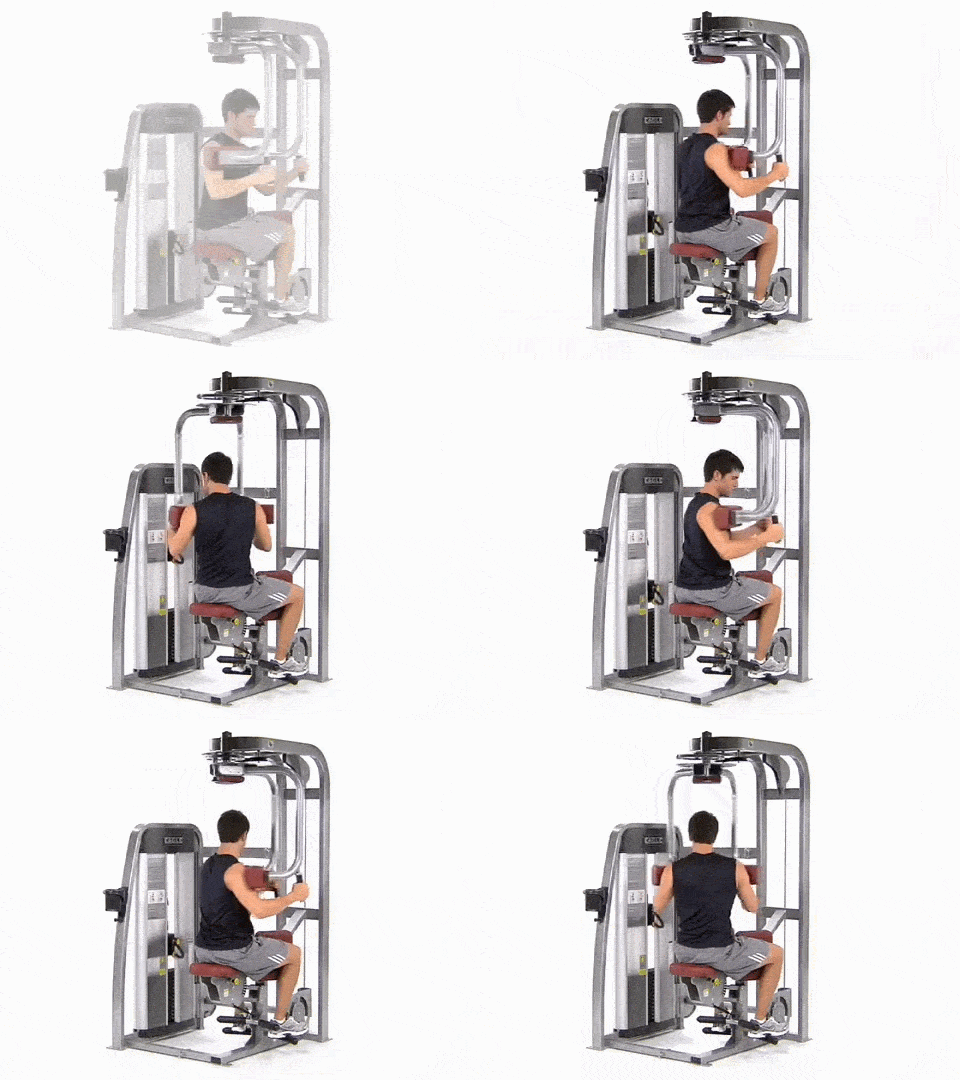
The key coaching cue: Initiate with the obliques, not the arms. The handles are grip points — they are not levers to pull. If the arms are generating force to move the machine, the obliques are not doing their job. Think of the arms as passive connections between the torso and the handles. The rotation comes from the mid-back and obliques driving the torso, with the arms simply transmitting that force to the machine.
5 Common Seated Rotary Torso Machine Mistakes (And How to Fix Them)
1. Incorrect seat height adjustment
This is the setup error that undermines more seated rotary torso machine sets than any other. If the chest pad is too high, the rotation axis does not align with the thoracic spine, making the movement feel awkward and uncomfortable. If it is too low, the pad rests on the stomach rather than the chest, providing insufficient upper-body support. Mid-chest pad contact, hips and knees at approximately 90 degrees — take the time to get this right before loading the weight.
2. Using the arms to pull the machine
The most common execution error. When the arms pull the handles rather than the obliques driving the torso rotation, the lats and shoulder muscles become the primary movers and the obliques are largely bypassed. The fix is deliberate: before each set, consciously release any tension in the arms and focus entirely on feeling the mid-back and lateral torso initiating the movement. If you feel this primarily in your shoulders or lats rather than your obliques, your arms are too involved.
3. Losing chest pad contact during rotation
When the chest lifts away from the pad during rotation, the upper body compensates — typically by leaning forward or shifting laterally — to extend the apparent range of motion beyond what the obliques can actually drive. That compensation moves the load from the obliques to the lumbar spine and hip structures. Keep the chest pressing into the pad throughout every rep. If you cannot maintain pad contact through the full intended range, reduce the range until the obliques are strong enough to support it.
4. Allowing the weight stack to drop between reps
Letting the weight plates rest on the stack between reps releases all tension from the obliques and allows a jerky, momentum-assisted start to the next rep. Keep the weight slightly elevated throughout the set — a small but consistent muscular effort that maintains oblique tension from the first rep to the last. This continuous tension is one of the primary advantages of machine-based oblique training and should not be discarded.
5. Ignoring the range of motion limiter
Most seated rotary torso machines have a range-of-motion adjustment that limits how far the machine can rotate. Many trainees ignore this and rotate to the machine’s full available range regardless of their individual thoracic mobility. Excessive rotation forces the lumbar spine to compensate for the thoracic spine’s mobility limits — which is both ineffective and potentially injurious. Set the limiter to a range that feels fully controlled at the obliques, with no lumbar compensation, and adjust it outward gradually as thoracic mobility improves.
Benefits of the Seated Rotary Torso Machine
Precise progressive overload on the obliques
The weight stack provides exact, incrementally adjustable resistance that makes oblique progression measurable and predictable. Adding one plate when the current weight is consistently controlled with full range and no compensation is straightforward — the same progressive overload logic that applies to any resistance exercise. Few other oblique exercises offer this level of precision.
Upper and lower body both fixed
The chest pad, thigh pads, and foot platforms address both upper- and lower-body contact points simultaneously. This dual fixation constrains the movement more completely than other rotational exercises and forces the obliques to generate every degree of rotation without assistance from hip shift, shoulder shrug, or leg drive. That constraint is genuinely valuable for oblique isolation.
Accessible for trainees with limited coordination
The guided range of motion and the fixed body positions remove the balance, stability, and coordination demands that make cable and free-standing rotational exercises more technically complex. A beginner can learn to feel the obliques working on this machine before progressing to more demanding rotational variations.
Bilateral asymmetry identification
Working each side independently and comparing the weights used or the perceived effort on each side makes left-right oblique strength discrepancies immediately apparent. That bilateral assessment is genuinely useful — oblique asymmetries are common and often go undetected in exercises that alternate sides within the same set.
Who Should Use This Exercise
- Beginners learning to isolate and feel the obliques working under load for the first time — the guided movement and fixed body positions make the oblique contraction more perceptible than most free-standing alternatives
- Trainees focused on oblique hypertrophy who want measurable, progressive loading on the obliques with precise weight increments
- People with lower back sensitivity who need a supported rotational oblique exercise — the chest pad and fixed lower body reduce lumbar stress compared to unsupported rotational alternatives
- Athletes and trainees with rotational strength asymmetries who need to train each side independently with measurable loads
Who Should Be Cautious
- People with lumbar disc issues — loaded trunk rotation can aggravate certain lumbar pathologies even with machine support; physiotherapy clearance is recommended before programming this exercise
- People with shoulder or chest wall issues — sustained pressure from the chest pad against the upper chest and shoulders can aggravate certain shoulder conditions; adjust the pad position or choose an alternative if chest or shoulder discomfort occurs
- Anyone who consistently overloads this machine — if the reflexive response to any exercise is to add weight before technique is established, the seated rotary torso machine will reinforce poor oblique training habits rather than correct them
How to Make It Easier or Harder
Easier
- Lighter resistance — the most direct regression; reduce the weight until the full range of motion is achievable with chest pad contact maintained and no arm pulling throughout
- Reduced range of motion — use the machine’s range of motion limiter to restrict the arc to a shorter, more controllable range while the oblique strength and thoracic mobility develop
Harder
- Heavier resistance with maintained technique — add one plate increment when 4 sets of 15 controlled reps are consistently achievable with neutral spine and no compensation
- Extended pause at end range — holding the peak contraction for two to three seconds significantly increases time under tension without adding weight
- Slower eccentric — three to four seconds on the return phase increases eccentric oblique demand and eliminates any residual momentum
Seated Rotary Torso Machine vs. Standing Cable Oblique Crunch
Both exercises train the obliques with adjustable resistance, but the movement patterns, body positions, and practical advantages differ meaningfully.
| Seated Rotary Torso Machine | Standing Cable Oblique Crunch | |
|---|---|---|
| Movement pattern | Trunk rotation | Lateral spinal flexion |
| Body position | Seated — fully supported | Standing — unsupported |
| Oblique function trained | Rotation | Lateral flexion |
| Lower body stability | Machine-fixed | Self-maintained |
| Progressive overload | Precise — stack increments | Precise — stack increments |
| Lumbar support | Yes — chest pad | No |
| Best for | Oblique rotation, beginners, asymmetry correction | Oblique lateral flexion, functional stability |
The practical takeaway: These exercises train the obliques through different movement patterns — rotation versus lateral flexion — and should be treated as complements rather than substitutes. The seated rotary torso machine is the better choice for isolated oblique rotation with maximum support and measurable loading. The standing cable oblique crunch is the better choice when the goal is lateral flexion with a functional stability demand. A complete oblique program benefits from both—I typically use the seated rotary torso machine for rotation and the standing cable oblique crunch for lateral flexion in the same session.
Exercise Variations
Standing Machine Twist
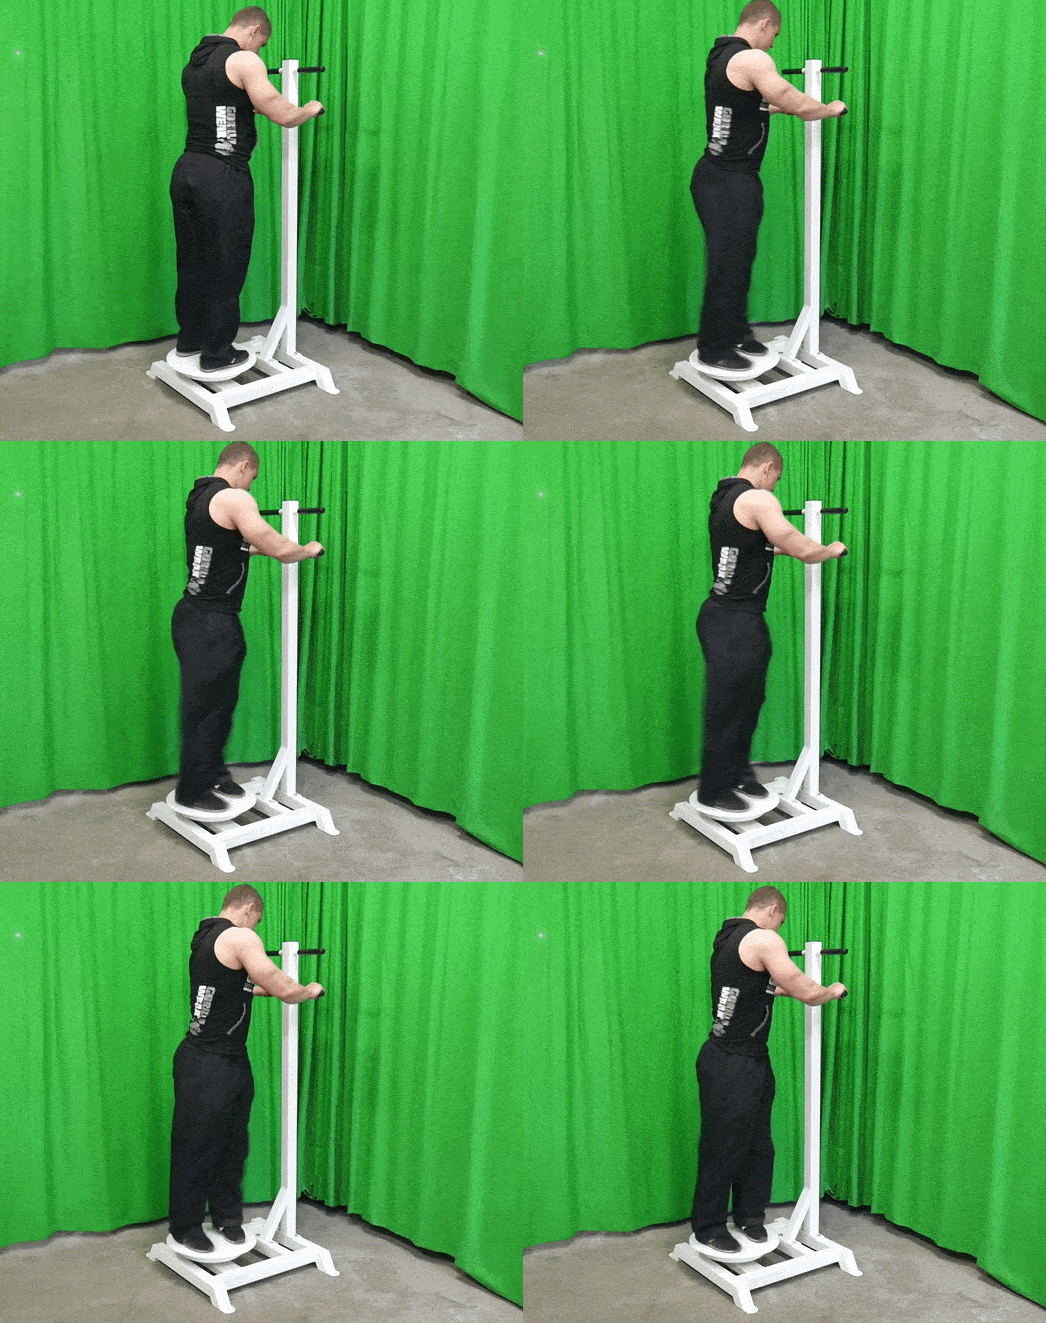
The standing machine twist reverses the movement direction of the seated rotary torso machine — instead of the upper body rotating toward a fixed lower body, the lower body rotates on a platform while the upper body stays fixed by handles. That lower-body-rotation pattern complements the seated machine’s upper-body-rotation training, and together the two machines provide complete rotational oblique coverage in both directions. The standing machine twist is best used as a warm-up or activation tool; the seated machine as the primary loaded oblique exercise.
Rotary Torso Machine
The rotary torso machine is available in both seated and kneeling configurations in some gyms. The kneeling version — where the trainee kneels on the seat, leans the chest against a front pad, and grips handles at shoulder height — changes the trunk angle slightly compared to the seated version, and some trainees find it produces a clearer oblique contraction. If your gym has both configurations, experimenting with each is worthwhile to find which delivers the more perceptible oblique stimulus for your individual anatomy.

Unilateral Focus Protocol
Rather than treating both sides as equal within a session, deliberately prioritize the weaker side — complete one additional set on the weaker side, or perform that side first in each pair when the obliques are freshest. This progressive asymmetry-correction approach is more systematic than simply using equal sets and hoping the weaker side catches up. Reassess every four to six weeks to track whether the asymmetry is closing.
Replacement Exercises (Alternatives)
If the seated rotary torso machine is unavailable or not appropriate, these exercises target the same primary muscle group:
- Standing Cable Oblique Crunch
- Twisting Cable Crunch
- Russian Twist – Oblique Trunk Rotation
- Hip Crossover
- Broomstick Twist
- Landmine 180s
- Decline Twisting Sit-Up
- Dumbbell Side Bend
- Lateral Crunch
- Bicycle Crunch
- Cross-Over Crunch
- Roman Chair Side Bend
- Heel Touches
- Hanging Windshield Wiper
- Side Jackknife: Double Leg Double Side Jackknife
- Hanging Oblique Knee Raise (Hanging Oblique Crunch)
Looking for more oblique exercises to add to your program? See our guide to the best oblique exercises. Looking for more? Explore our guides to upper ab exercises, lower ab exercises, and core exercises.
How To Incorporate the Seated Rotary Torso Machine Into Your Workouts
- As a primary oblique exercise — the resistance and progressive overload capability make it appropriate as the main loaded oblique movement in a core session, performed when the obliques are fresh
- Paired with a lateral flexion exercise — superset with a lateral crunch, dumbbell side bend, or standing cable oblique crunch for complete oblique coverage — rotation and lateral flexion trained back to back
- As an asymmetry correction tool — program with deliberate unilateral focus when left-right rotational strength discrepancy is identified; track loads on each side and adjust accordingly
- Rep range: 12–20 reps per side — the obliques respond well to moderate rep ranges with full range of motion and controlled tempo; avoid going below 10 reps with heavy loading on this machine
- Sets: 3–4 working sets per side
- Frequency: 2–3 times per week alongside other core training
- Tempo: Two seconds rotating, one to two second pause at peak contraction, two to three seconds returning — the return phase carries as much stimulus as the rotation itself
- Progression trigger: When 4 sets of 15 controlled reps with chest pad contact maintained, neutral spine, and deliberate oblique contraction at end range become consistently easy — add one plate and rebuild from 10 to 12 reps
Conclusion
The seated rotary torso machine delivers what it promises — isolated, measurable, progressive oblique rotation training — when it is set up correctly and loaded honestly. The problem has never been the machine. The problem has always been the combination of incorrect setup and excessive loading that turns a useful oblique tool into an expensive way to stress the lumbar spine.
Adjust the seat properly. Press the chest into the pad. Keep the arms passive. Pause at the end range. Keep the weight honest. Those five things — done consistently — will produce oblique development from this machine that most gym-goers have never experienced from it, simply because they have never done all five at the same time.
If you have written this machine off as ineffective, try it correctly before reaching that conclusion. You may find it delivers exactly what you were looking for.
Reviewed by a Fitness Professional: The exercise technique, muscles worked, and training recommendations presented in this guide were reviewed by Tomislav G., Certified Fitness Instructor , who specializes in personalized training, injury recovery, and human anatomy.
