



What is the lying hip raise?
The lying hip raise is a lower ab exercise performed lying on the back with legs extended vertically. From that position, the lower abs contract to lift the hips a few inches off the floor — a short, controlled movement that targets the lower portion of the rectus abdominis with minimal hip flexor involvement. It is a clean lower ab isolation exercise suitable for beginner and intermediate trainees.
Introduction
The lying hip raise is a lower-abs exercise performed while lying flat on the back, with legs extended vertically — feet pointing toward the ceiling — and the hips lifted off the floor through a short, controlled contraction of the lower abs. It is a deceptively simple movement that most people perform incorrectly, either by using momentum, lifting too high, or relying on the hip flexors rather than the lower rectus abdominis to initiate the movement.
Sometimes referred to as the supine hip raise or vertical-leg hip raise, this exercise occupies a useful middle ground between the reverse crunch and more demanding hanging variations. The legs are already in a vertical position at the start — which means the hip flexors are not required to raise them — leaving the lower abs as the primary, almost exclusive mover of the hip lift itself.
One important note on naming: this exercise is entirely different from the glute-focused hip thrust performed with the back against a bench. The lying hip raise is a lower ab exercise. The hip thrust is a posterior chain exercise. They share a word but nothing else.
Muscles Worked in the Lying Hip Raise
Primary muscle
Rectus abdominis (lower portion) — with the legs already vertical at the start, the hip flexors do not need to raise them. What remains is a pure lower ab movement: posterior pelvic tilt driving the hips off the floor. The lower portion of the rectus abdominis is the primary mover for that pelvic tilt, making this one of the cleaner lower ab isolation exercises available without equipment.
Secondary muscles
- External and internal obliques — stabilize the torso throughout the movement
- Transverse abdominis — braces the spine and maintains intra-abdominal pressure
- Hip flexors (iliopsoas) — involved minimally in maintaining the vertical leg position, not in driving the movement
- Glutes — contract at the top of the hip lift to assist with posterior pelvic tilt
Antagonists
Spinal erectors lengthen under control during the hip lift and drive the controlled return to the starting position.
How To Perform the Lying Hip Raise
Starting position
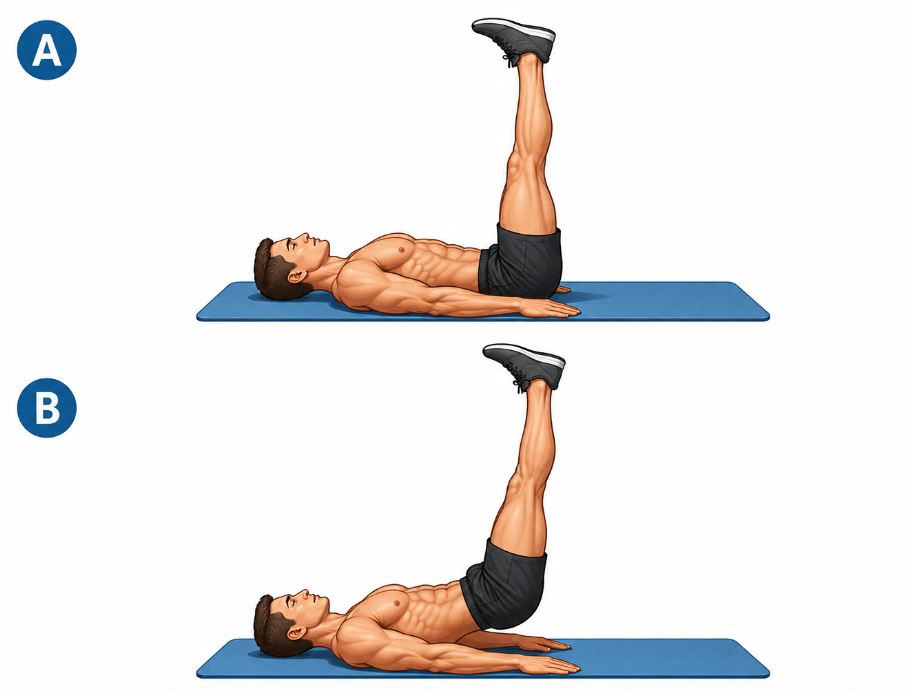
- Lie flat on your back on a mat with arms extended at your sides, palms facing down
- Raise both legs until they are perpendicular to the floor — feet pointing toward the ceiling, knees soft but not bent
- Alternative hand positions: hands placed under the tailbone for additional lower back support, or gripping a bench behind the head for upper body stability
- Press the lower back gently into the floor and brace the core before initiating the first rep
Execution
- Exhale and contract the lower abs, initiating the movement with a posterior pelvic tilt
- Lift the hips and glutes a few inches off the floor — the legs move straight upward, not backward
- Pull the navel inward and squeeze the glutes as the hips lift
- Hold the top position for one to two seconds, maintaining the contraction
- Slowly lower the hips back to the floor — do not drop; control the descent
- Allow the hips to just make contact with the floor before beginning the next rep
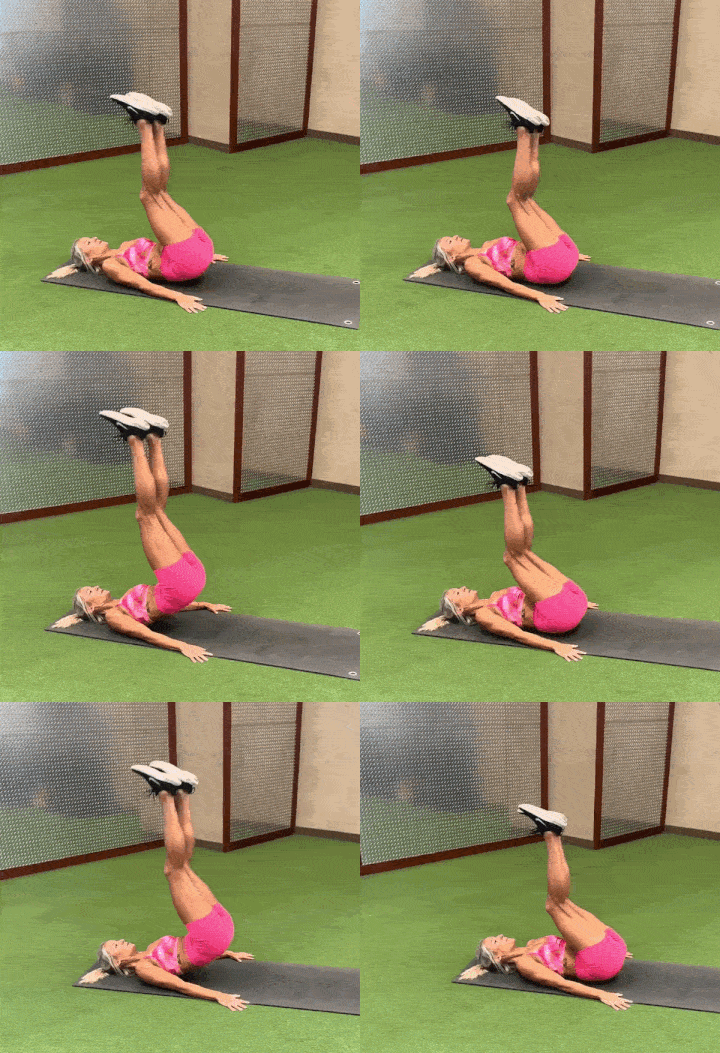
The key coaching cue: The movement is small — only a few inches of hip lift — and entirely vertical. The legs do not swing back or rock forward. If the legs are moving horizontally rather than the hips lifting vertically, the movement has become pendulum-driven by momentum rather than a controlled lower-ab contraction. Think of pushing the ceiling with your feet rather than swinging your legs.
Common Mistakes in the Lying Hip Raise
1. Using momentum and jerking the hips
Short, jerky movements that use momentum to bounce the hips off the floor are the most common error with this exercise. Momentum removes the lower ab stimulus entirely — the hips lift, but the abs did not cause it. Every rep should begin with a deliberate posterior pelvic tilt from a dead stop. If momentum is unavoidable, slow the pace down significantly and reduce the range of motion until the lower ab control develops.
2. Lifting the hips too high
Raising the hips so high that the entire lower back leaves the floor and the body rocks onto the upper back shifts the load away from the lower abs and onto the hip flexors and spinal erectors. The movement is intentionally small — just enough to lift the hips and glutes off the floor. More is not better here. The quality of the lower ab contraction matters far more than the height of the lift.
3. Letting the legs swing
The legs should remain vertical and stationary throughout the movement — they are not the moving part; the hips are. If the legs swing backward during the lowering phase and forward during the lift, momentum is driving the movement rather than the lower abs. Press the palms firmly into the floor and focus on keeping the legs fixed while the hips move.
4. Not contracting the lower abs consciously
This exercise requires a deliberate mind-muscle connection — the movement is small enough to be performed entirely passively by rocking the pelvis, without any conscious ab involvement. Before every rep, consciously draw the navel inward and focus on the lower abs initiating the posterior pelvic tilt. If you cannot feel the lower abs working, slow down further and add a three-second hold at the top of each rep.
5. Bending the knees
The moment the knees bend, the exercise changes — the hip flexors can now assist the movement and the lower ab isolation is reduced. Keep the legs straight throughout with a small degree of softness in the knee joint, not a bend.
Benefits of the Lying Hip Raise
Clean lower ab isolation
With the legs already vertical, the hip flexors have no role in raising them — they are already in their shortened position. What remains is a movement driven almost exclusively by the lower abs through posterior pelvic tilt. This makes the lying hip raise one of the cleanest lower-ab isolation exercises available without equipment.
No neck or upper back stress
Unlike crunches and sit-ups, the lying hip raise places no load on the cervical spine or upper back. There is no head to lift, no torso to raise. The upper body stays completely passive throughout. For trainees with neck sensitivity or upper back issues who still want to train the lower abs directly, this is one of the most comfortable options available.
Minimal equipment requirement
A mat is all that is needed. The vertical leg position provides the resistance setup — no cable, no machine, no bench required. That makes it practical for home training or any situation where gym equipment is unavailable.
Teaches posterior pelvic tilt in isolation
The lying hip raise is one of the most direct ways to teach and feel posterior pelvic tilt — the foundational movement pattern for all lower ab exercises. Because the movement is small and isolated, the trainee can focus entirely on feeling the lower abs tilt the pelvis without any other movement pattern competing for attention. I use this exercise regularly as a teaching tool before progressing clients to more complex lower ab variations.
Who Should Use This Exercise
- Beginners learning lower ab training for the first time — the lying hip raise teaches posterior pelvic tilt in its simplest form before adding the complexity of bent knees, hanging positions, or larger ranges of motion
- Trainees with neck or upper back sensitivity who need a lower ab exercise with zero cervical or thoracic demand
- People returning from lower back injury who need a gentle, controlled lower ab exercise — the hand-under-tailbone variation provides additional lumbar support
- Anyone who wants a pure lower ab isolation exercise without hip flexor compensation
Who Should Be Cautious
- People with acute lower back pain — the posterior pelvic tilt under load still places some demand on the lumbar region; use the hand-under-tailbone variation for additional support and reduce the range of motion if discomfort occurs
- People with hip flexor tightness causing anterior pelvic tilt — if the lower back cannot be pressed flat against the floor in the starting position due to hip flexor tightness, the exercise setup is compromised; address the flexibility issue before training this movement
- Advanced trainees looking for significant stimulus — the lying hip raise is a low-intensity exercise that provides minimal challenge for anyone who has progressed beyond the beginner stage; more demanding alternatives like the captain’s chair or hanging variations will be more productive
Progressions and Regressions
Regressions (easier)
- Posterior pelvic tilt hold — lying on the back with knees bent, pressing the lower back into the floor and holding for five seconds; teaches the foundational contraction before any leg movement is added
- Lying hip raise with hands under tailbone — placing the hands under the tailbone provides additional lower back support and makes the movement more comfortable for trainees with lumbar sensitivity
Progressions (harder)
- Lying hip raise with ankle weights — securing ankle weights adds external resistance to the straight legs, increasing the demand on the lower abs and hip flexors; even a small weight changes the exercise significantly given the vertical leg position
- Leg lift to hip raise — from a flat lying position, raise the straight legs to vertical first, then continue into the hip lift; combining both phases into one movement increases the hip flexor and lower ab demand substantially
- Reverse crunch — the natural next step; introduces a bent-knee position and a larger range of motion that increases the lower ab stimulus beyond what the lying hip raise can provide
Lying Hip Raise vs. Reverse Crunch
Both exercises target the lower rectus abdominis through posterior pelvic tilt initiated from the lower end of the body, but they differ in range of motion, leg position, and the degree of hip flexor involvement.
| Lying Hip Raise | Reverse Crunch | |
|---|---|---|
| Leg position | Straight, vertical throughout | Knees bent at 90° |
| Range of motion | Small — hip lift only | Larger — hips lift, and knees draw in |
| Hip flexor involvement | Minimal | Moderate |
| Lower ab isolation | High — very pure | Good |
| Difficulty | Beginner | Beginner – Intermediate |
| Equipment needed | None | None |
| Best for | Teaching pelvic tilt, pure isolation | Building lower ab strength and volume |
The practical takeaway: The lying hip raise is the purer isolation exercise — the vertical leg position removes almost all hip flexor involvement, and the small range of motion keeps the focus entirely on the posterior pelvic tilt. The reverse crunch is more demanding and more scalable — the bent-knee position and larger range of motion provide a greater stimulus per rep once the basic pelvic tilt pattern is learned. I often use the lying hip raise as a teaching exercise first, then progress clients to the reverse crunch once the lower ab contraction is consistently felt and controlled.
Exercise Variations
Lying Hip Raise with Ankle Weights
Secure an ankle weight snugly around each ankle and follow the standard instructions. The added weight increases the resistance on the lower abs and hip flexors throughout the vertical leg position. Even a lightweight — 1 to 2 kilograms per ankle — noticeably changes the exercise because the resistance acts at the end of the straight-leg lever. Start conservatively and build incrementally.

Leg Lift to Hip Raise
Begin lying flat with legs extended along the floor rather than already vertical. Raise the straight legs to vertical — this is the leg lift phase — then continue into the hip raise from the vertical position. Combining both phases increases the total range of motion and adds a hip flexor demand at the start that the standard version lacks. This variation bridges the lying hip raise and the lying leg raise in terms of difficulty and muscle demand.

Lying Hip Raise with Bench Support
Grip a bench or other stable object behind the head with both hands throughout the movement. The bench anchor stabilizes the upper body, prevents any rocking compensation, and allows the lower abs to work without the torso shifting. A useful variation for trainees who find the standard version difficult to control without upper body movement.
Replacement Exercises (Alternatives)
If the lying hip raise is not the right fit for your current training level or situation, these exercises target the same primary muscle group:
- Reverse Crunch
- Captain’s Chair Leg Raise
- Captain’s Chair Knee Raise
- Hanging Leg Raise
- Hanging Knee Raise
- Lying Leg Raise
- V-Leg Raise (Seated Knee-Up)
- Incline Reverse Crunch
- Swiss-Ball Reverse Crunch
- Full V-Sit (Jackknife Sit-Up)
The lying hip raise is the starting point in our roundup of the best lower ab exercises — the foundational movement every lower ab program should be built on. Don’t stop here — explore our guides to upper ab exercises, oblique exercises, and core exercises.
Programming Tips
- Rep range: 15–20 reps per set — the lying hip raise is a low-intensity exercise that responds well to higher rep ranges; the small range of motion and limited resistance make it unsuitable for low-rep heavy loading
- Sets: 3–4 working sets — sufficient volume for the stimulus this exercise provides
- Tempo: One to two seconds up, two-second hold at the top, two to three seconds down — the hold at the top is particularly important for this exercise because the range of motion is small and the contraction needs time to be felt
- Frequency: 2–3 times per week with at least one rest day between sessions
- Where in the session: At the end of the workout after compound movements; pairs well with an upper ab exercise as a superset for complete rectus abdominis coverage
- Mind-muscle connection: More important here than in almost any other ab exercise — the movement is small enough to be performed passively without any real lower ab involvement; focus on feeling the lower abs initiate every rep
- Progression trigger: When you can complete 4 clean sets of 20 reps with a deliberate posterior pelvic tilt on every rep and a controlled lowering phase — add ankle weights or progress to the reverse crunch
Conclusion
The lying hip raise is not the most impressive exercise in a lower ab program — it does not look demanding, it does not require special equipment, and the range of motion is small enough that it can be dismissed as too easy by trainees who have never actually felt their lower abs working correctly.
That underestimation is exactly why it is valuable. In my experience, the lying hip raise is the exercise that most reliably teaches trainees where their lower abs actually are and what a genuine posterior pelvic tilt feels like. The vertical leg position removes the hip flexors from the equation, the small range of motion forces a slow, deliberate contraction, and the absence of any complexity means there is nowhere to hide from the actual lower ab work.
Master the contraction here — feel the lower abs tilt the pelvis deliberately on every rep — and every lower ab exercise that follows will be more effective for it.
