



What is the seated knee tuck?
The seated knee tuck is a lower ab exercise performed sitting on the edge of a flat bench in which the knees draw toward the chest while the torso simultaneously leans forward to meet them. The combined movement from both ends targets the lower rectus abdominis and hip flexors together. It is suitable for beginner and intermediate trainees and requires only a flat bench.
Introduction
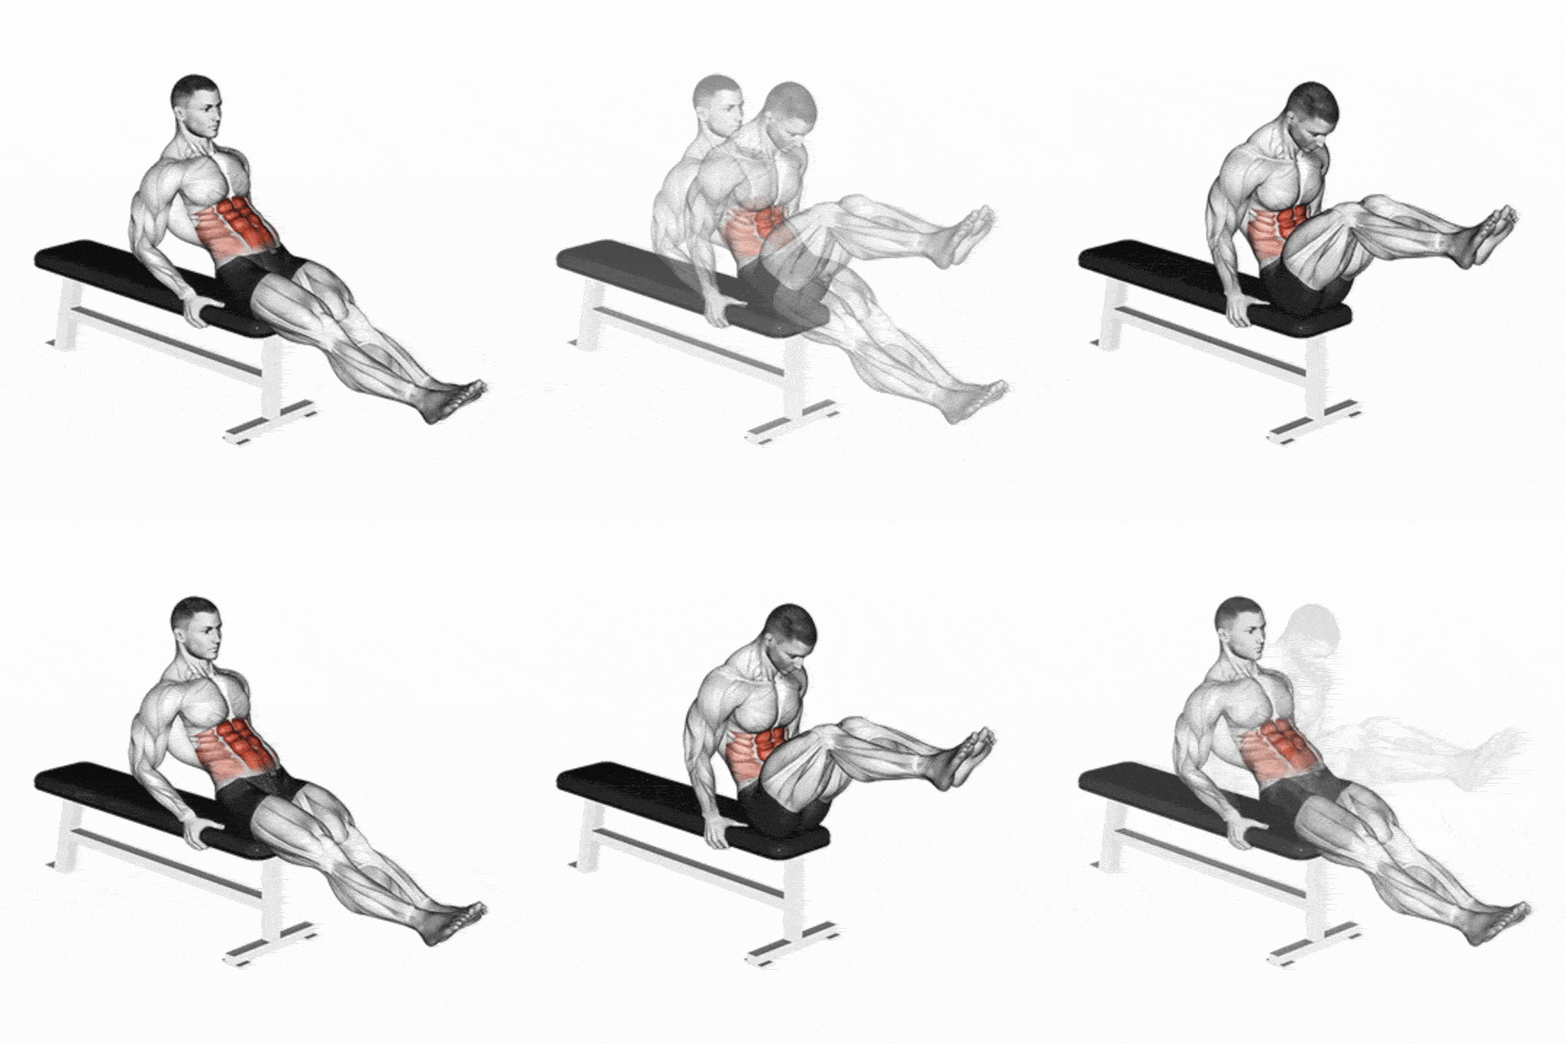
The seated knee tuck is a lower-ab exercise performed while sitting on the edge of a flat bench — torso leaned back at 45 to 60 degrees, legs extended, knees drawn toward the chest while the torso simultaneously moves forward to meet them. That simultaneous movement from both ends is what distinguishes it from most lower ab exercises: it is not purely a leg raise or a crunch, but a combined movement that loads the lower rectus abdominis and hip flexors through a full range of motion.
Also known as the bench knee-up, seated knee-up, or V-leg raise, this exercise is one of the more underrated lower ab movements in gym training. It requires nothing more than a flat bench; it is accessible to beginner and intermediate trainees, and the simultaneous torso-and-knee movement creates a distinctive lower-ab stimulus that pure leg-raise variations do not replicate.
One important technical point from the start: the movement works both ends simultaneously — torso forward and knees up. Trainees who move only the legs while the torso stays static are performing a less effective version of the exercise and missing the lower ab contraction that comes from the torso meeting the knees.
Muscles Worked in the Seated Knee Tuck
Primary muscles
- Rectus abdominis (lower portion) — the simultaneous movement of the torso and knees toward each other loads the lower portion of the rectus abdominis through both ends of the muscle simultaneously; the lower abs drive the posterior pelvic tilt while the knees draw in
- Hip flexors (iliopsoas, rectus femoris) — actively involved throughout the knee draw phase; the seated position and the simultaneous torso lean make hip flexor involvement an integral part of the exercise rather than a compensation
Secondary muscles
- External and internal obliques — stabilize the torso throughout the movement and assist with any rotational component
- Transverse abdominis — braces the spine and maintains intra-abdominal pressure
- Front quadriceps — assist with controlling the leg movement throughout
Antagonists
- Spinal erectors and surrounding lumbar musculature lengthen under control during the movement and drive the controlled return to the starting position.
How To Perform the Seated Knee Tuck
Starting position
- Sit on the edge of a flat bench with knees bent and feet flat on the floor
- Grip the bench behind you with both hands for support — hands placed just behind the hips
- Lean back until your torso makes a 45 to 60 degree angle with the bench surface
- Lift your feet a few inches off the floor, extending the legs slightly — toes pointed, knees slightly bent
- This is the starting position — torso leaned back, legs extended and hovering just above the floor

Execution
- Simultaneously draw the knees toward the chest and bring the torso forward to an upright position — both ends move toward each other at the same time
- Continue until the thighs are as close to the abdomen as possible and the torso is upright
- Hold the top position for one to two seconds, squeezing the lower abs
- Return to the starting position by simultaneously extending the hips and knees and leaning the torso back to the starting angle
- Lower the feet until the heels almost touch the floor — do not let the feet rest on the floor between reps; maintain the tension
The key coaching cue: Both ends move at the same speed and arrive at the top position at the same time. If the legs arrive before the torso, the hip flexors are leading. If the torso arrives before the legs, the movement has become a crunch. Think of closing a book — both covers move toward each other simultaneously and meet in the middle.
Common Mistakes in the Seated Knee Tuck
1. Moving only the legs while the torso stays static
This is the most common error, and it fundamentally changes the exercise. When only the legs move toward a stationary torso, the seated knee tuck becomes a hip-flexor exercise with some lower-ab involvement — the same pattern as a lying leg raise, but in a seated position. The defining characteristic of this exercise is the simultaneous movement from both ends. The torso must move forward to meet the knees. Without that, the lower ab stimulus is significantly reduced.
2. Using the hands to push off the bench
Pushing off with the hands to initiate movement is a compensatory pattern that reduces lower ab demand and shifts the load onto the arms and shoulders. The hands grip the bench for stability — they should not be generating force. If you need to push off to complete the movement, reduce the range of motion or add a slight lean further back at the starting position to make the concentric phase more manageable.
3. Letting the feet touch the floor between reps
Resting the feet on the floor at the bottom of each rep releases tension from the lower abs and hip flexors, turning each rep into an independent movement rather than a sustained set. Keep the heels just above the floor between reps — close enough to touch without actually resting. That maintained tension is what makes the exercise genuinely demanding.
4. Bending the knees too much at the start
The knees should be only slightly bent in the starting position — not already drawn close to the chest. Starting with the knees already significantly bent shortens the range of motion and reduces the stimulus. The starting angle should be close enough to extended that the movement covers a meaningful arc.
5. Rounding the upper back excessively
Some rounding of the lower back is natural and productive at the top of the movement — that posterior pelvic tilt is part of what makes the exercise effective. However, collapsing the entire thoracic spine and dropping the chest toward the knees is a compensatory pattern that reduces core engagement and places the cervical spine in an awkward position. Keep the chest tall throughout — the lower back can round, the upper back should stay relatively upright.
Benefits of the Seated Knee Tuck
Combined movement from both ends
The simultaneous torso and knee movement creates a unique stimulus that pure leg raise or crunch variations cannot replicate. Both ends of the rectus abdominis are loaded simultaneously — the lower portion through posterior pelvic tilt and the upper portion through a forward torso lean. That combined recruitment makes it a more complete lower-ab exercise per rep than single-end movements do.
No floor required
Performing the exercise on a bench elevates the starting position and allows a greater range of motion than the floor version — the legs can extend below bench level at the starting position, which would not be possible lying flat. That extended starting position increases the range per rep and the lower ab stretch before each contraction.
Accessible with minimal equipment
A flat bench is the only requirement. No cables, no machines, no pull-up bar. That makes it practical for any gym and for home setups with a basic bench.
Easy to scale with added resistance
Holding a small dumbbell between the ankles or wearing ankle weights adds resistance without changing the movement pattern. The progression from bodyweight to weighted is straightforward and provides a clear overload stimulus as strength develops.
Trains the anterior chain as a unit
The seated knee tuck trains the rectus abdominis and hip flexors in a coordinated movement — which has greater functional carryover to athletic movements requiring simultaneous trunk and hip flexion than isolated exercises targeting each muscle group separately.
Who Should Use This Exercise
- Beginner and intermediate trainees who want a lower ab exercise with more movement complexity than the reverse crunch but without the grip and stability demands of hanging variations
- Trainees who want to train lower abs and hip flexors simultaneously in a single efficient movement
- Athletes who need coordinated anterior chain strength — the combined torso and knee movement pattern has direct carryover to sports requiring simultaneous trunk and hip flexion
- Anyone with access only to a flat bench who wants an effective lower ab exercise without specialized equipment
Who Should Be Cautious
- People with lower back pain or lumbar disc issues — the lean-back starting position places the lumbar spine in a loaded extension position that can aggravate existing pathology; use a shallower lean angle or choose the reverse crunch instead
- People with hip flexor injuries — the hip flexors are heavily involved throughout this exercise; existing hip flexor tendinopathy or anterior hip impingement can be aggravated
- People with wrist issues — gripping the bench behind the hips requires sustained wrist extension; adjust the grip position or use a padded surface if wrist discomfort occurs
- Advanced trainees looking for maximum lower ab stimulus — the seated knee tuck is an intermediate exercise; for advanced lower ab development, the hanging leg raise or captain’s chair variations provide a more demanding stimulus
Progressions and Regressions
Regressions (easier)
- Reverse crunch — lying on the back with knees bent and lifting the hips off the floor; teaches the posterior pelvic tilt pattern with less hip flexor demand and no balance requirement
- Partial seated knee tuck — same movement but with a shallower starting lean and shorter range of motion; useful for building the coordination pattern before attempting the full range
Progressions (harder)
- Weighted seated knee tuck — holding a light dumbbell between the ankles adds external resistance; even 2 to 5 kilograms changes the exercise significantly given the lever length
- Captain’s chair knee raise — the same bent-knee draw pattern in a hanging position; more demanding due to the grip, shoulder stability, and anti-swing requirements
- Incline bench seated knee tuck — performing the exercise on a bench tilted at an incline with the head at the higher end increases the gravitational load throughout the movement
Seated Knee Tuck vs. Captain’s Chair Knee Raise
Both exercises draw the bent knees toward the chest, but the positions and support structures impose meaningfully different demands.
| Seated Knee Tuck | Captain’s Chair Knee Raise | |
|---|---|---|
| Position | Seated on bench | Suspended — forearms on pads |
| Torso movement | Moves forward to meet knees | Fixed against backrest |
| Grip demand | Low — hands grip bench for stability | Moderate — forearms on pads |
| Anti-swing demand | None | Low — backrest prevents swinging |
| Hip flexor involvement | High | Moderate |
| Lower ab isolation | Good — but hip flexors share the load | Better — backrest stabilizes torso |
| Difficulty | Beginner – Intermediate | Beginner – Intermediate |
| Equipment needed | Flat bench | Captain’s chair |
The practical takeaway: The seated knee tuck involves movement at both ends of the body simultaneously — torso and knees meeting — which trains the anterior chain as a coordinated unit but makes pure lower ab isolation harder to achieve. The captain’s chair knee raise keeps the torso fixed, which isolates the lower abs and hip flexors more cleanly. For pure lower ab development, the captain’s chair is the more targeted tool. For training the anterior chain as a unit with greater functional movement complexity, the seated knee tuck provides a stimulus that the captain’s chair cannot replicate.
Exercise Variations
Weighted Seated Knee Tuck
Hold a small dumbbell between the ankles or fasten ankle weights before performing the standard movement. The added resistance increases the demand on the lower abs and hip flexors throughout the range of motion. Start with 2 to 3 kilograms and build incrementally — even a modest weight change noticeably affects the exercise, given the lever length of the extended legs at the starting position.

Seated Knee Tuck on Floor
The same movement performed sitting on the floor rather than a bench. The floor version limits the starting range of motion because the legs cannot extend below hip level — they must stay parallel to or above the floor throughout. This makes the floor version slightly easier than the bench version and serves as a useful starting point for trainees who initially find the bench version too demanding.
Incline Seated Knee Tuck
Perform the exercise on a bench tilted at a mild incline with the head at the higher end. The incline increases the gravitational load during the torso lean-back phase and requires greater lower-ab strength to initiate forward movement. A useful progression once the flat bench version is consistently controlled.
Replacement Exercises (Alternatives)
If the seated knee tuck is not the right fit for your current training level or equipment situation, these exercises target the same primary muscle group:
- Reverse Crunch
- Captain’s Chair Leg Raise
- Captain’s Chair Knee Raise
- Hanging Leg Raise
- Hanging Knee Raise
- Lying Hip Raise
- Lying Leg Raise
- Incline Reverse Crunch
- Swiss-Ball Reverse Crunch
- Full V-Sit (Jackknife Sit-Up)
Programming Tips
- Rep range: 12–20 reps per set for bodyweight, 10–15 reps with added resistance — the seated knee tuck responds well to moderate-to-higher rep ranges where the simultaneous movement pattern can be maintained with control
- Sets: 3–4 working sets
- Tempo: Two seconds for the concentric phase, one second hold at the top, two to three seconds for the return — the return phase is where most trainees rush; control the lean-back and leg extension deliberately
- Frequency: 2–3 times per week with at least one rest day between sessions
- Where in the session: At the end of the workout after compound movements; pairs well with an upper ab exercise as a superset for complete rectus abdominis coverage
- Mind-muscle focus: Concentrate on the simultaneous movement — torso and knees arriving at the top position at the same time; if one end is consistently arriving first, slow down and consciously synchronize both ends
- Progression trigger: When you can complete 4 clean sets of 20 reps with synchronized movement, consistent lower ab contraction at the top, and controlled return on every rep — add a light dumbbell between the ankles or progress to the captain’s chair knee raise
Conclusion
The seated knee tuck is an exercise that does not get the attention it deserves in lower ab programming. It trains the lower abs and hip flexors together through a coordinated simultaneous movement, requires nothing more than a flat bench, and sits in a useful middle ground between basic floor exercises and more demanding hanging variations.
The technical key is the simultaneous movement — both ends traveling toward each other at the same speed, arriving together, returning together. That synchronization is what separates a productive set from a hip flexor exercise performed while sitting on a bench.
In my experience, trainees who take the time to master that simultaneous pattern find the seated knee tuck genuinely challenging at bodyweight before ever needing to add resistance. Get both ends moving together, feel the lower abs contracting at the top, and control the return. Do that consistently, and this simple bench exercise will deliver more lower-ab stimulus than most people expect.
The seated knee tuck is one of the more underrated movements in our guide to the most effective lower ab exercises — particularly for trainees who want to train the anterior chain as a coordinated unit. See our companion guides to upper ab, oblique, and core exercises to cover every region.
Frequently Asked Questions
Can I do the seated knee tuck on the floor instead of a bench?
Yes — the floor version works but has one significant limitation. On the floor, the legs cannot extend below hip level at the starting position, which shortens the range of motion compared to the bench version where the legs hang off the edge. A shorter starting range means less stretch on the lower abs and hip flexors before each contraction. The bench version is more effective for this reason, but the floor version is a practical alternative when a bench is unavailable and still provides a useful lower ab stimulus.
Why do I feel the seated knee tuck more in my hip flexors than my abs?
Usually because the torso is staying static while only the legs move. When only the knees draw in without the torso simultaneously leaning forward to meet them, the movement becomes a hip flexor-dominant leg raise in a seated position. Consciously move the torso forward at the same speed as the knees rise — both ends arriving at the top position simultaneously. That synchronization shifts the stimulus toward the lower abs. If hip flexor dominance persists, slow the movement down significantly and focus on the torso leading slightly rather than the legs.
Is the seated knee tuck the same as the reverse crunch?
No — they share the lower ab target but differ in position, movement pattern, and muscle demand. The reverse crunch is performed lying on the back with knees bent, lifting only the hips off the floor through a short posterior pelvic tilt. The seated knee tuck is performed sitting on a bench with the torso and knees moving simultaneously toward each other through a larger range of motion. The reverse crunch is a purer lower ab isolation exercise with less hip flexor involvement; the seated knee tuck trains the lower abs and hip flexors together through a more complex, coordinated movement pattern.
How do I make the seated knee tuck harder without adding weight?
Three effective options without adding external resistance. First, slow the tempo — a three to four second eccentric on the return phase dramatically increases time under tension. Second, add a three second isometric hold at the top of each rep where the knees are closest to the chest — this eliminates any momentum and forces the lower abs to sustain the contraction. Third, increase the starting lean angle — leaning further back at the start position increases the range of motion and the gravitational demand on the concentric phase. Combining all three makes the bodyweight version genuinely challenging before any weight is added.
How stable does the bench need to be for the seated knee tuck?
Sufficiently stable that it does not slide or tip when you lean back and grip behind the hips. A standard flat gym bench anchored to the floor or heavy enough to resist movement is ideal. Avoid performing this exercise on a bench that slides easily on smooth flooring — the rear grip combined with the lean-back position creates a backward force on the bench that can cause it to shift under load. If bench stability is a concern, place it against a wall or use a heavier bench before adding any weighted variation.
