



L-sit pull-ups are an advanced pull-up variation where you hold your legs straight out in front of you, roughly parallel to the floor, as you pull yourself up to the bar. Your body forms an “L” shape throughout the set. The exercise combines a strict vertical pull for the latissimus dorsi and elbow flexors with a demanding isometric hold for the abdominals and hip flexors.
Because the legs stay in front of the body, you can’t swing or kick, which makes every rep stricter. Leg position matters more than many lifters expect: in a study on chin-ups, changing leg position affected both the number of reps performed and biceps activity. That study compared different degrees of knee bend rather than the L-sit, but it shows that your leg position isn’t a minor detail.
L-sit pull-ups suit lifters who can already perform strict pull-ups and hold their legs up while hanging. In this guide, you’ll learn how to perform them with proper form, how to build up to the full version, which muscles they work, and how they compare with standard pull-ups.
L-sit pull-ups (L-sit chin-ups when performed with an underhand grip) are an advanced bodyweight pulling exercise in which the legs are held straight and roughly parallel to the floor while the body is pulled up until the chin clears the bar. The exercise mainly trains the latissimus dorsi, teres major, and elbow flexors, while the abdominals and hip flexors work isometrically to hold the L-position.
Clients who try L-sit pull-ups for the first time often ask me which muscles they’re supposed to feel, because the next day their abs and hip flexors are often just as sore as their back. The honest answer is that it’s both a back exercise and a trunk exercise, but not a complete replacement for either.
The pull itself trains the lats and arms much like a regular pull-up. The difference is that most people’s sets end when their legs drop, not when their back is exhausted. That’s why I don’t use L-sit pull-ups as the main lat builder in a bodybuilding program. I use them as a strict, skill-based pull-up variation for clients who enjoy calisthenics, and I keep regular pull-ups or pulldowns in the program for the main back work.
— Krunoslav, Ph.D. in Kinesiology
Other Names for L-Sit Pull-Ups
You’ll find this exercise under several names:
- L pull-ups – a shortened version of the name.
- L-sit chin-ups – the same exercise with an underhand grip.
- Hanging L-sit pull-ups – emphasizes holding the L-position while hanging.
- Pike pull-ups – an informal name used in some calisthenics programs.
Required Equipment
You need very little equipment, but enough space under the bar:
- Pull-up bar. The bar must be high enough for your legs to stay horizontal without touching the floor. See the different types of pull-up bars for home options.
- Gymnastic rings (optional). Rings make the exercise harder to stabilize; read more about calisthenics equipment worth buying.
- Chalk (optional). Helps keep a secure grip during longer sets.
How to Do L-Sit Pull-Ups
L-sit pull-ups start with a stable L-position. Set the legs first, then pull, keeping the leg position the same from the first rep to the last.
Starting Position
Hang from the bar, then set your body position:
- Grab the bar with an overhand grip slightly wider than shoulder width, or with an underhand grip about shoulder width for the chin-up version.
- Hang with your elbows fully or nearly fully extended, using the deepest comfortable overhead position your shoulders allow, without excessive shrugging.
- Raise your straight legs until they are roughly parallel to the floor, with the feet together and the knees straight but not forcefully locked.
- Brace your abdominals and avoid arching your lower back, similar to the tension of a hollow body hold.
- Keep your head and neck neutral, with your gaze forward.

Execution
From the L-position, pull with control:
- Drive your elbows down toward your sides; your shoulder blades move naturally with your arms.
- Keep your legs at the same height throughout the rep, without letting them drop or swinging them up for momentum.
- Pull until your chin clears the bar. Your torso will lean back slightly, which is a natural result of the L-position.
- Pause briefly, then lower yourself under control until your elbows are fully or nearly fully extended, avoiding dropping abruptly into a passive hang. Keep the legs up during the descent.
- Exhale during the pull or at the top, inhale as you lower, and avoid holding your breath for the entire set.
At the end of the set, lower your legs under control before letting go of the bar. If your legs drop below the target height during a set, end the set or switch to an easier leg position.
Video Demonstration
The video below shows L-sit pull-ups from start to finish. Notice how the lifter sets the L-position before the first pull and keeps the legs at the same height throughout the rep.
Also pay attention to the torso. It leans back slightly as the lifter rises, while the legs remain steady instead of bouncing up and down. Filming yourself from the side is the easiest way to check whether your legs stay horizontal.

The mistake I see most with L-sit pull-ups is what I call the “drawbridge.” On the first rep, the legs are perfectly horizontal. With every rep after that, they lower a few degrees, like a castle drawbridge slowly coming down. By the last rep, the legs are hanging at 45 degrees and the lifter is doing a regular pull-up with slightly raised feet.
With clients, I set one rule: choose the leg position you can hold for the whole set. If that means bending the knees into a tuck, that’s fine. I’d rather see five clean tuck reps than three “real” L-sit reps and three drawbridge reps. Clients are usually surprised how quickly the full L comes once they stop fighting for it on every set.
Quick Form Checklist
Check these points before and during every set:
- Legs straight and roughly parallel to the floor before the first pull
- Abdominals braced, lower back not arched
- Elbows drive down toward the sides
- Chin clears the bar, legs stay at the same height
- Controlled lowering to fully or nearly fully extended elbows
The grip changes how the pull feels, but on L-sit pull-ups the leg hold usually remains the main challenge. This is the overview I give my clients:
| Grip | Elbow Path | Typical Characteristics |
|---|---|---|
| Overhand, slightly wider than shoulders (L-sit pull-up) | Down and slightly out to the sides | The standard version; usually feels the hardest |
| Underhand, about shoulder width (L-sit chin-up) | Close to the body, in front of the torso | Usually feels easier on the pull; strong elbow-flexor involvement |
| Neutral, palms facing each other | Close to the body | Comfortable for many wrists and elbows; requires parallel handles |
When a client is learning the L-position, I usually start with the underhand grip, because the easier pull lets them focus on holding the legs. Once the L-hold is solid, we switch to the overhand grip. Clients with sensitive wrists or elbows often prefer the neutral grip on parallel handles.
In a study on the lat pulldown, a pronated grip produced greater lat activation than a supinated grip, while grip width made little difference. That was a machine exercise without any leg hold, so it only partly applies here. In practice, I choose the grip based on comfort and on which part of the exercise the client needs to practice.
— Krunoslav, Ph.D. in Kinesiology
Technical Emphasis & Targeting Adjustments
Small changes in body position shift the difficulty between the back and the trunk. Use these cues as practical adjustments:
- Elbows down toward the sides → more lat emphasis. Driving the elbows down and back emphasizes the main pulling action of the lats.
- Legs at hip height → more abdominal and hip-flexor work. Holding the legs horizontal puts the most demand on the rectus abdominis and hip flexors.
- Knees tucked or legs lower → less trunk demand. Bending the knees or lowering the legs shortens the lever and lets you focus more on the pull.
- Quads tight, toes pointed → steadier legs. Actively tensing the quadriceps keeps the knees straight and makes the legs easier to hold still.
- Lower for about 3–5 seconds → more eccentric control. A slower descent keeps the legs from swinging and builds strength in the full range.
Common L-Sit Pull-Up Mistakes
Most L-sit pull-up mistakes happen when the leg hold starts to fade. Watch for these:
- Letting the legs drop during the set. Gradually lowering the legs turns the exercise into a regular pull-up. Choose a leg position you can hold for every rep.
- Swinging the legs for momentum. Kicking the legs up to start the pull defeats the purpose of the strict L-position. Set the legs first, then pull.
- Arching the lower back. Losing abdominal tension tilts the pelvis and makes the legs harder to hold. Brace the abs before every rep.
- Shortening the range. Stopping halfway down to protect your leg hold reduces back strain. Lower until the elbows are fully or nearly fully extended.
- Holding your breath for the whole set. Breath-holding can make you tire faster. Exhale during the pull and inhale as you lower.
If your legs keep dropping, check your hamstrings before blaming your abs. Many lifters can’t keep straight legs horizontal because tight hamstrings pull the legs down, not because their abdominals are weak. Sit on the floor with your legs straight: if you can’t sit upright without rounding your back, flexibility is probably part of the problem.
In that case, bend your knees slightly during L-sit pull-ups and add regular hamstring stretching to your routine. Many clients find that the full L becomes much easier within a few weeks, without any extra ab training.
Mechanical Considerations
Raising the legs doesn’t change your body weight, but it changes how that weight is arranged. To stay balanced under the bar, the torso leans back slightly as the legs move forward, so the pull starts from a different body angle than a regular pull-up. At the same time, the straight legs act like a long lever in front of the hips, and the hip flexors and abdominals have to work isometrically to hold them up. Bending the knees shortens that lever, which is why the tuck version is easier. This is biomechanical reasoning, not a measured result.
No study appears to have examined L-sit pull-ups directly. However, research shows that the trunk muscles are involved even in standard hanging pull-ups: in a comparison of chin-ups and lat pulldowns, chin-ups showed greater biceps and erector spinae activity during the pulling phase. Together with the leg-position study mentioned in the introduction, this suggests that body position during hanging pulls affects more than just the arms, although the L-sit itself hasn’t been tested.
Muscles Worked by L-Sit Pull-Ups
L-sit pull-ups are a compound exercise that combines a vertical pull with a demanding trunk hold:
MAIN
- Latissimus dorsi – adducts and extends the shoulder to pull the body up.
- Teres major – assists the lats.
- Biceps brachii and brachialis – flex the elbows throughout the pull.
SECONDARY
- Middle and lower trapezius and rhomboids – control the shoulder blades. Learn more about the trapezius muscle.
- Posterior deltoid – assists shoulder extension.
- Brachioradialis – assists elbow flexion, along with other forearm muscles.
STABILIZERS (working intensely in this variation)
- Rectus abdominis – stabilizes the pelvis and trunk while the legs are held up.
- Hip flexors – the iliopsoas and rectus femoris hold the legs in the L-position.
- Quadriceps – keep the knees straight.
- Obliques and other core muscles – prevent the body from rotating or swinging.
- Rotator cuff – stabilizes the shoulder joint.
Pros and Cons
L-sit pull-ups are a rewarding advanced variation, but they aren’t ideal for every goal:
Advantages
- Strict reps. The L-position makes kipping and leg drive much harder, so every rep relies on controlled pulling.
- Trunk and hip-flexor strength. The isometric leg hold trains the abdominals and hip flexors while also working the back.
- Calisthenics skill. The exercise builds body control that carries over to other advanced bodyweight movements.
- Minimal equipment. All you need is a high enough bar.
Potential Drawbacks
- The legs often limit the set. Many lifters stop because the leg hold fails, not because the back is tired.
- Advanced prerequisites. You need strict pull-ups and a solid hanging L-hold first; if you’re not there yet, start with our guide to your first pull-up.
- Hamstring flexibility matters. Tight hamstrings make the straight-leg version difficult.
- Harder to load. Adding external weight is awkward and rarely necessary.
Safety Considerations
L-sit pull-ups are generally safe for lifters with the right preparation. Most issues come from the hip flexors and lower back being pushed beyond what they’re ready for:
- Build up gradually. Start with tuck or single-leg versions and progress only when the leg hold is solid for the whole set. Scapular pull-ups are a good way to prepare the shoulders for hanging work.
- Protect your lower back. If you can’t keep your abs braced and your lower back from arching, use an easier leg position.
- Watch for hip-flexor cramps. Cramping in the front of the hips is common at first; lower the legs, rest, and reduce the volume next session.
- Lower your legs before letting go. Dropping from the bar with the legs still extended can lead to an awkward landing.
Variations of L-Sit Pull-Ups
These variations let you build up to the full exercise or make it even harder:
Tuck L-Sit Pull-Up
Difficulty: Intermediate

Bend your knees to about 90 degrees, with the thighs roughly parallel to the floor. The shorter lever makes the hold much easier and is the best starting point for most lifters.
Single-Leg L-Sit Pull-Up
Difficulty: Intermediate to advanced

Extend one leg straight while keeping the other tucked, and switch legs from set to set. It’s a useful bridge between the tuck and the full L.
L-Sit Chin-Up
Difficulty: Advanced

Use an underhand grip about shoulder width. Most lifters find the pull slightly easier than the overhand version, as in regular chin-ups.
Neutral-Grip L-Sit Pull-Up
Difficulty: Advanced

Perform the exercise on parallel handles with the palms facing each other. Many lifters find this grip more comfortable for the wrists and elbows.
L-Sit Pull-Up on Rings
Difficulty: Advanced

Rings move freely, so the shoulders and trunk have to work harder to keep the body stable. Try this version only once the bar version feels controlled.
Replacement Exercises
If you can’t yet perform L-sit pull-ups, or want to train the same qualities separately, these exercises are good substitutes:
- Wide-Grip Pull-Up. The standard pull-up trains the same back muscles without the leg hold and is easier to progress.

- Hanging Leg Raise. The hanging leg raise builds the abdominal and hip-flexor strength needed for the L-position.
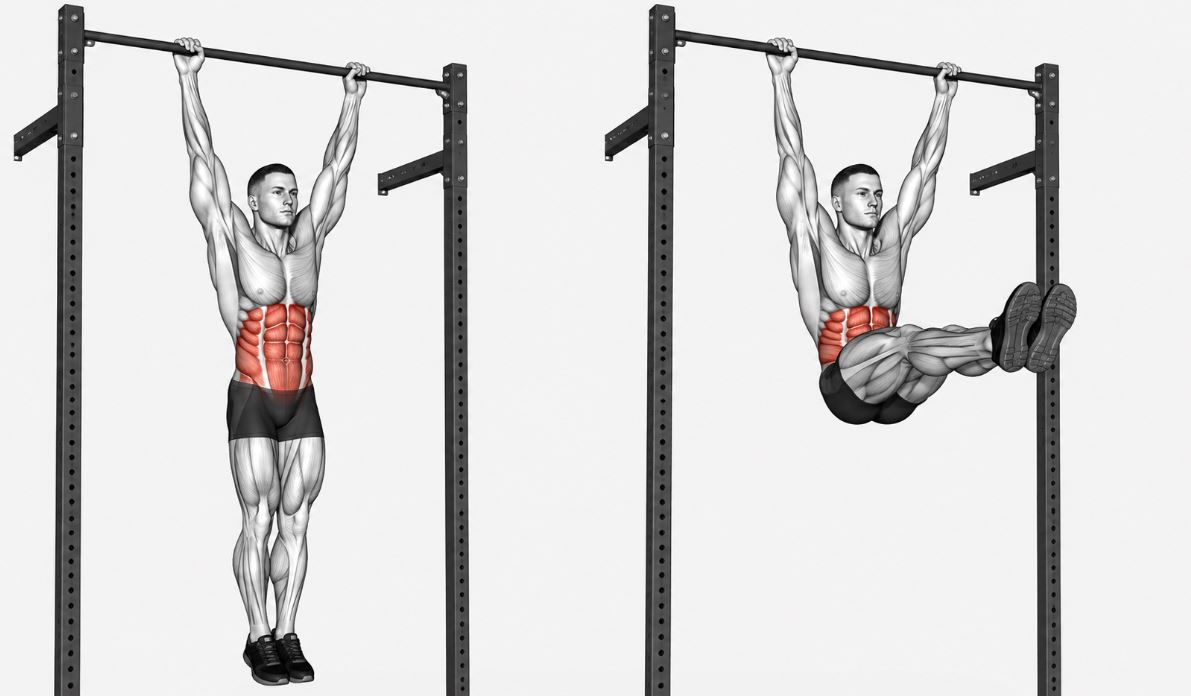
- Hanging Knee Raise. The hanging knee raise is an easier way to develop the same qualities.

- Captain’s Chair Straight Leg Raise. The captain’s chair straight-leg raise trains leg hold with back support, without needing to grip a bar.

- Commando Pull-Up. The commando pull-up is another strict pull-up variation that adds a trunk challenge.

- Negative Chin-Up. Negative chin-ups help build the pulling strength you’ll need before adding the L-position.

How to Program L-Sit Pull-Ups
Use the box below as a starting point. L-sit pull-ups fit naturally into a calisthenics program or as a strict pull-up variation in a gym routine.
Show full programming guideHide programming guide ▾
| Goal | Sets | Reps | Rest | Tempo |
|---|---|---|---|---|
| Skill practice (tuck or single-leg) | 3–5 | 2–4 | 90–120 s | Controlled, brief pause at the top |
| Strength | 3–5 | 3–5 | 2–3 min | Firm pull, 3 s lowering |
| Hypertrophy | 3–4 | 6–10 (tuck if needed) | 90–120 s | Controlled, 3–4 s lowering |
Choose the leg position that lets you stay in the target rep range with every rep clean. Muscle growth has been reported across a broad range of loads and repetition ranges, so an easier leg position with more reps is a reasonable choice when muscle growth is the goal.
- Early in a pull or full-body session, when you’re fresh enough to hold the L-position
- In place of standard pull-ups for a training block
- As a combined back-and-core exercise in short, time-efficient workouts
- Followed by direct ab work, such as the hanging knees-to-elbows, only if you still have energy left
Progress through the leg positions first: tuck, single-leg, then full L. Within each stage, add reps until you reach the top of your range, then move to the next stage. Once the full L-sit pull-up feels solid, try the ring version or add a short pause at the top. Our tips to improve your pull-ups apply to every stage.
Many beginners are strong enough to train hard, but still can’t get their first proper pull-up. That’s why I created a full step-by-step guide designed to help you build the required strength and technique.
See the complete guide here →L-Sit Pull-Ups vs Standard Pull-Ups
Both exercises train the same main back muscles, but the leg position changes the demands considerably:
| Feature | L-Sit Pull-Ups | Standard Pull-Ups |
|---|---|---|
| Leg position | Straight, roughly parallel to the floor | Hanging below the body |
| Torso angle | Leans back slightly | Close to vertical |
| Abdominal and hip-flexor demand | High (isometric hold) | Low to moderate |
| Possibility of kipping | Very limited | Possible without good technique |
| What usually limits the set | The leg hold | The back and arms |
| Ease of loading | Awkward | Easy with a dip belt |
| Experience level | Advanced | Intermediate |
| Best for | Strict pulling with trunk strength | Main vertical pulling exercise |
The main difference is what limits the set. In standard pull-ups, the back and arms usually tire first; in L-sit pull-ups, the leg hold often gives out before the back is fully challenged. That makes the L-sit version a great strict, skill-based variation, but a less efficient choice when back muscle growth is the main goal.
Neither is better overall. Many lifters use standard pull-ups as their main vertical pull and L-sit pull-ups as a variation or skill exercise. For more grip comparisons, see our chin-up vs pull-up comparison.
Final Thoughts
L-sit pull-ups combine a strict vertical pull with a demanding hold for the abdominals and hip flexors. Set the L-position before the first rep, keep the legs at the same height throughout, and choose a leg position you can hold for the whole set.
Build up through the tuck and single-leg versions, and keep regular pull-ups or pulldowns in your program for the main back work. To learn more about the muscles that hold the L-position, read our guide to the abdominal muscles.
Frequently Asked Questions
What muscles do L-sit pull-ups work?
They mainly work the lats, teres major, and elbow flexors, while the abdominals and hip flexors work intensely to hold the legs up.
Are L-sit pull-ups harder than regular pull-ups?
Yes, for most lifters. The isometric leg hold adds a major trunk and hip-flexor demand, and kipping is very limited.
What’s the difference between L-sit pull-ups and L-sit chin-ups?
The grip. L-sit pull-ups use an overhand grip; L-sit chin-ups use an underhand grip, which most lifters find slightly easier.
Why do my legs keep dropping?
Usually because of limited abdominal and hip-flexor strength or tight hamstrings. Bend the knees slightly or use the tuck version.
How many pull-ups should I be able to do first?
A good guideline is several strict pull-ups plus the ability to hold your legs up while hanging for a few seconds.
Do L-sit pull-ups build abs?
They train the abdominals isometrically, but direct ab exercises are still useful if ab development is a priority.
Can I do L-sit pull-ups with bent knees?
Yes. The tuck L-sit pull-up, with knees bent to about 90 degrees, is the best starting point for most lifters.
Should my legs stay exactly horizontal?
Aim for roughly parallel to the floor, but the key is keeping them at the same height throughout the set.
Are L-sit pull-ups good for building back muscle?
They train the back, but the leg hold often limits the set. Use regular pull-ups or pulldowns as your main back exercises.
