

Introduction
The crossover crunch is one of the more effective floor-based oblique exercises available — and one that consistently gets performed in a way that produces more neck strain than oblique development. The premise combines two movements that the obliques are actually designed to do: spinal flexion and trunk rotation. Done correctly, that combination creates a genuine oblique stimulus that neither a standard crunch nor a pure lateral crunch can replicate on its own.
You will also hear this exercise called the cross-body crunch, twisting crunch, or figure-4 crunch — the last name referring to the crossed-leg position that defines the setup. Whatever you call it, the movement is the same: one leg crossed over the other, elbow driving toward the opposite knee, flexion and rotation happening simultaneously rather than sequentially.
I want to address something directly before we go any further: the crossover crunch is frequently lumped in with the bicycle crunch as an interchangeable exercise. They are not. The bicycle crunch involves continuous alternating leg movement and a higher overall demand. The crossover crunch uses a fixed crossed-leg position that stabilizes the pelvis and keeps the focus on the oblique contraction at the top of the movement. Different exercises, different stimulus, both worth including.
Muscles Worked in the Crossover Crunch
Primary muscles
- Rectus abdominis — drives the spinal flexion component of the movement; does the majority of the work as you curl the torso upward, which is why you will feel the burn in the abs rather than purely in the obliques if you do enough reps
- Internal oblique (on the twisted side) — contributes to the rotation as the shoulder drives across the midline toward the opposite knee
- External oblique (on the opposite side) — works on the side away from the direction of twist, assisting with the rotational component
Secondary muscles
- Transverse abdominis — braces the spine and maintains intra-abdominal pressure throughout the movement
- Hip flexors — minimally involved due to the fixed crossed-leg position, which is precisely the point of that setup
Antagonists
Spinal erectors lengthen under control during the flexion and rotation phase and drive the controlled return to the starting position.
One important mechanical note: this exercise works the rectus abdominis and the obliques simultaneously through a combined movement, rather than isolating one or the other. That makes it a more complete abdominal exercise than either a standard crunch or a pure lateral crunch — but also means it should not be treated as an oblique isolation exercise. If pure oblique isolation is the goal, the lateral crunch or standing side bend is more specific.
How to Do a Crossover Crunch: Step-by-Step Form Guide
Starting position
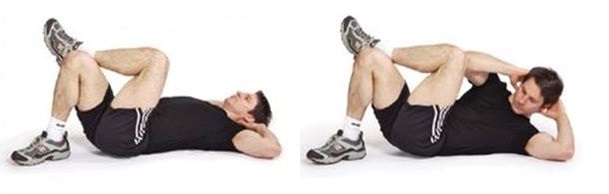
- Lie face-up on an exercise mat with knees bent and feet flat on the floor
- Cross one leg over the other — right ankle resting on the left knee, for example — so the crossed knee is in the same lateral plane as the shoulder on that side, not wider
- Place both hands behind the head or over the ears, elbows flared wide
- Optionally, extend the arm on the side of the crossed leg along the floor for stability — this arm stays in contact with the floor throughout the set
- Press the lower back gently into the mat and brace the core before beginning
Execution
- Exhale and curl the torso upward through spinal flexion — the same initiation as a standard crunch
- As you near the top of the movement, immediately rotate at the waist, driving the elbow toward the opposite knee — the one that is crossed over
- The movement is simultaneous flexion and rotation, not flexion followed by rotation; both happen together
- Drive with the shoulder, not just the elbow — think of the shoulder moving toward the opposite knee rather than the elbow poking across
- Hold the top position for one to two seconds, feeling both the abdominal and oblique contraction
- Lower slowly and under control back to the starting position
- Complete all reps on one side before switching the crossed leg and repeating on the other side
The key coaching cue: The elbow on the active arm should never move faster than the shoulder. If the elbow is reaching across but the shoulder is staying behind, the rotation is coming from the arm rather than the trunk — and the obliques are getting almost nothing. Drive the shoulder. The elbow follows.
5 Common Crossover Crunch Mistakes (And How to Fix Them)
1. Pulling on the neck
Hands behind the head with the temptation to pull is a universal crunch problem, and the rotational component of the crossover crunch makes it worse — as the torso twists, the tendency to yank the head in the direction of rotation increases. The neck stays long throughout. The chin stays away from the chest. Hands support the head; they do not move it. If neck strain is persistent, move the hands to the temples or cross the arms over the chest instead.
2. Rotating from the elbow rather than the shoulder
This is the mistake that makes the crossover crunch ineffective for oblique development. When the elbow reaches across the body, but the shoulder and torso stay relatively fixed, the movement is coming from the arm — not the trunk. The obliques barely register it. Focus on driving the shoulder toward the opposite knee. If the shoulder is moving, the obliques are working. If only the elbow is moving, they are not.
3. Lifting the hips off the floor
Both hips should stay stable and in contact with the floor throughout the entire set. Hip lifting usually means the movement has become too large — the torso is going too high, and the hip flexors are assisting. Reduce the range of motion and focus on keeping both hip bones pressed into the mat. The crossed-leg position helps with this, but it does not guarantee it.
4. Doing flexion and rotation sequentially rather than simultaneously
Crunching straight up first, then twisting at the top, is a common error that significantly reduces the oblique stimulus. The rotation should begin at the same time as the flexion — both movements happening together from rep one. Think of the combined movement as a single action: curl-and-twist, not curl-then-twist.
5. Moving too fast
Speed is the enemy of the crossover crunch. Fast reps mean momentum is doing the work rather than the obliques. Slow the movement down to a deliberate pace — two seconds up, one second hold, two seconds down. At that tempo, you will feel exactly which muscles are working and which are not. Most trainees who switch to a controlled tempo are surprised by how much harder the exercise becomes.
Benefits of the Crossover Crunch

Combined flexion and rotation stimulus
The crossover crunch trains both the sagittal and transverse planes simultaneously — flexion through the rectus abdominis and rotation through the obliques. That combination is more functional than pure flexion or pure rotation alone, and it more closely reflects the movement demands of sports and daily activities, where the core must flex and rotate simultaneously.
No equipment required
Like the standard crunch and lateral crunch, the crossover crunch requires only a mat and floor space. That makes it one of the most accessible combined ab-and-oblique exercises for home training or when gym equipment is unavailable.
Fixed pelvis reduces hip flexor compensation
The crossed-leg position naturally stabilizes the pelvis and limits the range of motion to a degree that reduces hip flexor involvement. Unlike some rotational exercises where the hip flexors compensate heavily, the crossover crunch keeps the focus on the abdominals and obliques throughout.
Useful as a higher-intensity crunch progression
For trainees who have mastered the standard floor crunch and want more oblique involvement without moving to loaded or machine exercises, the crossover crunch is a logical bodyweight progression. Same floor position, same basic movement pattern, significantly greater oblique demand.
Who Should Use This Exercise
- Intermediate trainees who have mastered the standard floor crunch and want to add an oblique component without adding equipment or changing the training environment
- Athletes in rotational sports — tennis, golf, combat sports, swimming, baseball — who need combined flexion-rotation core strength with direct carryover to sport-specific movement patterns
- Trainees building a complete bodyweight core program who need a rotational exercise that complements lateral flexion work like the lateral crunch
- Anyone who finds the bicycle crunch too demanding as an intermediate step before progressing to that exercise
Who Should Be Cautious
- People with neck problems — the combined flexion and rotation puts the cervical spine under more demand than a standard crunch; these trainees should keep the hands at the temples rather than behind the head and reduce the range of rotation
- People with lumbar disc issues — combined flexion and rotation under load is one of the movement patterns most associated with disc stress; anyone with active lumbar pathology should consult a physiotherapist before programming this exercise
- Beginners who have not yet mastered the standard crunch — if someone cannot perform a clean floor crunch without neck pulling or hip flexor compensation, adding the rotational component will simply layer a second compensation pattern on top of the first; master the basic crunch first
- People with shoulder impingement — the rotational drive from the shoulder can aggravate existing shoulder impingement; reduce the range of rotation or choose a non-rotational oblique exercise if shoulder discomfort occurs
How to Make It Easier or Harder
Easier
- Reduced rotation range — limiting the rotation to a smaller arc reduces the oblique demand; a useful modification when learning the combined movement pattern before progressing to the full range
- Arms across the chest — removing the hands-behind-head position eliminates the neck strain risk and makes the movement easier to control for beginners
- Slower tempo — paradoxically, slowing the movement down makes the technique more achievable because momentum is removed and the muscles must do all the work
Harder
- Extended hold at top — holding the flexed and rotated position for three to five seconds dramatically increases time under tension and oblique activation; one of the most effective ways to increase intensity without changing the exercise setup
- Swiss ball crossover crunch — performing the movement with the lower back supported on a stability ball allows greater spinal extension at the starting position, increasing the range of the flexion component and adding a stability demand throughout
- Arms extended overhead — holding the arms straight overhead rather than behind the head increases the lever arm of the torso significantly, making even the bodyweight version considerably more challenging
Crossover Crunch vs. Bicycle Crunch
Both exercises combine spinal flexion with trunk rotation from a lying position, but they differ in movement pattern, intensity, and who they are most appropriate for.
| Crossover Crunch | Bicycle Crunch | |
|---|---|---|
| Leg position | Fixed — one leg crossed | Alternating — continuous pedaling |
| Movement pattern | Fixed side, controlled rotation | Alternating sides, continuous movement |
| Hip flexor demand | Low — pelvis stabilized | Moderate — legs moving throughout |
| Oblique stimulus | Focused — one side per set | Bilateral — alternating each rep |
| Difficulty | Intermediate | Intermediate |
| Pace | Slow and controlled | Can be faster |
| Best for | Controlled oblique isolation, beginners to rotation | Higher-intensity combined core training |
The practical takeaway: The crossover crunch is the more controlled and focused of the two — the fixed leg position stabilizes the pelvis and keeps the movement deliberate, making it better for learning rotational oblique technique. The bicycle crunch is more demanding overall due to the continuous alternating movement and higher hip flexor involvement. I use the crossover crunch to teach rotational crunch mechanics before progressing clients to the bicycle crunch, and I use both in programs where complete oblique development is the goal.
Exercise Variations
Swiss Ball Crossover Crunch
Perform the crossover crunch with the lower back supported on a stability ball rather than the floor. The curved surface of the ball allows the spine to extend further back at the starting position, increasing the range of the flexion component and giving the rectus abdominis a fuller stretch before each contraction. The instability of the ball also increases the demand on the deep core stabilizers throughout the movement. Set up by sitting on the ball and rolling forward until the lower back is centered on top, then assume the crossed-leg position and perform the movement as described. The feet need to be planted firmly and wider than in the floor version to maintain balance.
Weighted Crossover Crunch
Hold a light weight plate or dumbbell behind the head with both hands while performing the standard crossover crunch. The added weight increases the demand on the rectus abdominis and obliques without changing the movement pattern. Start with a very light weight — even 2 to 5 kilograms changes the exercise considerably. Only add weight once the bodyweight version is consistently controlled with genuine rotation from the shoulder rather than just elbow reaching.
Replacement Exercises (Alternatives)
If the crossover crunch is not the right fit for your current training level or situation, these exercises target the same primary muscle group:
- Dumbbell Side Bend
- Landmine 180s
- Roman Chair Side Bend
- Lateral Crunch
- Standing Machine Twist
- Rotary Torso Machine
- Seated Rotary Torso Machine
- Standing Cable Oblique Crunch
- Twisting Cable Crunch
- Hip Roll or Lower Body Russian Twist
- Broomstick Twist
- Bicycle Crunch
- Decline Twisting Sit-Up
- Heel Touches
- Russian Twist – Oblique Trunk Rotation
- Hanging Windshield Wiper
- Side Jackknife: Double Leg Double Side Jackknife
- Hanging Oblique Knee Raise (Hanging Oblique Crunch)
How To Incorporate the Crossover Crunch Into Your Workouts
- After standard crunch work — program the crossover crunch following the basic abdominal crunch or cable crunch in a core session; the standard crunch warms up the spinal flexion pattern before adding the rotational component
- Paired with a lateral flexion exercise — superset with a lateral crunch or side bend for complete oblique coverage — rotation and lateral flexion trained back to back in one efficient pairing
- As a rotational exercise in a bodyweight core circuit — the crossover crunch fits naturally in a circuit alongside reverse crunches, standard crunches, and planks for a complete no-equipment core session
- Rep range: 12–20 reps per side — the controlled tempo requirement means higher reps are appropriate; fast sets of 20 or more are almost certainly using momentum rather than oblique contraction
- Sets: 3–4 working sets per side
- Frequency: 2–3 times per week alongside other core training
- Tempo: Two seconds up with simultaneous rotation, one to two second hold at the top, two seconds down — never sacrifice the shoulder drive for more reps
- Progression trigger: When 4 sets of 20 controlled reps with genuine shoulder rotation and no neck pulling become consistently easy — add an extended hold, progress to the Swiss ball version, or move to the bicycle crunch
Conclusion
The crossover crunch is a better exercise than most people make it. The problem is that it is performed as a fast, sloppy sit-up with some elbow reach attached — which produces neck strain and minimal oblique development in equal measure.
Slow it down. Drive the shoulder, not the elbow. Keep the hips on the floor. Feel the combined flexion and rotation happening simultaneously rather than one after the other. At that tempo and with that intention, the crossover crunch delivers a combined rectus abdominis and oblique stimulus that is genuinely hard to replicate with a single bodyweight floor exercise.
It will not make you sore the way heavier cable work or Roman chair variations will — but as a controlled, teachable, equipment-free exercise that trains the two primary functions of the abdominal wall simultaneously, it earns its place in any core program.
Want more oblique variety in your training? Explore our guide to the best exercises for the oblique muscles. Pair this with our guides to upper ab, lower ab, and core training for a complete program.
Frequently Asked Questions
Which leg should I cross over first — does it matter?
It does not matter which leg you start with, but you must complete equal sets on both sides. The leg that is crossed over determines which oblique is targeted — crossing the right leg over the left and driving the left elbow toward the right knee targets the right-side obliques primarily. Most trainees have a dominant side that feels easier or more natural; starting with the weaker side first when you are freshest is a useful strategy for addressing any left-right asymmetry in oblique strength over time.
Can I do crossover crunches every day?
Not productively. The obliques and rectus abdominis are skeletal muscles that require recovery time between sessions — typically 48 hours — to adapt and grow stronger. Daily crossover crunches accumulate fatigue faster than they drive adaptation. Two to three sessions per week with at least one rest day between is the effective range. The exception is very low-intensity recovery work — a few slow sets with a focus on technique and mind-muscle connection rather than load or volume — which some trainees use on non-training days without meaningful recovery cost.
Is the crossover crunch safe during pregnancy?
From the second trimester onward, supine exercises — any exercise performed lying on the back — are generally not recommended due to the pressure the uterus places on the vena cava in that position, which can reduce blood return to the heart. This applies to the crossover crunch regardless of its intensity. In the first trimester, women who were already performing this exercise before pregnancy may be able to continue with individual medical guidance. Anyone who is pregnant should consult their obstetrician or a certified prenatal fitness specialist before continuing or modifying any core exercise.
How do I know if my obliques are actually working during the crossover crunch?
Place one hand flat on the obliques on the side being trained — the lateral abdominal wall between the lower ribs and the hip on the working side. If the obliques are contracting, you will feel them harden under your hand as you reach the top of the movement. If you feel nothing, the movement is coming from momentum or from the hip flexors rather than the obliques. Slow the rep down to a three-second ascent, focus on the shoulder driving toward the opposite knee rather than the elbow reaching, and check again. That tactile feedback is one of the fastest ways to confirm whether the target muscle is actually doing the work.
Reviewed by a Women’s Strength Specialist: The training recommendations and educational content presented in this article were reviewed by Kelley V., MPH, MS, CSCS, ACE Health Coach , whose expertise includes women’s strength training, hormonal health, and long-term athletic development.
